• Skip to primary navigation
  • Skip to main content
  • Skip to primary sidebar
  • Skip to footer

DANIELLE AT HOME

  • HOME
    • About
    • Contact
  • LIFESTYLE
    • Favourites
    • Goals
    • Home
      • DIY Projects
      • Organization
    • Holidays
      • Christmas
      • Easter
      • Halloween
      • New Years
      • Thanksgiving
      • Valentine’s Day
      • Gift Guides
  • STYLE
  • WELLNESS
  • FOOD + DRINK
    • Appetizers
    • Breakfast
    • Dessert
    • Drinks
    • Side Dishes
    • Snacks
    • Holiday Recipes
      • Christmas
      • Cinco De Mayo
      • Easter
      • Father’s Day
      • Halloween
      • Mother’s Day
      • New Years
      • St. Patrick’s Day
      • Thanksgiving
      • Valentine’s Day

Side Dishes

Homemade Caramel Corn

October 30, 2018 by Danielle 2 Comments

IMG_20181012_142119

BOO! I have one more Halloween post before the big day tomorrow! I hope you all enjoy the fun and spooky day, and if you have kids I hope they have the best time trick or treating! Like I said in this post, I wish I could go! Anyway I hope you are all doing something festive (I love festive!).

Today I thought I’d share one of my favourite fall recipes that I think is the perfect treat for Halloween night! I think this is a great recipe if you’re staying in watching a scary movie, or if you’re having people over for a Halloween party. I know I get sick of these mini chocolate bar and prefer to have festive fall treats at Halloween parties.

Tomorrow we will be snacking on Caramel Corn, drinking a beer and watching a scary movie. Oh and by scary movie I mean Hocus Pocus….it’s the scariest movie I can handle (Pathetic I know!).

IMG_20181012_142314_1

I always found caramel intimidating, so I never tried making my own caramel corn until recently. Once I did I felt really silly for waiting so long since it is incredibly easy! It’s perfect for halloween or really and day ending in Y! We’re addicted! So please give this a try it’s really easy and really delicious!

IMG_20181012_142115

Homemade Caramel Corn

Yields: 12 Cups

Ingredients:

  •  12 Cups Popped Popcorn (1 cup kernels, approx.)
  •  1 Cup Unsalted Butter
  •  1 1/2 Cup Brown Sugar, packed
  •  1/3 Cup Light Corn Syrup
  •  1/2 Teaspoon Vanilla Extract
  •  1 Teaspoon Salt
  •  1 Teaspoon Baking Soda

Directions:

Preheat oven to 225 degrees F. Line a large baking sheet (you may need two) with parchment paper. Spread popcorn evenly on baking sheet, and set aside.


In a medium saucepan on medium heat add butter, brown sugar and corn syrup. Whisk together until butter has melted and ingredient combine into a smooth sauce. This will take 3-5 minutes. Add vanilla, salt and baking soda to the sauce. Whisk constantly. Sauce will lighten in colour and increase in volume. Continue to cook for 2-4 minutes to thicken, whisking constantly. Remove from the heat.

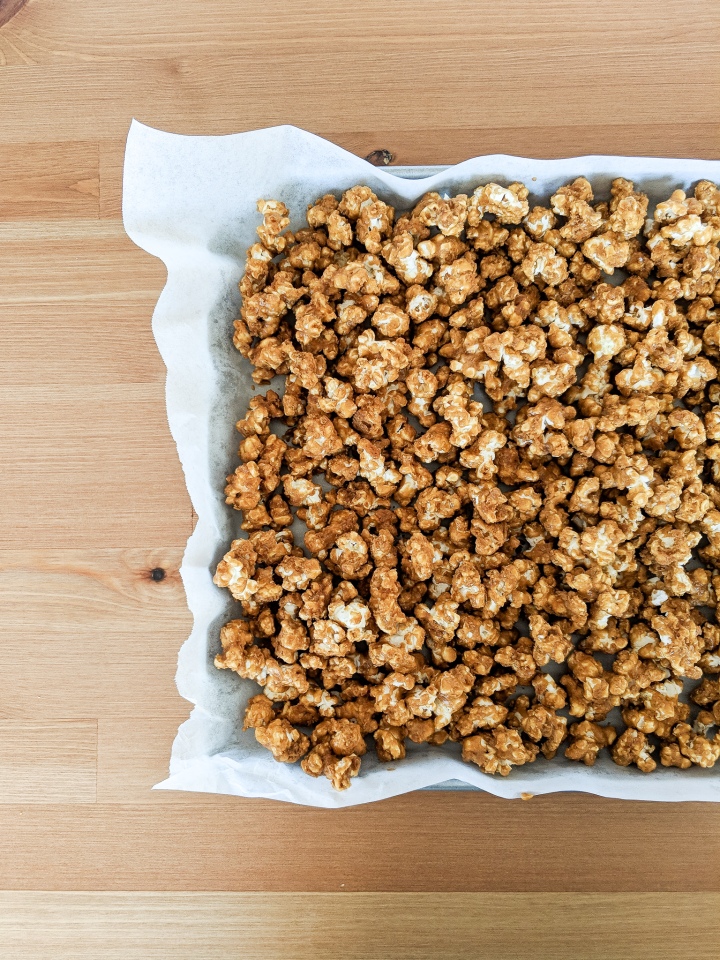
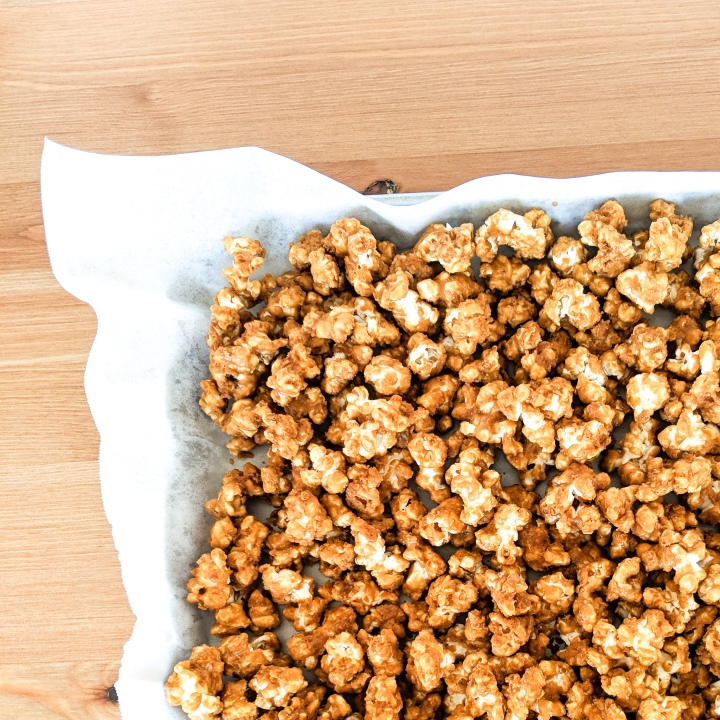
Pour sauce over the trays of popcorn. Use a spatula (silicone is best) to toss popcorn and coat. This does not need to be perfect.

Bake popcorn for 30 minutes. Check on the popcorn every 10 minutes. Remove the baking sheet from the oven and toss the popcorn again to continue coating and breaking up chunks. Repeat this process 2-3 times over the 30 minute baking time.

Remove baking sheet from the oven set aside and allow to cool for at least an hour. Check on your popcorn after 30 minutes to break up any large clumps that are forming. Once fully cool serve immediately or store in an airtight contained for up to 5 days.


Adapted from Homemade Hooplah, Homemade Caramel Popcorn.

Skillet Cornbread

September 20, 2018 by Danielle 1 Comment

IMG_20180916_100150

I remember the first time I ever had a piece of cornbread. I was at a random BBQ restaurant by SeaTac airport. Although I’m sure it was one of the wort places to try cornbread I still loved it. It’s my favourite side to soup and chili. It would also be great alongside some BBQ Chicken. I also can’t wait to try using this cornbread as a base for stuffing. I bet it would be amazing!

I like making cornbread in a cast iron skillet because the hot skillet creates a really nice crust. If you don’t have a cast iron skillet any oven safe skillet or baking pan will work for this recipe.

IMG_20180916_094102

This recipe is great plain but it is also great with mix ins. For savoury mix in’s I like fresh corn, cheddar cheese, jalapeños and chives. If you like a sweet cornbread try some dried cranberries, blueberries, or even swirl in raspberry jam. My favourites are Jalapeno and cheddar, or raspberry jam. I recommend adding 1 cup of which ever mix in’s you choose.

IMG_20180916_100225.jpg


Skillet Cornbread

Yields: 8 Servings

Ingredients:

  • 1/2 Cup Unsalted Butter
  • 1/4 Cup Honey
  • 1 Egg
  • 1 Cup Buttermilk
  • 1 Cup Cornmeal1
  • 1 Cup All Purpose Flour
  • 1 Tsp Baking Powder
  • 1/2 Tsp Baking Soda
  • 1/8 Tsp Salt

Directions:

Preheat oven to 400°F. Melt butter in a 12 inch cast iron skillet over low heat stirring occasionally.  Pour melted butter into a medium-sized bowl and allow to cool for 5-10 minutes. In a large bowl whisk together cornmeal, flour, baking powder, baking soda and salt. Set aside. Add honey, egg and butter milk to the melted butter. Whisk to combine. Pour when ingredients into the dry, and whisk until combined.

If adding mix in’s fold them into the batter careful not to over mix.

If your skillet is no longer warm heat it on low for a few minutes to warm up. Once skillet is heated pour in the batter. Bake for 15-20 minutes until the edges are golden brown and a tooth pick comes out clean. Allow to cool before slicing.

Adapted from, Sally’s Baking Addiction


You might also like…

IMG_3554

Ceddar Drop Biscuits

IMG_3592

BBQ-less BBQ Chicken

Apple Cheddar Pecan Salad

September 11, 2018 by Danielle Leave a Comment

IMG_4081

I’m not a huge salad fan. I like restaurant salads, but homemade salads aren’t really my thing. They often taste too earthy and they never seem to have the correct amount of dressing. There are a few exceptions… anything with arugula, Kale Caesar Salad and this Apple Cheddar Pecan Salad. This salad is my go to for the fall, I love the refreshing fresh crunch the apples give. I’ve been making this salad for years and everyone who has tried it loves it.

IMG_4120

The homemade dressing on this salad really ties together the salad and really boosts the fall flavour. It has apple cider and pure maple syrup as two of the ingredients. I love to blend my dressings up in my magic bullet to emulsify the olive oil, but you can of course just use a whisk.

I like to serve this salad on the side of marinated chicken, or add a grilled chicken breast on top and take it to work for lunch. If you give it a try it will soon become your favourite fall salad.

IMG_4085.jpg

Cheddar Apple Pecan Salad

Yields: 6-8 Servings

Ingredients:

Salad:

  • 8 Cups Baby Greens
  • 1 Apple, thinly sliced
  • 1/4 Cup of Pecans
  • 1/4 Cup of Cheddar Cheese, shredded

Dressing:

  • 1/4 Cup Olive Oil
  • 2 Tbsp Apple Cider Vinegar
  • 1 Tbsp Dijon Mustard
  • 2 Tsp Pure Maple Syrup
  • Pinch of Salt & Pepper

Directions:

In a blender, or small dish add olive oil, apple cider vinegar, dijon mustard, maple syrup, salt and pepper. Blend or whisk until the dressing comes together and emulsifies.

Add baby greens, apples, pecans and cheese to a large bowl. Drizzle dressing over salad and toss to coat. Serve immediately.


You might also like…

IMG_3573

Kale Caesar Salad

IMG_3546

Cheddar Drop Biscuits

Kale Caesar Salad

August 28, 2018 by Danielle Leave a Comment

IMG_3573

We eat a lot of kale in my house. We sauté it, we put it in smoothies, and it into soups and casseroles. And of course we make salads out of it. When it comes to kale salads I am partial to a creamy dressing since kale can be such a tough green.

For a while I was buying a creamy parmesan dressing from the store for my kale salads. Making a creamy dressing at home seamed fussy and intimidating, but now that I’ve made this recipe I can’t go back to the bottled stuff again.

Now this salad is not a week night salad for me. I can handle making the dressing, but on a weeknight I skip the bacon and use store-bought croutons. It’s still delicious, but if you have the time to make your own it will be so much fresher and tastier!

IMG_3578

I love to serve this salad in the summer with grilled chicken, steak, or my BBQ-less Barbecue Chicken. In the winter I love to serve this along side lasagna, spaghetti or any roasted meat.

I also love kale because it’s the only salad you can toss in advance. I like to wash and prep my kale, and then toss it in dressing a few hours before serving. Then just before serving I’ll toss in the croutons and bacon. This helps the kale soften and not be as tough.

In addition to dressing the salad in advance I like to massage my kale. I know it sounds funny, but it makes your kale more tender. Once you kale has been washed, dried and chopped. Massage the leaves with your hands until they become a bright green colour. Then coat the leaves with dressing, this will make your kale more tender.

IMG_3569

Even if you are not a kale salad lover, you’re going to love this salad!

What’s your favourite salad?

Yields: 6-8 Servings

Ingredients:

For the Salad:

  • 1 Bunch Kale
  • 1/4 Cup Olive Oil
  • 1 Tablespoon White Vinegar
  • 2 Teaspoons Dijon Mustard
  • 1/2 Teaspoon Worcestershire Sauce
  • 2 Gloves of Garlic
  • 1 Teaspoons Capers
  • 4 Tablespoons Mayonnaise
  • 4 Tablespoons Parmesan Cheese, freshly grated
  • 2 Lemons, juiced
  • Salt & pepper, to taste
  • 4 Strips of Bacon
  • Optional: Additional parmesan cheese for topping

For the Croutons:

  • 4 Slices of Seeded Multi Grain Bread
  • 4 Tablespoons Olive Oil
  • 1/2 Teaspoon Garlic Powder
  • 1/4 Teaspoon Salt
  • 1/4 Teaspoon Pepper

Method:

In a blender combine, olive oil, vinegar, dijon mustard, worcestershire sauce, garlic, capers, mayonnaise, parmesan cheese, lemon juice, salt and pepper. Blend until smooth.

Wash, dry and chop the kale. Place in a large salad bowl. Massage the leaves until they are bright green. Toss the kale in the dressing and set aside. If prepping the salad in advance, cover the tossed salad with plastic wrap and store in the fridge.

Cook the bacon using your preferred method until crisp. Blot off excess grease and allow to cool completely. Once cool crumble the bacon, set aside.

Preheat the oven to 375°F. Cut the bread into 1 inch cubes, place the bread on a sheet tray. Drizzle olive oil over the bread and toss to coat. Sprinkle garlic powder, salt and pepper over bread and toss to coat evenly.

Bake the croutons for 15-20 minutes, flipping halfway through. Be careful to brown the croutons and not burn. Allow the croutons to cool fully as they will continue to harden and crisp as they cool.

When ready to serve, add bacon, croutons and parmesan cheese (if using) to the dressed kale. Toss the salad together. Serve immediately.

Adapted from Jillian Harris


You might also like…


IMG_3130

The BEST Chicken Marinade

IMG_3126

Lemon Parmesan Green Beans

IMG_3592

BBQ-less BBQ Chicken

Lemon Parmesan Green Beans

July 18, 2018 by Danielle 1 Comment

Today I’m sharing with you my favourite veggie side dish. These green beans are tender and fresh with a cheesy bite. They are also super fast to wipe up, so they are not just for dinner parties.

IMG_3125

In this recipe I use french green beans, my favourite are by Manns. I like using french style green beans because they are smaller and more tender then traditional green beans. They also cook quickly which is perfect for a week night.

I par cook the beans in boiling water before pan frying in butter and seasoning with lemon juice. At the end I top the beans with freshly grated parmesan. It really is as easy as it sounds.

IMG_3124

What is your favourite easy and delicious side?


Servings: 4-6

Ingredients:

  • 1 lbs Fresh French Cut Green Beans
  • 1 tablespoon unsalted butter
  • Juice of half a lemon
  • Freshly Grated Parmesan Cheese
  • Salt and Pepper to taste
  • Optional: Chili Flakes


Directions:

Place the beans in a wok or fry pan, cover with water. Simmer for 5 minutes, then drain. Over medium heat add butter, beans, salt, pepper and chili flakes to the pan. Sauté the beans for 2 minutes. Add lemon juice and continue to sauté for 2-3 more minute until beans are tender and begin to crisp. Transfer the beans to a serving dish and top with freshly grated parmesan.

« Previous Page

Primary Sidebar

Danielle at Home

Hi, I’m Danielle. I am a twenty something woman working her office job by day and blogging at night! I’m married, a new home owner and I love sharing all my favourite things on this blog. So grab a glass of wine and follow along. I’m so glad you’re here!

SUBSCRIBE & FOLLOW

Pinterest
Instagram
Facebook
Twitter

Footer

Copyright © 2025 Danielle at Home on the Foodie Pro Theme