• Skip to primary navigation
  • Skip to main content
  • Skip to primary sidebar
  • Skip to footer

DANIELLE AT HOME

  • HOME
    • About
    • Contact
  • LIFESTYLE
    • Favourites
    • Goals
    • Home
      • DIY Projects
      • Organization
    • Holidays
      • Christmas
      • Easter
      • Halloween
      • New Years
      • Thanksgiving
      • Valentine’s Day
      • Gift Guides
  • STYLE
  • WELLNESS
  • FOOD + DRINK
    • Appetizers
    • Breakfast
    • Dessert
    • Drinks
    • Side Dishes
    • Snacks
    • Holiday Recipes
      • Christmas
      • Cinco De Mayo
      • Easter
      • Father’s Day
      • Halloween
      • Mother’s Day
      • New Years
      • St. Patrick’s Day
      • Thanksgiving
      • Valentine’s Day

Side Dishes

Scalloped Potatoes

April 5, 2019 by Danielle Leave a Comment

The perfect Easter side dish.

IMG_20190317_172403

Ok this recipe is a real winner. Scalloped potatoes are so yummy. I didn’t grown up eating scalloped potatoes with Easter dinner. My Grandma hates cheese (crazy right?!) so a potato dish covered in cheese just wasn’t on our table. But in my house we love cheese and potatoes and my hubby loves anything smothered in a creamy sauce. That means this recipe is a serious winner!

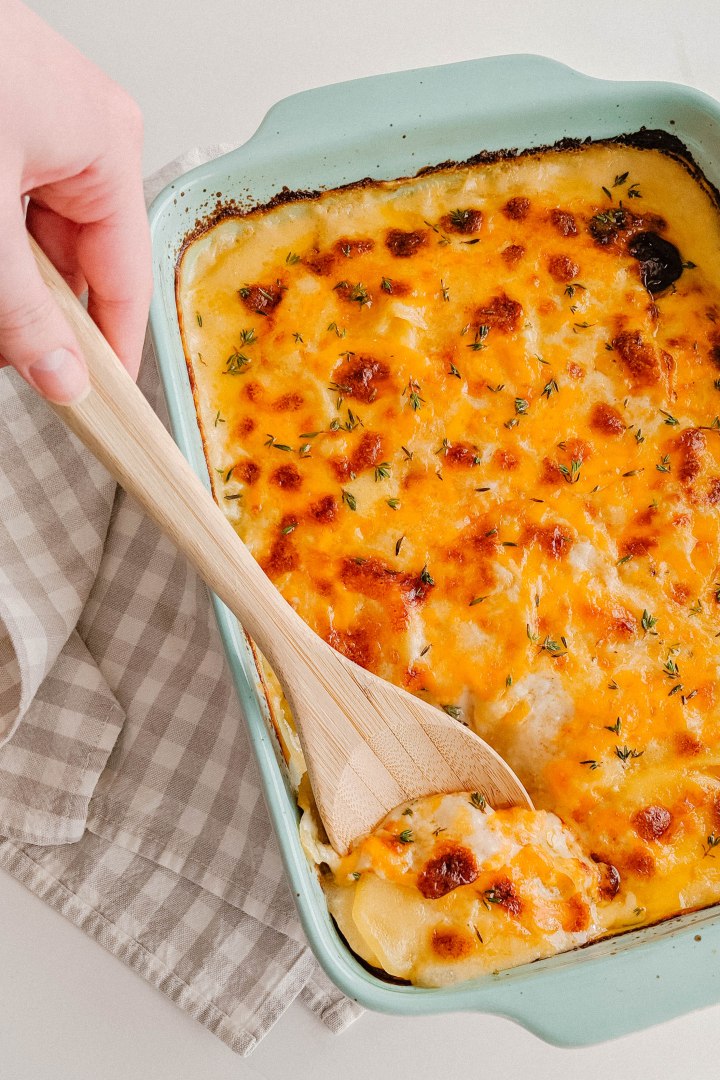
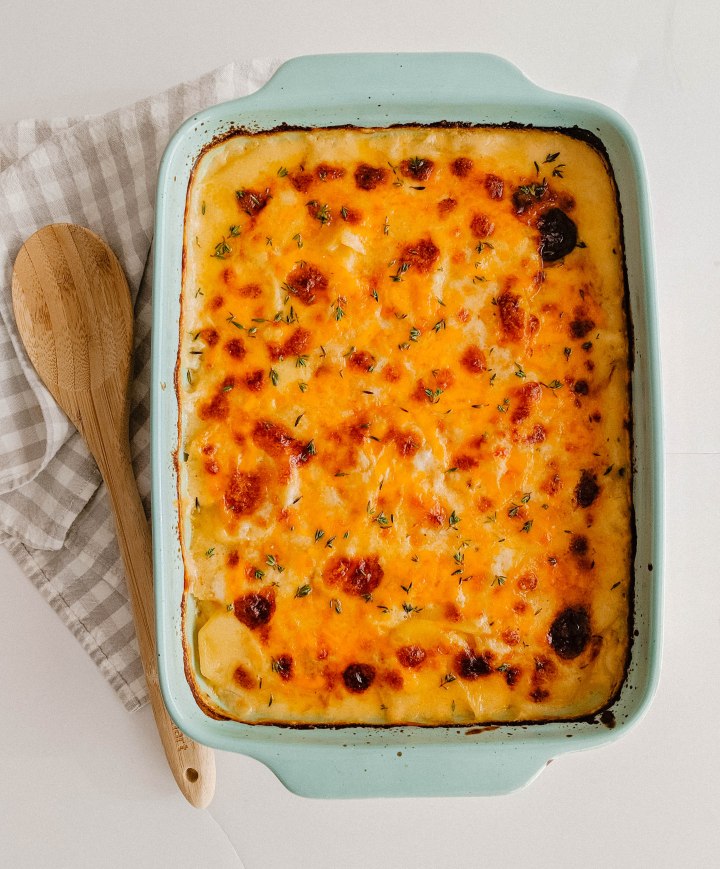
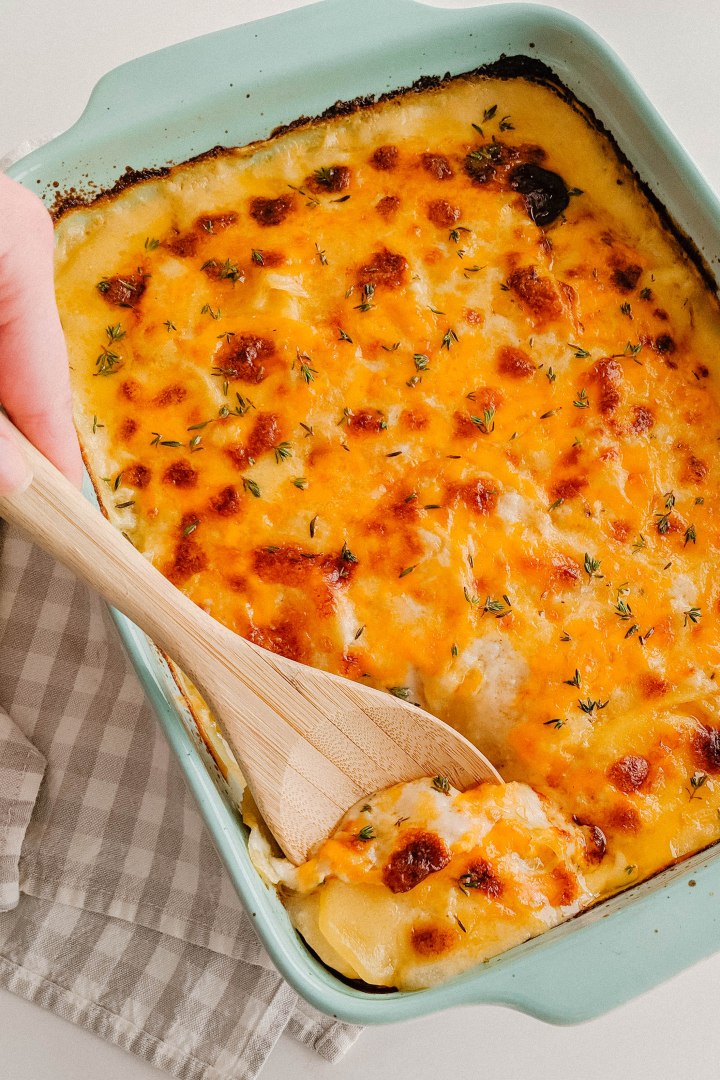
Layers of potatoes smothered in a creamy sauce , sautéed onions and more cheese than your diet would ever allow. This is comfort food people. It’s for special occasions not everyday.

IMG_20190317_172243IMG_20190317_172536

I’ve got a few tips for making this recipe and then we can get into making (and eating) this deliciousness!

Ok first things first cut those potatoes thin! As thin as you can. Personally I use a mandolin. They are really great at this job. This is the one I have. I love it because its small but effective. I use setting number two!

Secondly the type of potato. You can use russets but I like using a yellow potato. They hold their shape better after a long cook time and overall I prefer their flavour.

Slow cook your onions. This is a must! I’m super impatient but for this dish you can rush cooking your onions. You want them soft, translucent and not even a little brown. If they brown they will discolour your cream sauce.

Layering. Add sauce and cheese in between each layer of potatoes. Now depending how thin you cut your potatoes you will have approximately 4-6 layers of potatoes. Spoon a small about of sauce over each layer and sprinkle a small amount of cheese over each layer.

Now lets get into this delicious recipe!

IMG_20190317_172358.jpg

Scalloped Potatoes

Yields: 12 servings

Ingredients:

  • 3 tbsp Butter
  • Yellow Onion, thinly sliced into half moons
  • 4 Garlic Cloves, minced
  • 1/4 cup All Purpose Flour
  • 1 cup Vegetable Broth (you can use chicken)
  • 2 cups Milk (I use 2%)
  • 1 1/2 tsp Salt
  • 1/2 tsp Pepper
  • 1 tsp Fresh Thyme, chopped
  • 4 pounds Yellow Potatoes, peeled and sliced 1/8 inch thick
  • 2 cups Old Cheddar Cheese, grated
  • 1/2 cup Fresh Parmesan Cheese, grated

Directions:

Preheat oven to 400°F.

In a large sauté pan melt butter over medium low heat. Add onions sauté until soft and translucent, about 6-7 minutes. Add garlic and cook until fragrant. Add flour to the pan. Cook flour and onions for about a minute. Slowly add vegetable stock, stir constantly until a thick but smooth sauce forms. Slowly add milk to sauce, stir until smooth. Add salt, pepper and thyme. Cook over low heat for 5 minutes to thicken slightly. Set aside.

Line a 13×9 inch baking dish with a layer of potatoes. Top with 1/3 cup sauce (approx.) and onions. Sprinkle 1/4 cup cheese over sauce. Continue to layer potatoes until complete. Pour the remaining sauce over the top layer of potatoes. Sprinkle with remaining cheese.

Cover pan with foil and bake for 30 minute. Remove foil and bake for an additional 30-40 minutes until the top is brown and the potatoes are cooked though.

Remove from the oven and let cool for 5 minutes before serving. Top with additional thyme and cheese if desired.

Recipe adapted from Gimme Some Oven.

Scalloped Potatoes copy

Winter Grain Salad with Glory Dressing

January 19, 2019 by Danielle 3 Comments

Simple delicious whole food ingredients smothered is the best dressing ever invented.

img_20190106_125638

Happy Saturday guys! I’m popping on here today to share a staple salad and a dressing that can be used to make just about anything taste delicious! This recipe is actually adapted from a recipe my husband got from an old roommate. Many years ago my husband, then boyfriend made us glory bowls for dinner. It was one of the first dinners he ever cooked for me. At this time I was still living at home and honestly hadn’t cooked much, he was the better cook back then. I watched him prep the ingredients, cook rice, grill chicken and make the most amazing dressing. I was so impressed! Since then his recipe for glory dressing has evolved and the scrape of paper the recipe was written on is scribbled with notes and splattered with soy sauce. Isn’t that a sign of a well loved recipe? I think so.

img_20190106_125753img_20190106_125729

The best thing about the recipe I’m sharing today is how customizable it is. Today I’m sharing a simple but hardy salad full of whole grains and delicious vegetables. I’ve added grilled chicken, crispy tofu, sliced steak and soft boiled eggs to this salad to round out the meal. You can also switch up the vegetables, add cucumber and pickled red onion, or ad roasted cauliflower and sweet potatoes. The world is your oyster. This is really just a jumping off point for your own creativity!

Now the dressing, it’s made up of olive oil, tahini, soy sauce, apple cider vinegar, garlic and sesame oil. I recommend making this dressing in a blender or a magic bullet. You can make it by hand, but I like the magic bullet because it emulsifies the oil and makes the dressing super creamy. Also you can skip the step of chopping garlic, because lets be honest chopping garlic is the worst!

Once the dressing is made pick your favourite grain and veggies toppings, assemble and smother with dressing. You won’t regret it!

img_20190106_125728

Winter Grain Salad with Glory Dressing

Yields: 2 cups dressing & 4 salad bowls

Salads:

  • 3 cups Brown Rice, cooked
  • 4 Cups Spring Mix
  • 2 Carrots, raw grated
  • 4 Beets, cooked sliced
  • Optional: chicken, steak, crispy tofu, soft boiled egg

Dressing:

  • 3 tablespoons Tahini
  • 1/2 cup Soy Sauce
  • 1/4 cup Apple Cider Vinegar
  • 1/4 cup Water
  • 2 Garlic Cloves
  • 1 cup Olive Oil
  • 1 teaspoon Sesame Oil

Directions:

Add dressing ingredients to a blender, blend until smooth and emulsified.

Place a bed or rice into bowls or on plates, top with spring mix, sliced beets, grated carrots and optional protein toppings. Drizzle dressing over the salad. Serve immediately.

Dressing keeps up to week in your refrigerator.

You may also like…

IMG_4085

Apple Cheddar Pecan Salad

Winter Grain Salad with Glory Dressing - YUM!

Garlic and Thyme Roast Potatoes

December 4, 2018 by Danielle 1 Comment

IMG_20181123_183128

Ok so I know these aren’t the prettiest pictures, but this is an amazing recipe so I had to share it anyway. This recipe is for a classic English roast potato, kicked up a notch with garlic and thyme. They were so tasty!

This is a riff on my Mom’s roast potatoes. She always makes them with roast beef dinner and they are amazing! She even get chunks of beef fat from the butcher to roast her potatoes in… just like her mom did. Personally that’s a bit much or me. Plus I like to try to make as many side as I can vegetarian, so everyone can enjoy.

I like to use half butter and half olive oil to roast my potatoes. This way you get delicious flavour from the butter, but a slightly higher smoke point for the oil. This will help stop things from burning. And both make for a crispy potato! Yum!

IMG_20181123_183424_1.jpg

This recipe calls for russet potatoes.. I have not experimented with any other type of potato. This is what my mom and Grandma used, so why mess with a good thing?

The most important part about working with potatoes is to let them steam in the colander after cooking,  this is the only way you will get crispy potatoes.

The second rule of this recipe is patience. These potatoes roast for an hour and a half! Yes they do! It takes a long time to get the texture of a signature roast potato! Believe me when I say it is so worth the wait. Patience is a virtue right…. And believe me it will all be worth it!

IMG_20181123_183131

Garlic and Thyme Roast Potatoes

Serves: 6

Ingredients:

  • 5 Russet Potatoes
  • 2 Tablespoons Butter, melted
  • 3 Tablespoons Olive Oil
  • 1 Bunch Thyme
  • 6 Garlic Gloves
  • Salt and Pepper

Directions:

Preheat the oven to 375°F.

In a large pot of salted water, boil potatoes for 8 minutes. Strain potatoes and set aside to steam for 5 minutes.

In a large baking dish or roasting pan add butter and oil (2 tbsp each). Place in your preheated oven for a few minutes until butter is melted (2-5 mins). Remove pan from the oven and add potatoes. Season liberally with salt and pepper, and toss to coat in fat. Roast in the oven for 30 minutes.

In a small bowl place garlic cloves. Tear thyme bunch in half or thirds and add to bowl. Drizzle with oil (about a tbsp). Toss to coat. Remove potatoes from the oven and sprinkle garlic and thyme over the pan. Give the pan a good shake to evenly distribute and return to the oven. Bake for an additional hour.

Remove from the oven and serve immediately…. hopefully with lots of gravy!

Adapted from Jamie Oliver


Baked Macaroni & Cheese

November 20, 2018 by Danielle Leave a Comment

I love all carbs, but noodles are my favourite! I always get cravings for Baked Macaroni and Cheese in the fall and winter. It’s just so comforting. I know the box stuff is convenient but it’s not the same. I have also tried all of those trick for making a single serving in the microwave and I’m sorry but that just wont cut it! Homemade with a roux and cream sauce os the only way!

I have been making homemade Baked Macaroni and Cheese since I was a teenager. In high school I used to make it every Monday night for my brother and I to have for dinner before heading off to dance and soccer. I used a recipe out of one of my mom’s well used cookbooks and would top the whole thing with ritz crackers instead of breadcrumbs. It was good, but even back then I knew it wasn’t perfect.

It was dry, there wasn’t enough cheesy flavour and the noodles were way too soft. For years I didn’t make Baked Macaroni Cheese. There is a store by my house that sells a decent Baked Macaroni and Cheese, so when I need my fix my husband runs out and grabs some (he knows to keep me well fed!). Since it’s just the two of us it seemed like over kill to make a whole pan. But one morning I was watching cooking videos on Youtube and got inspired to perfect my Baked Macaroni and Cheese recipe.

This recipe it perfect. It solved all the issues I had in the past and I really learned a lot about making Baked Macaroni and Cheese.

  1. Undercook your pasta. Always undercook your pasta when making a Baked Macaroni and Cheese. Then you won’t end up with bloated macaroni
  2. Use the strongest and highest quality cheese you can afford. You want to get the most flavour out of your cheese as possible. Find the best old cheddar cheeses you can find, you wont be disappointed.
  3. Make way more sauce then you think you need. The sauce to noodle ratio should alarm you, you should be terrified that your making soup instead of macaroni and cheese. All kidding aside you need a lot of sauce!

If you can remember those three things your Baked Macaroni and cheese will turn out perfect. I hope that this recipe makes it to your table this fall.

Baked Macaroni & Cheese

Yields: 6 servings

Ingredients:

8 Ounces Elbow Macaroni

  • 1/4 Cup Butter
  • 1/3 Cup All Purpose Flour
  • 3 Cups Whole Milk 
  • 8 Ounces Aged Old White Cheddar (crumbled or grated)
  • 4 Ounces Sharp Orange Cheddar Cheese (crumbled or grated)
  • 1/4 Teaspoon Salt 
  • 1/4 Teaspoon Chili Powder
  • 1/8 Teaspoon Garlic Powder

  • 1 Cup Plain Breadcrumbs
  • 2 Tablespoons Butter, melted

Directions:

Cook macaroni according to package directions, but reduce the cook time by 2 minutes. You need very al dente pasta for this recipe. Drain pasta and set aside.

Preheat the oven to 350 °F. Grease an 8 inch baking dish with butter or oil.

In a large sauce pan melt butter over medium heat. Whisk in flour and continue to cook for about 2 minutes. Slowly whisk milk into the roux. Whisk constantly to combine the mixture and prevent milk from burning. Continue to cook the mixture until it thickens, about 10 minutes. Whisk sauce occasionally.

Once the sauce has thickened reduce the heat to low. Add the cheese to the sauce, stir to combine. Season the sauce with salt, chili and garlic powder.

Fold cooked macaroni to the sauce to coat. Transfer the mixture to your prepared baking dish. Set aside.

In a small bowl mix together breadcrumbs and melted butter. Sprinkle the mixture over the macaroni and cheese. Bake for 25 minutes until the top is golden and the macaroni and cheese is bubbling.

Adapted from Seasons and Suppers

You may also like…

Homemade Lasagna
Chicken Pot Pie

Roasted Butternut Squash Soup with Sage

November 15, 2018 by Danielle Leave a Comment

Every year I make butternut squash soup and every year I’m underwhelmed. It never turns out very flavourful. Over the past year I’ve been cooking with all kinds of squashes a lot more then I used to. We love eating acorn, butternut and delicata squash. I’ve been roasting, mashing, topping salads and making sauces out of squash constantly. So when I made soup this year I was ready to get it right. And I did just that! This recipe is rich is flavour, easy to make and great for work day lunches.

In this recipe I roast butternut squash, onions and garlic in the oven until caramelized and browning. I also add fresh sage and delicious brown butter which takes the soup to the next level!

I like serving this soup with so super fast homemade croutons or to make it a really filling me some cooked apple sausage. Both are great options.

Roasted Butternut Squash Soup with Sage

Yields: 8 servings

Ingredients:

  • 1 Medium Butternut Squash, peeled and chopped
  • 1 Medium Onion, chopped
  • 2 Cloves of Garlic
  • 1/2 Teaspoon of Salt
  • 1/4 Teaspoon of Pepper
  • 1 Tablespoon Olive Oil
  • 2 Tablespoons of Butter
  • 2 Teaspoons Fresh Sage, chopped
  • 6 Cups Low Sodium Vegetable Stock
  • Optional: Salt and Pepper, to taste

Directions:

Preheat oven to 400 °F. Spread out chopped butternut squash, onions and whole garlic cloves on a large baking sheet. Toss with olive oil, salt and pepper. Roast in the oven for 30-40 minutes until soft and squash begins to caramelize.

In a large soup pot melt the butter on medium heat. Continue to cook the butter in medium heat until it becomes golden and brown buts form on the bottom of the pot (3-5 mins). Reduce heat to low and add chopped sage. Sauté sage until fragrant and starting to crisp, about a minute. 

Add onions, butternut squash and garlic to the pot. Stir mixture to combine. Add the vegetable stock. Bring soup to a simmer for at least 30 minutes.

Using an immersion blender blend soup until completely smooth (If using a traditional blender allow soup to cool before blending). Return soup to pot. Taste the soup, add salt and pepper to taste if needed.

Serve with your favourite soup toppings and sides.

You may also like…..

Chicken Noodle Soup

Sautéed Brussels Sprouts

November 1, 2018 by Danielle 2 Comments

IMG_20181026_115931

Happy November! Do you get excited for a new month? I don’t normally, but now that we are heading into the holiday season I was very excited for this new month.

Today I will be sharing a recipe for Sautéed Brussels Sprouts. This recipe is delicious on your Thanksgiving or Christmas table, but so simple you could throw it together on a typical weeknight (we do!). Now I know that brussels sprouts are a polarizing vegetable, but I think even a brussels sprout hated would enjoy this recipe.

IMG_20181026_120223

I like to sauté shaved brussel sprouts instead of cooking them whole. Not only do they cook fast but I have found that people who claim not to like brussels sprouts will like them way better if they are shaved like this. Also add bacon, garlic and cheese to anything and I’m totally sold.

IMG_20181026_120241

Sautéed Brussels Sprouts

Yields: 4-6 Servings

Ingredients:

  • 1 lbs Brussels Sprouts
  • 2 Sliced Bacon, diced
  • 1 Garlic Clove, minced
  • 2 Teaspoon Worcestershire Sauce (soy sauce can be substituted)
  • Fresh Parmesan Cheese
  • Salt and Pepper, to taste

Directions:

Trim the end off the brussels sprouts and remove outer leaves. Use a food processors grater attachment of a knife to shave brussels sprouts. Alternatively you can buy a bag of pre cut brussels sprouts. Set aside.

In a frying pan cook diced bacon over medium heat until starting to crisp, about 3-5 minutes. Drain off excess fat. I leave just enough bacon fat in the pan to coat and discard the rest. Add brussels sprouts to the pan. Sauté over medium heat for 2 minutes. Add minced garlic and sauté for 4 minutes. Add Worcestershire sauce and salt and pepper to the pan. Sauté for another minute.

Transfer to a serving dish and top with freshly grated or shaved parmesan. Serve immediately.


You may also like…

IMG_3124

Lemon Parmesan Green Beans


« Previous Page
Next Page »

Primary Sidebar

Danielle at Home

Hi, I’m Danielle. I am a twenty something woman working her office job by day and blogging at night! I’m married, a new home owner and I love sharing all my favourite things on this blog. So grab a glass of wine and follow along. I’m so glad you’re here!

SUBSCRIBE & FOLLOW

Pinterest
Instagram
Facebook
Twitter

Footer

Copyright © 2025 Danielle at Home on the Foodie Pro Theme