• Skip to primary navigation
  • Skip to main content
  • Skip to primary sidebar
  • Skip to footer

DANIELLE AT HOME

  • HOME
    • About
    • Contact
  • LIFESTYLE
    • Favourites
    • Goals
    • Home
      • DIY Projects
      • Organization
    • Holidays
      • Christmas
      • Easter
      • Halloween
      • New Years
      • Thanksgiving
      • Valentine’s Day
      • Gift Guides
  • STYLE
  • WELLNESS
  • FOOD + DRINK
    • Appetizers
    • Breakfast
    • Dessert
    • Drinks
    • Side Dishes
    • Snacks
    • Holiday Recipes
      • Christmas
      • Cinco De Mayo
      • Easter
      • Father’s Day
      • Halloween
      • Mother’s Day
      • New Years
      • St. Patrick’s Day
      • Thanksgiving
      • Valentine’s Day

Seasonal Recipes

Pressed Italian Sandwich

October 16, 2018 by Danielle Leave a Comment

IMG_20181012_153239-3

Italian and salami subs are my absolute favourite kind of sandwich. So last week when I discovered the most amazing asiago ciabatta bread I knew I have to combine this amazing bread with the fillings of my favourite sub. While looking for a little inspiration I came across Italian pressed sandwiches. I immediately wanted to try one.

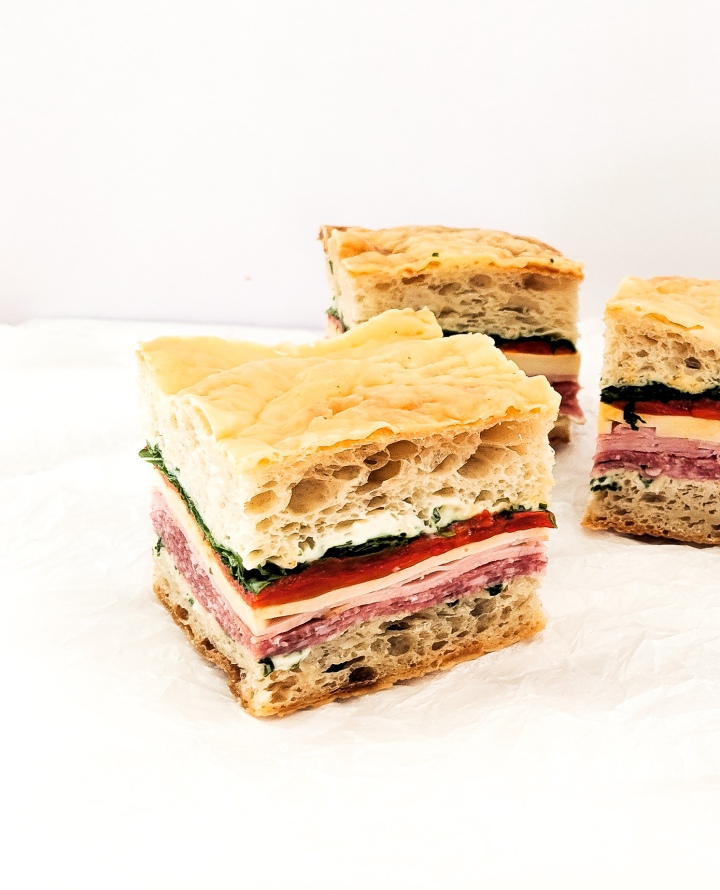
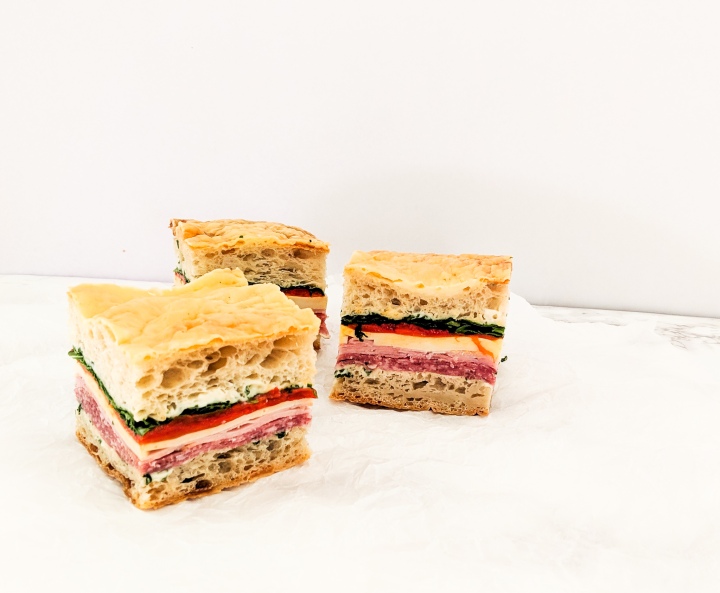
So the recipe I have for you today is my version of an Italian pressed sandwich. It has salami, ham, provolone, roasted red peppers and arugula on it. I even whipped up a little basil mayo for it. This is insanely simple and quite frankly is barely a recipe.

These are the perfect replacement for tea sandwiches at a party. You can whip them up in advance and since ciabatta is such a hearty bread they don’t get soggy! These would also be perfect for packing in a lunch box for work or school, so yummy!

IMG_20181012_153242-2

Italian Pressed Sandwiches

Yields: 8 Sandwiches

Ingredients:

  • 1 loaf Ciabatta Bread (I used asiago ciabatta, but any will work)
  • 1/3 Cup Mayonnaise
  • 1/4 Cup Fresh Basil, chopped
  • 300 Grams Italian Cold Cuts (I used 200 grams salami and 100 grams ham)
  • 6-8 Slices of Provolone Cheese
  • 6 Roasted Red Peppers
  • 3 Cups Arugula
  • Salt and Pepper to taste

Directions:

In a small bowl mix together mayonnaise and basil, set aside. Slice the ciabatta loaf horizontally separating the top half from the bottom half. Spread the both sides of the bread with a thin layer of basil mayonnaise. Season both halves of the bread with salt and pepper if desired. Layer meat on the bottom half of the bread, layer the cheese next. Pat the roasted red peppers dry to remove excess oil (the dryer the better). Layer the peppers on the sandwich. Top with arugula and the the top half of the loaf.

Wrap the sandwich tightly in plastic wrap. Place the sandwich in the fridge. To get the pressed effect and weight to the top of your sandwich. I placed a cast iron skillet and some canned goods on top of my sandwich. Allow to sit in the refrigerator for at least 3 hours, but up to 12 hours. The flavours get better the longer they sit.

Remove sandwich from the fridge and cut into 8 pieces, trim the edges if desired. Serve immediately.

Adapted from Seasons and Suppers 


You may also like…

IMG_4081

Apple Cheddar Pecan Salad


Easy Chicken Soup

October 11, 2018 by Danielle 2 Comments

IMG_20180929_142036

For the last two weeks my husband has been nursing a horrible cold. Like most men he really struggles when he gets sick. I’ve been pumping him full of fluids, and comforting nutritious foods. Including chicken soup.

For a long time he hated soup, honestly he still kind of does. I of course love soup and could eat it all fall and winter long. Especially when I get sick. So naturally when I found out he was a soup hater I questioned our entire relationship (kidding!). Actually I was determined to find soup that he would actually enjoy. I now have a few soup recipes in my arsenal that he enjoys. Luckily my Chicken Soup is one of the recipes he enjoys and it’s perfect for a bad cold!

IMG_20180929_142053

This recipe is super easy and you probably have all the ingredients in your fridge right now. It’s actually easy enough that you could make it while you’re sick.

I roasted the chicken for this soup, but you could use leftover cooked chicken instead. I also recommend cooking your noodles first instead of cooking them in the soup. Cooking them in the broth makes them soggy and they soak up too much of the broth. You can also switch up the vegetables based on what you have on hand.

Give this recipe a try next time you get sick.

IMG_20180929_142032

Easy Chicken Soup

Yields: 10 Servings

Ingredients:

  • 2 Cups Uncooked Short Cut Pasta (Shells, macaroni, bow-tie etc)
  • 2 Tbsp Olive Oil
  • 1 Garlic Clove
  • 1/2 Medium Yellow Onion, diced
  • 2 Stalks of Celery, diced
  • 3 Carrots, diced
  • 2 Chicken Breasts
  • 10 Cups Low Sodium Chicken Broth
  • 1 Tsp Thyme, fresh
  • Salt and Pepper to taste
  • Optional: 2/3 Cup Frozen Peas

Directions:

Preheat the over to 400°F. Place chicken on a sheet pan lined with parchment paper. Season the chicken with salt and pepper, bake for 30 minutes or until the internal temperature reached 165°F. Dice chicken and set aside.

While the chicken cooks bring a large pot of water to a boil and cook the pasta according to package directions. Drain and set aside.

In the same large pot heat olive oil over medium-low heat. Add onions and cook for 2-3 minutes. Season with salt and pepper to taste. Add garlic, carrots and celery, cook for 4 minutes. Add broth to the pot and bring to a simmer.

Stir in chicken, frozen peas and thyme. Continue to simmer the soup for 5 minutes. Stir pasta into the soup just before serving.

This soup will keep in the fridge for 3-4 days, or it can be stored in the freezer for up to 3 months.

Adapted from, Fraiche Nutrition.

You may also enjoy…

IMG_20180930_182444

Chicken Pot Pie

IMG_20180914_142616

Slow Coker Vegetarian Chili

Pumpkin Chocolate Chip Cookies

October 9, 2018 by Danielle 2 Comments

IMG_20180929_134842.jpg

Happy Belated Canadian Thanksgiving! I spent the whole weekend spending quality time with family, enjoying delicious food and drinks. It was great to disconnect from my phone and just hangout all weekend. Now that I’m back home it’s back into the kitchen, and today I am sharing a recipe for Pumpkin Chocolate Chip Cookies.

These cookies are so easy and get gobbled up (Thanksgiving Joke!) so fast! And they are the perfect way to use up any left over canned pumpkin from making pumpkin pies and breads.

IMG_20180929_134745

These cookies are soft and chewy, slightly spiced, deliciously sweet and chocolatey (is that a word?). I was very sceptical for the pumpkin chocolate combo and resisted it for quite awhile, but now that I know what I’ve been missing I’ll be making these every fall.

These cookies are actually eggless which is great for feeding a crowd since so many people have allergies. You could also sub non dairy butter and dairy free chocolate chips to make these cookies vegan. I love the versatility.

Have I convinced you to add these to your fall baking list yet?

IMG_20180929_134835

Pumpkin Chocolate Chip Cookies

Yields: 18 Cookies

Ingredients:

  • 1/2 Cup Unsalted Butter, partially melted
  • 1/4 Cup Brown Sugar, packed
  • 1/2 Cup White Sugar
  • 1 Tsp Vanilla Extract
  • 6 Tbsp Pumpkin Puree (not pumpkin pie filling)
  • 1 and 1/2 Cups All Purpose Flour
  • 1/4 Tsp Salt
  • 1/4 Tsp Baking Powder
  • 1/4 Tsp Baking Soda
  • 1 Tsp Pumpkin Pie Spice
  • 1/2 Cup Chocolate Chips

Directions:

Microwave the butter for 30-60 seconds until butter is half melted. In a medium bowl, whisk the butter, brown sugar, and granulated sugar until smooth. Whisk in the vanilla and pumpkin until smooth. Set aside.

In a large bowl whisk together the flour, salt, baking powder, baking soda, and pumpkin pie spice. Pour the wet ingredients into the dry ingredients and mix together with a wooden spoon or spatula. Fold in the chocolate chips. Chill the dough for 1 hour.

Preheat oven to 350°F. Roll the dough into balls, place them on a baking sheet and slightly flatten. The cookies will only spread minimally. Bake the cookies for 10 minutes. Press more chocolate chips onto the tops, if desired. Allow the cookies to cool for at least 5 minutes on the cookie sheets before transferring to a cooling rack.

Adapted from Sally’s Baking Addiction.

Chicken Pot Pie

October 4, 2018 by Danielle 1 Comment

IMG_20180930_182444

My husband has been begging to make Chicken Pot Pie for months now, but I just couldn’t bring myself to make it during the hot summer months. This past Sunday the skies were grey and the air was cold. It seemed like the perfect day to finally make this delicious comfort food. And believe me it did not disappoint, he hasn’t stopped talking about how delicious it was!

Now I know Chicken Pot Pie can be a big intimidating since you have to make the crust, but really just remember to keep your dough cold and I promise you will be fine. Check out my tips for pie in this post.

IMG_20180930_181126

This recipe would also be perfect to make use of Thanksgiving leftovers. Canadian Thanksgiving is coming up this weekend and using all your leftover turkey in the pot pie would be delicious! It actually might be better then your turkey dinner.

This dish is also perfect when you need to bring someone a homemade meal. It’s perfect to bring a new mom ore someone who needs a little extra love. It’s warm and comforting and bring everyone a bit of joy. I hope you and your family enjoy it too.

IMG_20180930_182448

Chicken Pot Pie

Yields: 1 9 inch Pie

Ingredients:

Crust:

Crust:

  • 2 2/3 cups All Purpose Flour
  • 1 teaspoon salt
  • 1/2 cup Vegetable Shortening, cold
  • 1/2 cup Unsalted Butter, cold
  • 8 to 12 tablespoons ice water
  • Egg, beaten

Filling:

  • 3 Chicken Breasts
  • 1 Cup Carrots, sliced (2 large carrots)
  • 1/2 Cup Celery, sliced (2 stalks)
  • 1/3 Cup Butter
  • 1/2 Large Onion, chopped
  • 1 Large Garlic Clove, minced
  • 1/4 Cup All Purpose Flour
  • 1 3/4 Cup Chicken Broth
  • 2/3 Cup Milk (I used 2%, but any kind will work)
  • 1 Cup Frozen Peas
  • 1 Tsp Salt
  • 1/2 Tsp Black Pepper
  • 1 Tsp Fresh Thyme, chopped

Directions:

In a large bowl mix the flour and salt. Add the cold butter and shortening. Cut the butter and shortening into the flour mixture using a pastry cutter or two forks until the chunks of butter and shortening are the size of small peas.

Drizzle in the ice water and stir the mixture to bring the dough together. Continue to add water until the dough starts to clump and form a ball. Form the dough into a ball. Cut dough in half and form each half into discs. Wrap each disc tightly in plastic wrap, and chill in the fridge for at least 1 hour.

Preheat your oven to 450°F. Place the chicken breasts on a baking sheet and bake in the oven for 20 minutes or until the internal temperature of the chicken reaches 165°F. Set aside to cool.

In a large sauté pan melt the butter over medium low heat. Add the onions and garlic to the butter and cook for 2-3 minutes. Season onions and garlic with salt and pepper. Add carrots and celery, cook for 4-5 minutes.

Add flour to the pan to create a roux. Cook the flour for 2-3 minutes to prevent the filling from having a floury taste. Slowly add chicken broth to the roux, stirring constantly to prevent lumps. Once fully combined add the milk to the pan. Simmer the sauce until it become thick and coats the back of the spoon, about 5 minutes.

Chop the cooled chicken breasts. Add the chicken, frozen peas and thyme to the sauce and stir to combine. Set mixture aside.

Preheat the oven to 425°F. Remove your dough from the fridge. Roll out the pie dough into two discs. Carefully line your pie plate with one of the rolled out halves of dough. Pour the filling into the pie plate. Carefully place the top layer of dough on the filling. Using a fork or your fingers seal the edges of the pie dough. Cut a few slits in the top crust to allow steam to escape. Brush the top of the pie with the beaten egg.

Bake the pie for 30-40 minutes until the crust is golden brown. Set the pie aside to cool for 15 minutes before serving.

Adapted from Grandma’s Berry Pie and Sally’s Baking Addiction.


You may also like…


IMG_20180914_142616

Slow Cooker Vegetarian Chili

Healthier Pumpkin Bread

October 2, 2018 by Danielle Leave a Comment

IMG_20180929_140830.jpg

Now that it is officially October I feel it is acceptable to post all things pumpkin. As much as I love pumpkin I just think September is too early. But with Canadian Thanksgiving coming up on Sunday I have pumpkin on the brain.

This recipe is perfect because it has whole wheat flour, coconut oil and maple syrup making it much better for you and more nutritious then a lot of the more indulgent recipes out there. Since this bread is healthier then some of the other pumpkin treats out there you’re free to enjoy all season long.

IMG_20180929_140752.jpg

The texture of this bread is AMAZING! I actually can’t believe how well it turned out, its soft and dense while still being light and airy. The best way to achieve this texture is to hand mix the batter. Gently fold the dry ingredients into the wet until just combined.

This bread would also be great with some mix ins or other toppings. I topped mine with a few handfuls of pumpkin seeds, but you could just leave it plain. You could also mix in nuts or chocolate chips. you could even ice the top with cream cheese frosting and serve it as a dessert.. not so healthy but defiantly delicious. however you make it you won’t be disappointed.

IMG_20180929_141112.jpg

Healthier Pumpkin Bread

Yields: 1 Loaf

Ingredients:

  • 1/3 Cup Coconut Oil, melted
  • 1/2 Cup Maple Syrup
  • 2 Eggs
  • 1 Cup Pumpkin Purée (NOT pumpkin pie filling)
  • 1/4 Cup Milk (I used 2%, but any milk even non dairy will work)
  • 1 Tsp Vanilla Extract
  • 1 1/2 Tsp Pumpkin Pie Spice
  • 1 Tsp Baking Soda
  • 1/2 Tsp Salt
  • 1 Cup All Purpose Flour
  • 3/4 Cup Whole Wheat Flour
  • Optional: 1/4-1/2 Cup mix-ins or toppings, pumpkin seeds, nuts, chocolate chips etc.

Directions:

Preheat oven to 325°F and grease a 9×5-inch loaf pan.

In a large bowl whisk flour, baking soda, salt and pumpkin pie spice. Set aside.

In a medium sized bowl whisk together coconut oil, maple syrup until completely combined.  Add eggs, pumpkin purée, milk and vanilla extract to the wet ingredients and whisk together to combine.

Pour the wet ingredients into the dry and fold the mixture together with a spatula or wooden spoon. Continue to fold until the flour is just combined. Gently fold in any mix-in’s if using.

Pour the batter into the greased loaf pan. Sprinkle the loaf with toppings if desired.

Bake the loaf for 50-60 minutes, or until a tooth pick comes out clean. Allow the bread to cool in the loaf pan for 10 minutes before transferring to a cooling rack.

Adapted from, Cookie and Kate

Slow Cooker Vegetarian Chili

September 25, 2018 by Danielle Leave a Comment

IMG_20180914_142616

I’ve been trying to cook less during the week. Life is just so busy and there aren’t enough hours in the day to get everything accomplished. So I’ve been cooking big batches of food and reheating leftovers. Making up pans of lasagna and enchiladas to get us though busy weeknights. Of course another great time saver is the slow cooker. I will admit I don’t utilize mine as much as I should. I mostly use mine to batch cook soups, stews and sauces. It really is satisfying to come home from work and smell dinner cooking away.

One of my favourite recipes for the slow cooker is vegetarian chili. I love this recipe because it’s cheap, it’s easy and it’s flavourful. This recipe doesn’t require browning or sautéing. You can literally just dump everything in the slow cooker and let it do it’s thing.

IMG_20180914_142559

For this chili recipe all you have to do is chop your vegetables, blend one can of tomatoes and add everything to the slow cooker. It really is crazy how simple that is.

Once your chili is ready it’s time to add toppings! I like sour cream, cheddar cheese and green onion. Tortilla chips or Fritos (YUM!) are also great on top. I also like to serve my chili with a bun or some cornbread to round out the meal.

It’s seriously so delicious and couldn’t be easier! It also screams fall and football Sundays. I love throwing all the ingredients in the slow cooker running my Sunday errands, going on our weekly walk and coming home to a perfect Sunday dinner. A perfect Sunday dinner that makes enough leftovers for Monday and even more for your freezer! I mean isn’t that what we all need?

IMG_20180914_142557.jpg

Slow Cooker Vegetarian Chili

Yields: 8 servings

Ingredients:

  • 1 White Onion, diced
  • 2 Carrots, diced
  • 2 Stalks of Celery, diced
  • 1 Red Pepper, chopped
  • 4 Cloves of Garlic, minced
  • 1 Chipotle in Adobo Sauce, chopped
  • 2 Tsp Adobo Sauce
  • 2 15 oz Cans Fire Roasted Tomatoes
  • 1 15 oz Can Red Kidney Beans, rinsed
  • 1 15 oz Can Black Beans, rinsed
  • 1 15 oz Can Pinto Beans, rinsed
  • 1 Cup Frozen Corn
  • 1 Cup Low Sodium Vegetable Broth
  • 3 Tbsp Chili Powder
  • 2 Tbsp Ground Cumin
  • Salt & Pepper to taste

Directions:

Chop onion, carrots, celery, red pepper, garlic and chipotle pepper. Add to the slow cooker. Pulse one can of the tomatoes in a food processor or blender until tomatoes break down and the mixture is thick. Add the pulsed tomatoes and the can of un pulsed tomatoes to slow cooker. Drain and rinse kidney beans, black beans and pinto beans. Add beans and corn to the slow cooker. Add vegetable broth, adobe sauce, chili powder and cumin to the slow cooker. Cook on low for 8 hours, or high for 4 hours. Before serving add salt and pepper if needed.


You may also like…

IMG_3554

Cheddar Drop Biscuits

IMG_20180916_094102

Skillet Cornbread


« Previous Page
Next Page »

Primary Sidebar

Danielle at Home

Hi, I’m Danielle. I am a twenty something woman working her office job by day and blogging at night! I’m married, a new home owner and I love sharing all my favourite things on this blog. So grab a glass of wine and follow along. I’m so glad you’re here!

SUBSCRIBE & FOLLOW

Pinterest
Instagram
Facebook
Twitter

Footer

Copyright © 2026 Danielle at Home on the Foodie Pro Theme