• Skip to primary navigation
  • Skip to main content
  • Skip to primary sidebar
  • Skip to footer

DANIELLE AT HOME

  • HOME
    • About
    • Contact
  • LIFESTYLE
    • Favourites
    • Goals
    • Home
      • DIY Projects
      • Organization
    • Holidays
      • Christmas
      • Easter
      • Halloween
      • New Years
      • Thanksgiving
      • Valentine’s Day
      • Gift Guides
  • STYLE
  • WELLNESS
  • FOOD + DRINK
    • Appetizers
    • Breakfast
    • Dessert
    • Drinks
    • Side Dishes
    • Snacks
    • Holiday Recipes
      • Christmas
      • Cinco De Mayo
      • Easter
      • Father’s Day
      • Halloween
      • Mother’s Day
      • New Years
      • St. Patrick’s Day
      • Thanksgiving
      • Valentine’s Day

Fall

Whole Wheat Banana Pancakes with Brûlée Bananas

October 23, 2018 by Danielle 4 Comments

IMG_20181020_120841

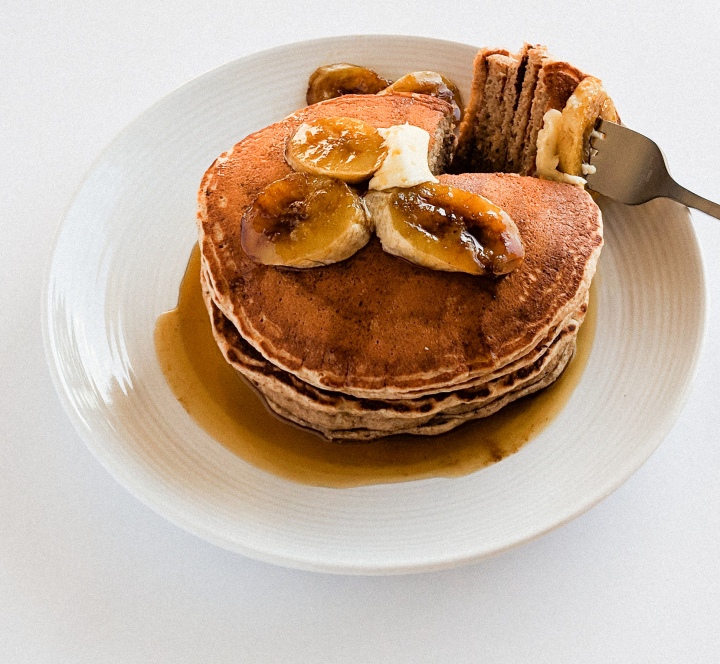
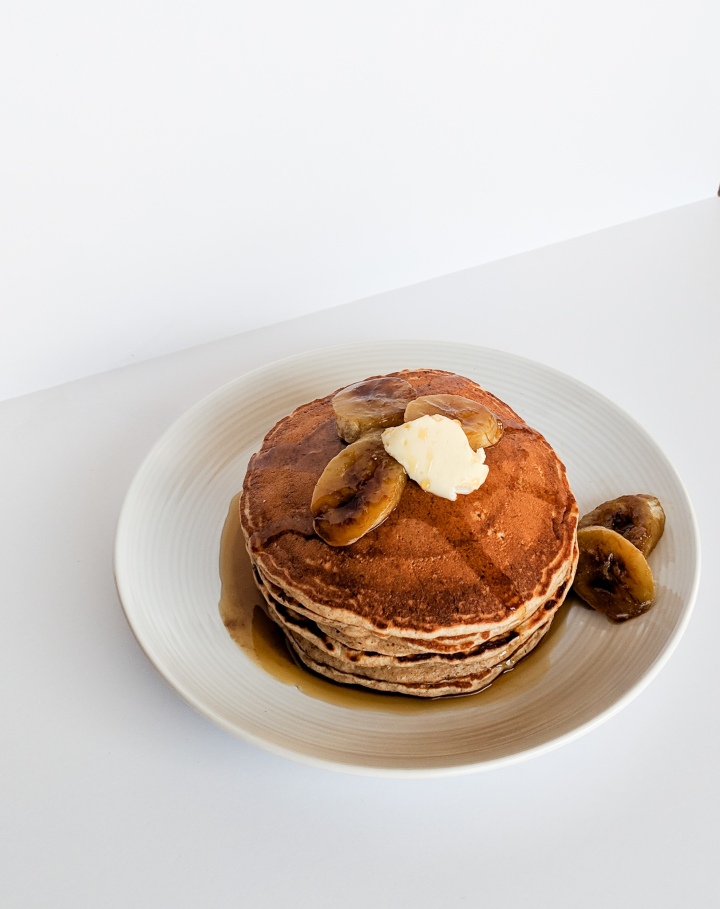
I have had that Jack Johnson song Banana Pancakes stuck in my head all week, so on Saturday when I woke up early and had nothing on the agenda for the day I thought I’d make a special breakfast of Banana Pancakes. I decided to switch things up a bit and add brûlée bananas to the top…. Yum!

IMG_20181020_120608

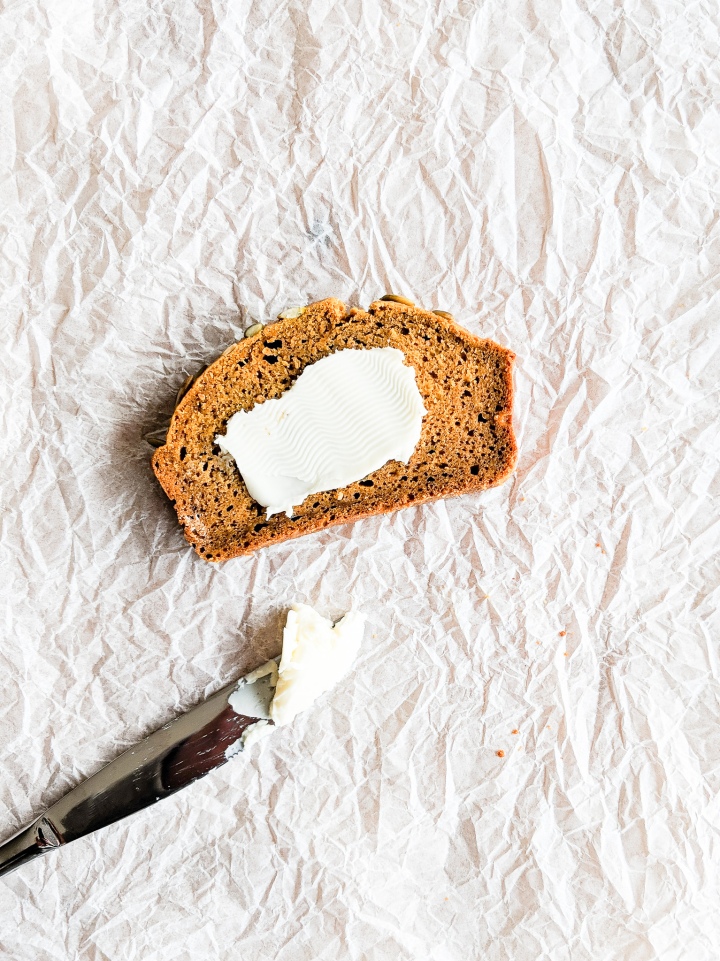
I like to use whole wheat four whenever I can since it has added fibre. I also love the nutty flavour which compliments banana really well. The problem with whole wheat flour is that it can create tough pancakes that sit in your belly like a rock! So I’ve added extra moisture to keep these pancakes light and fluffy!

IMG_20181020_120819

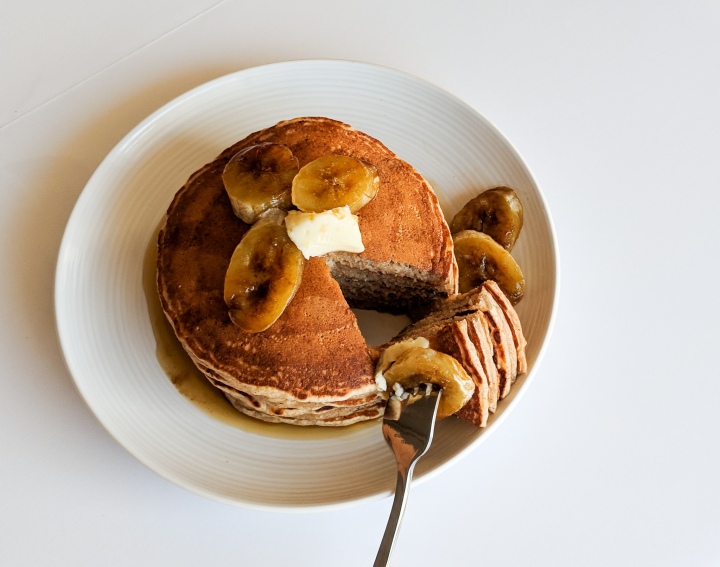
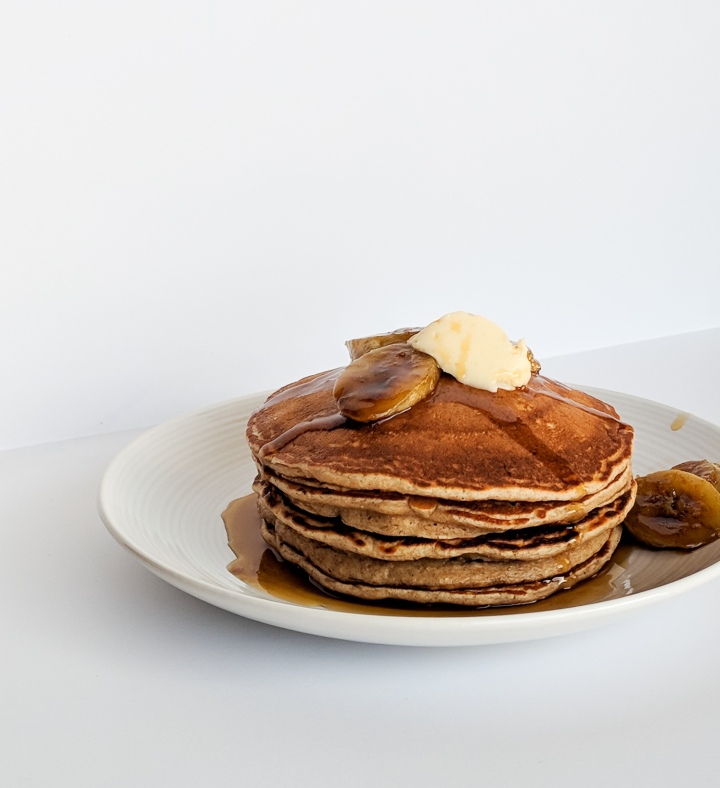
Now the brûlée bananas are an extra special touch that really doesn’t take much effort at all. The banana caramelize and sweeten which is a nice addition to the soft fluffy pancakes. I like to top my pancakes with butter and a little maple syrup, but next time I’m adding walnuts for some extra crunch!

These were so good, I hope you give them a try!

IMG_20181020_120537

Whole Wheat Bananas with Brûlée Bananas

Yields: 8-10 Pancakes (depending on size)

Ingredients:

Pancakes:

  • 1 1/3 Cup Whole Wheat Flour
  • 1/4 Teaspoon Salt
  • 2 Teaspoons Baking Powder
  • 1/2 Teaspoon Cinnamon
  • 1 Egg
  • 1 1/4 cup Milk (any kind)
  • 2 Tablespoons Butter, melted
  • 1 Ripe Banana, mashed
  • 1 Tablespoon Brown Sugar
  • 1 Teaspoon Vanilla Extract

Brûlée Bananas

  • 2 Tablespoons Turbinado Sugar (raw brown sugar) or White Sugar
  • 1 Large Banana, Sliced

Directions:

Move the rack in your oven to the top position closest to the element. Preheat your oven to broil (500°F). Place Turbinado or white sugar in a small bowl. Dip one side of the banana slices into sugar and place on cookie sheet. Broil bananas until sugar crystallizes and starts to brown. This will take 2-5 minutes depending on your oven. DO NOT walk away from oven, check on bananas every 30 seconds to 1 minute. Do not let bananas burn.

Once caramelized set bananas aside to cool.

In a large bowl mix together flour, salt, baking powder and cinnamon. Set aside. In a small bowl whisk banana, butter and egg together. Add milk, brown sugar and vanilla extract to wet ingredients. Whisk until smooth. Pour wet ingredients into dry and fold together using a spatula or wooden spoon. Mix until just combined. Set aside until ready to use.

Preheat a skillet or grilled over medium heat. Once warm grease pan with a small amount of butter or oil. Pour 1/3 cup of batter onto skillet. Cook until bubbles form on surface of the pancake, about 2-3 minutes. Flip and cook the second side until golden brown, about 1-2 minutes.

Serve pancakes with butter, broiled bananas and maple syrup.

Adapted from Sally’s Baking Addiction and Entertaining with Beth.


You may also like…

IMG_3074

Yeast Raised Waffles

Apple Cinnamon Scones with Maple Glaze

October 18, 2018 by Danielle Leave a Comment

IMG_20180928_123811

I remember when I was a little girl helping my Grandma prepare for her Y’s Menette meeting’s. We would make tea sandwiches and treats together and prep the living room for the meeting. She would let me hang around the meetings for a few minutes to have a snack and then I would go off to help Grandpa in the garden or play some cards. I thought she was so fancy making her afternoon tea.

IMG_20180928_123759

Afternoon tea is never complete without scones. I have been making scones with my Grandma almost as long as I have been making pies. My Grandma used a recipe passed down to her from her mother. My mom uses the same recipe and at my bridal shower my Grandma gave me a copy of the recipe. Now the original recipe has gotten rave reviews from family and friends for years, they really are the best, but I’m not sure if I’m ready to share the family secret just yet.

Today I am sharing a variation of the original recipe, Apple Cinnamon Scones with Maple Glaze. Perfect for fall and I think Grandma would approve. I made these scones with some whole wheat flour because I like the nutty flavour it has which compliments the cinnamon and apple. I also added the glaze to the scones, because everything is better with maple glaze.

IMG_20180928_123759-2

Whole Wheat Apple Cinnamon Scones with Maple Glaze

Yields: 8 Scones

Ingredients:

Scones:

  • 1 1/4 Cup All Purpose Flour
  • 3/4 Cup Whole Wheat Flour
  • 2 Teaspoons Baking Powder
  • 1 Teaspoon Cinnamon
  • 1/4 Teaspoon Salt
  • 1/4 Cup Granulated Sugar
  • 1/3 Cup Unsalted Butter, cold and cubed
  • 1 Apple, diced
  • 1 Large Egg
  • 3/4 Cup Milk ( I use 2%, but any dairy milk will work)

Glaze

  • 2 Cups Confectioner (Icing) Sugar
  • 1/4 Cup Pure Maple Syrup
  • 3 Tablespoons Half and Half

Directions:

Preheat the oven to 400° F. Line a baking sheet with parchment paper, set aside. Sift together flour, baking powder, cinnamon, salt and sugar. Using two forks or a pastry cutter cut butter into flour. Stir in the diced apple.

In a liquid measuring cup whisk together milk and egg. Pour 3/4 of a cup of the mixture into the dry ingredients, set the remaining mixture aside. Using your hands or a wooden spoon gently mix the wet and dry ingredients until just combined (some flour may still show).

Turn the dough onto a floured surface and form into a disk. Flatten the dough with your hands until it is 2 inches tall (do not use a rolling pin). Cut the dough into 8 wedges. Lay the scones on the baking sheet. Brush the scones with the reserved milk and egg mixture. Bake scones for 20-30 minutes until golden brown. Allow to cool completely.

In a small bowl whisk confectioner sugar, maple syrup and half and half together. Glaze should be opaque, thick and pourable.

Drizzle glaze onto cooled scones. Allow glaze to set before serving.

Adapted from, Granny Robinson’s Scones

Easy Chicken Soup

October 11, 2018 by Danielle 2 Comments

IMG_20180929_142036

For the last two weeks my husband has been nursing a horrible cold. Like most men he really struggles when he gets sick. I’ve been pumping him full of fluids, and comforting nutritious foods. Including chicken soup.

For a long time he hated soup, honestly he still kind of does. I of course love soup and could eat it all fall and winter long. Especially when I get sick. So naturally when I found out he was a soup hater I questioned our entire relationship (kidding!). Actually I was determined to find soup that he would actually enjoy. I now have a few soup recipes in my arsenal that he enjoys. Luckily my Chicken Soup is one of the recipes he enjoys and it’s perfect for a bad cold!

IMG_20180929_142053

This recipe is super easy and you probably have all the ingredients in your fridge right now. It’s actually easy enough that you could make it while you’re sick.

I roasted the chicken for this soup, but you could use leftover cooked chicken instead. I also recommend cooking your noodles first instead of cooking them in the soup. Cooking them in the broth makes them soggy and they soak up too much of the broth. You can also switch up the vegetables based on what you have on hand.

Give this recipe a try next time you get sick.

IMG_20180929_142032

Easy Chicken Soup

Yields: 10 Servings

Ingredients:

  • 2 Cups Uncooked Short Cut Pasta (Shells, macaroni, bow-tie etc)
  • 2 Tbsp Olive Oil
  • 1 Garlic Clove
  • 1/2 Medium Yellow Onion, diced
  • 2 Stalks of Celery, diced
  • 3 Carrots, diced
  • 2 Chicken Breasts
  • 10 Cups Low Sodium Chicken Broth
  • 1 Tsp Thyme, fresh
  • Salt and Pepper to taste
  • Optional: 2/3 Cup Frozen Peas

Directions:

Preheat the over to 400°F. Place chicken on a sheet pan lined with parchment paper. Season the chicken with salt and pepper, bake for 30 minutes or until the internal temperature reached 165°F. Dice chicken and set aside.

While the chicken cooks bring a large pot of water to a boil and cook the pasta according to package directions. Drain and set aside.

In the same large pot heat olive oil over medium-low heat. Add onions and cook for 2-3 minutes. Season with salt and pepper to taste. Add garlic, carrots and celery, cook for 4 minutes. Add broth to the pot and bring to a simmer.

Stir in chicken, frozen peas and thyme. Continue to simmer the soup for 5 minutes. Stir pasta into the soup just before serving.

This soup will keep in the fridge for 3-4 days, or it can be stored in the freezer for up to 3 months.

Adapted from, Fraiche Nutrition.

You may also enjoy…

IMG_20180930_182444

Chicken Pot Pie

IMG_20180914_142616

Slow Coker Vegetarian Chili

Pumpkin Chocolate Chip Cookies

October 9, 2018 by Danielle 2 Comments

IMG_20180929_134842.jpg

Happy Belated Canadian Thanksgiving! I spent the whole weekend spending quality time with family, enjoying delicious food and drinks. It was great to disconnect from my phone and just hangout all weekend. Now that I’m back home it’s back into the kitchen, and today I am sharing a recipe for Pumpkin Chocolate Chip Cookies.

These cookies are so easy and get gobbled up (Thanksgiving Joke!) so fast! And they are the perfect way to use up any left over canned pumpkin from making pumpkin pies and breads.

IMG_20180929_134745

These cookies are soft and chewy, slightly spiced, deliciously sweet and chocolatey (is that a word?). I was very sceptical for the pumpkin chocolate combo and resisted it for quite awhile, but now that I know what I’ve been missing I’ll be making these every fall.

These cookies are actually eggless which is great for feeding a crowd since so many people have allergies. You could also sub non dairy butter and dairy free chocolate chips to make these cookies vegan. I love the versatility.

Have I convinced you to add these to your fall baking list yet?

IMG_20180929_134835

Pumpkin Chocolate Chip Cookies

Yields: 18 Cookies

Ingredients:

  • 1/2 Cup Unsalted Butter, partially melted
  • 1/4 Cup Brown Sugar, packed
  • 1/2 Cup White Sugar
  • 1 Tsp Vanilla Extract
  • 6 Tbsp Pumpkin Puree (not pumpkin pie filling)
  • 1 and 1/2 Cups All Purpose Flour
  • 1/4 Tsp Salt
  • 1/4 Tsp Baking Powder
  • 1/4 Tsp Baking Soda
  • 1 Tsp Pumpkin Pie Spice
  • 1/2 Cup Chocolate Chips

Directions:

Microwave the butter for 30-60 seconds until butter is half melted. In a medium bowl, whisk the butter, brown sugar, and granulated sugar until smooth. Whisk in the vanilla and pumpkin until smooth. Set aside.

In a large bowl whisk together the flour, salt, baking powder, baking soda, and pumpkin pie spice. Pour the wet ingredients into the dry ingredients and mix together with a wooden spoon or spatula. Fold in the chocolate chips. Chill the dough for 1 hour.

Preheat oven to 350°F. Roll the dough into balls, place them on a baking sheet and slightly flatten. The cookies will only spread minimally. Bake the cookies for 10 minutes. Press more chocolate chips onto the tops, if desired. Allow the cookies to cool for at least 5 minutes on the cookie sheets before transferring to a cooling rack.

Adapted from Sally’s Baking Addiction.

Chicken Pot Pie

October 4, 2018 by Danielle 1 Comment

IMG_20180930_182444

My husband has been begging to make Chicken Pot Pie for months now, but I just couldn’t bring myself to make it during the hot summer months. This past Sunday the skies were grey and the air was cold. It seemed like the perfect day to finally make this delicious comfort food. And believe me it did not disappoint, he hasn’t stopped talking about how delicious it was!

Now I know Chicken Pot Pie can be a big intimidating since you have to make the crust, but really just remember to keep your dough cold and I promise you will be fine. Check out my tips for pie in this post.

IMG_20180930_181126

This recipe would also be perfect to make use of Thanksgiving leftovers. Canadian Thanksgiving is coming up this weekend and using all your leftover turkey in the pot pie would be delicious! It actually might be better then your turkey dinner.

This dish is also perfect when you need to bring someone a homemade meal. It’s perfect to bring a new mom ore someone who needs a little extra love. It’s warm and comforting and bring everyone a bit of joy. I hope you and your family enjoy it too.

IMG_20180930_182448

Chicken Pot Pie

Yields: 1 9 inch Pie

Ingredients:

Crust:

Crust:

  • 2 2/3 cups All Purpose Flour
  • 1 teaspoon salt
  • 1/2 cup Vegetable Shortening, cold
  • 1/2 cup Unsalted Butter, cold
  • 8 to 12 tablespoons ice water
  • Egg, beaten

Filling:

  • 3 Chicken Breasts
  • 1 Cup Carrots, sliced (2 large carrots)
  • 1/2 Cup Celery, sliced (2 stalks)
  • 1/3 Cup Butter
  • 1/2 Large Onion, chopped
  • 1 Large Garlic Clove, minced
  • 1/4 Cup All Purpose Flour
  • 1 3/4 Cup Chicken Broth
  • 2/3 Cup Milk (I used 2%, but any kind will work)
  • 1 Cup Frozen Peas
  • 1 Tsp Salt
  • 1/2 Tsp Black Pepper
  • 1 Tsp Fresh Thyme, chopped

Directions:

In a large bowl mix the flour and salt. Add the cold butter and shortening. Cut the butter and shortening into the flour mixture using a pastry cutter or two forks until the chunks of butter and shortening are the size of small peas.

Drizzle in the ice water and stir the mixture to bring the dough together. Continue to add water until the dough starts to clump and form a ball. Form the dough into a ball. Cut dough in half and form each half into discs. Wrap each disc tightly in plastic wrap, and chill in the fridge for at least 1 hour.

Preheat your oven to 450°F. Place the chicken breasts on a baking sheet and bake in the oven for 20 minutes or until the internal temperature of the chicken reaches 165°F. Set aside to cool.

In a large sauté pan melt the butter over medium low heat. Add the onions and garlic to the butter and cook for 2-3 minutes. Season onions and garlic with salt and pepper. Add carrots and celery, cook for 4-5 minutes.

Add flour to the pan to create a roux. Cook the flour for 2-3 minutes to prevent the filling from having a floury taste. Slowly add chicken broth to the roux, stirring constantly to prevent lumps. Once fully combined add the milk to the pan. Simmer the sauce until it become thick and coats the back of the spoon, about 5 minutes.

Chop the cooled chicken breasts. Add the chicken, frozen peas and thyme to the sauce and stir to combine. Set mixture aside.

Preheat the oven to 425°F. Remove your dough from the fridge. Roll out the pie dough into two discs. Carefully line your pie plate with one of the rolled out halves of dough. Pour the filling into the pie plate. Carefully place the top layer of dough on the filling. Using a fork or your fingers seal the edges of the pie dough. Cut a few slits in the top crust to allow steam to escape. Brush the top of the pie with the beaten egg.

Bake the pie for 30-40 minutes until the crust is golden brown. Set the pie aside to cool for 15 minutes before serving.

Adapted from Grandma’s Berry Pie and Sally’s Baking Addiction.


You may also like…


IMG_20180914_142616

Slow Cooker Vegetarian Chili

Healthier Pumpkin Bread

October 2, 2018 by Danielle Leave a Comment

IMG_20180929_140830.jpg

Now that it is officially October I feel it is acceptable to post all things pumpkin. As much as I love pumpkin I just think September is too early. But with Canadian Thanksgiving coming up on Sunday I have pumpkin on the brain.

This recipe is perfect because it has whole wheat flour, coconut oil and maple syrup making it much better for you and more nutritious then a lot of the more indulgent recipes out there. Since this bread is healthier then some of the other pumpkin treats out there you’re free to enjoy all season long.

IMG_20180929_140752.jpg

The texture of this bread is AMAZING! I actually can’t believe how well it turned out, its soft and dense while still being light and airy. The best way to achieve this texture is to hand mix the batter. Gently fold the dry ingredients into the wet until just combined.

This bread would also be great with some mix ins or other toppings. I topped mine with a few handfuls of pumpkin seeds, but you could just leave it plain. You could also mix in nuts or chocolate chips. you could even ice the top with cream cheese frosting and serve it as a dessert.. not so healthy but defiantly delicious. however you make it you won’t be disappointed.

IMG_20180929_141112.jpg

Healthier Pumpkin Bread

Yields: 1 Loaf

Ingredients:

  • 1/3 Cup Coconut Oil, melted
  • 1/2 Cup Maple Syrup
  • 2 Eggs
  • 1 Cup Pumpkin Purée (NOT pumpkin pie filling)
  • 1/4 Cup Milk (I used 2%, but any milk even non dairy will work)
  • 1 Tsp Vanilla Extract
  • 1 1/2 Tsp Pumpkin Pie Spice
  • 1 Tsp Baking Soda
  • 1/2 Tsp Salt
  • 1 Cup All Purpose Flour
  • 3/4 Cup Whole Wheat Flour
  • Optional: 1/4-1/2 Cup mix-ins or toppings, pumpkin seeds, nuts, chocolate chips etc.

Directions:

Preheat oven to 325°F and grease a 9×5-inch loaf pan.

In a large bowl whisk flour, baking soda, salt and pumpkin pie spice. Set aside.

In a medium sized bowl whisk together coconut oil, maple syrup until completely combined.  Add eggs, pumpkin purée, milk and vanilla extract to the wet ingredients and whisk together to combine.

Pour the wet ingredients into the dry and fold the mixture together with a spatula or wooden spoon. Continue to fold until the flour is just combined. Gently fold in any mix-in’s if using.

Pour the batter into the greased loaf pan. Sprinkle the loaf with toppings if desired.

Bake the loaf for 50-60 minutes, or until a tooth pick comes out clean. Allow the bread to cool in the loaf pan for 10 minutes before transferring to a cooling rack.

Adapted from, Cookie and Kate

« Previous Page
Next Page »

Primary Sidebar

Danielle at Home

Hi, I’m Danielle. I am a twenty something woman working her office job by day and blogging at night! I’m married, a new home owner and I love sharing all my favourite things on this blog. So grab a glass of wine and follow along. I’m so glad you’re here!

SUBSCRIBE & FOLLOW

Pinterest
Instagram
Facebook
Twitter

Footer

Copyright © 2026 Danielle at Home on the Foodie Pro Theme