• Skip to primary navigation
  • Skip to main content
  • Skip to primary sidebar
  • Skip to footer

DANIELLE AT HOME

  • HOME
    • About
    • Contact
  • LIFESTYLE
    • Favourites
    • Goals
    • Home
      • DIY Projects
      • Organization
    • Holidays
      • Christmas
      • Easter
      • Halloween
      • New Years
      • Thanksgiving
      • Valentine’s Day
      • Gift Guides
  • STYLE
  • WELLNESS
  • FOOD + DRINK
    • Appetizers
    • Breakfast
    • Dessert
    • Drinks
    • Side Dishes
    • Snacks
    • Holiday Recipes
      • Christmas
      • Cinco De Mayo
      • Easter
      • Father’s Day
      • Halloween
      • Mother’s Day
      • New Years
      • St. Patrick’s Day
      • Thanksgiving
      • Valentine’s Day

Fall

Roasted Butternut Squash Soup with Sage

November 15, 2018 by Danielle Leave a Comment

Every year I make butternut squash soup and every year I’m underwhelmed. It never turns out very flavourful. Over the past year I’ve been cooking with all kinds of squashes a lot more then I used to. We love eating acorn, butternut and delicata squash. I’ve been roasting, mashing, topping salads and making sauces out of squash constantly. So when I made soup this year I was ready to get it right. And I did just that! This recipe is rich is flavour, easy to make and great for work day lunches.

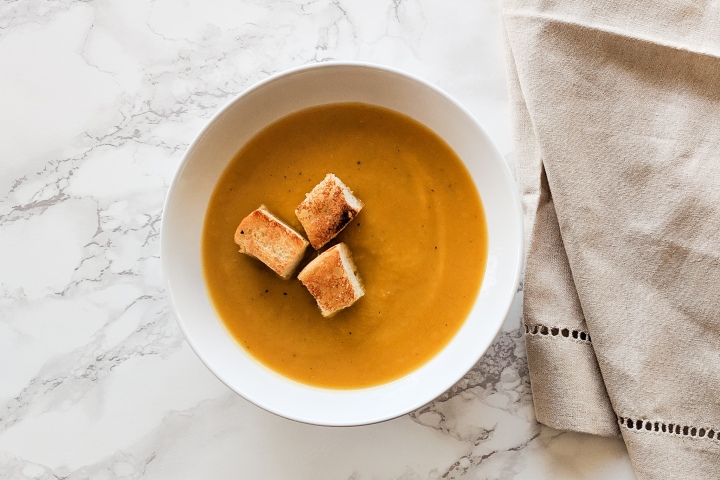
In this recipe I roast butternut squash, onions and garlic in the oven until caramelized and browning. I also add fresh sage and delicious brown butter which takes the soup to the next level!

I like serving this soup with so super fast homemade croutons or to make it a really filling me some cooked apple sausage. Both are great options.

Roasted Butternut Squash Soup with Sage

Yields: 8 servings

Ingredients:

  • 1 Medium Butternut Squash, peeled and chopped
  • 1 Medium Onion, chopped
  • 2 Cloves of Garlic
  • 1/2 Teaspoon of Salt
  • 1/4 Teaspoon of Pepper
  • 1 Tablespoon Olive Oil
  • 2 Tablespoons of Butter
  • 2 Teaspoons Fresh Sage, chopped
  • 6 Cups Low Sodium Vegetable Stock
  • Optional: Salt and Pepper, to taste

Directions:

Preheat oven to 400 °F. Spread out chopped butternut squash, onions and whole garlic cloves on a large baking sheet. Toss with olive oil, salt and pepper. Roast in the oven for 30-40 minutes until soft and squash begins to caramelize.

In a large soup pot melt the butter on medium heat. Continue to cook the butter in medium heat until it becomes golden and brown buts form on the bottom of the pot (3-5 mins). Reduce heat to low and add chopped sage. Sauté sage until fragrant and starting to crisp, about a minute. 

Add onions, butternut squash and garlic to the pot. Stir mixture to combine. Add the vegetable stock. Bring soup to a simmer for at least 30 minutes.

Using an immersion blender blend soup until completely smooth (If using a traditional blender allow soup to cool before blending). Return soup to pot. Taste the soup, add salt and pepper to taste if needed.

Serve with your favourite soup toppings and sides.

You may also like…..

Chicken Noodle Soup

Homemade Lasagna

November 13, 2018 by Danielle Leave a Comment

IMG_20181109_121152

If I could eat Italian food for every meal I would. Pasta for breakfast sounds way better then oatmeal or eggs to me. I have always loved Lasagna. My mom would always make it when my grandparents came to visit. It’s such a great crowd pleasing meal that can be made in advance.

Now this recipe is not my mom’s. Her recipe came from the back of the pasta box. Although delicious you wont see me make a lasagna recipe that contains cottage cheese in place of ricotta…. sorry mom! This recipe has, ground beef, Italian sausage, ricotta, fresh basil and lots of cheese!! I’ll also share a trick for avoiding soggy noodles. Believe me this recipe is worth the effort.

IMG_20181109_120547

So my tips for this recipe are….

  1. Find the biggest pan you can! If you can get a pan thats actually called a lasagna pan that’s the best this to use since this makes a large quantity. I use the deepest 13×9 baking dish I own and always have a little bit left over. SO the bigger the better!
  2. Double or even triple the recipe. Make up a few lasagnas in foil baking dishes and stock your freezer. I wouldn’t call this recipe hard, but it is time consuming so you might as well batch cook.
  3. Throw a parmesan rind into your meet sauce. Now this is totally optional, so if you don’t have one no worries. If you do have a parmesan rind (I freeze my leftover rinds) throw it in to simmer with your sauce it will add incredible flavour.
  4. Either use fresh lasagna noodles or quick soak your dried pasta. Ok so I hate cooking lasagna sheets, they always tear and my largest pot is already being used to simmer the meat sauce. So I have two options for you, the first is using fresh pasta. This stuff cooks so fast you don’t need to boil it! It can be pretty pricy though so I normally opt for option two, quick soaking regular lasagna noodles. I put the noodles in a large pan, cover the noodles with boiling hot water for 2-3 minutes. This will soften the noodles but they will still have a nice structure, and they don’t soak up too much sauce as the lasagna bakes.
  5. My fifth and final tip is that fresh is best! Fresh cheese and fresh basil! Get your self a basil plant, they are the best! Basil is one of the only herbs I refuse to use dried. In my opinion if you only have dried basil you might as well not use any at all. Secondly your cheese should be either deli sliced, or freshly grated by you! Pre grated cheese has a weird powder on it and it impacts the flavour of the cheese so buying a block is best (and cheaper!)

So now you have a fews tip on how I make this lasagna, its really so good!

IMG_20181109_121217-2

Homemade Lasagna

Yields: 12 Servings

Ingredients:

  • 1 Pound Italian Sausage (I use spicy, but sweet is also delicious!)
  • 2 Pounds Lean Ground Beef
  • 1 White Onion, finely diced
  • 6 Cloves of Garlic, crushed
  • 2 (28 oz) Cans Crushed Tomatoes
  • 2 (6 oz) Cans Tomato Paste
  • 1 (15 oz) Can Tomato Sauce
  • 1/2 Cup Red Wine (Chianti and Pino Noir are my favourites)
  • 1 Tablespoon White Sugar
  • 1/2 Cup Fresh Basil, chopped
  • 1 Tablespoon Italian Seasoning
  • 1/2 Teaspoon Salt
  • 1/4 Teaspoon Black Pepper
  • Parmesan Cheese Rind (optional)
  • 1 Pound Lasagna Noodles
  • 16 Ounces Ricotta Cheese
  • 1 Egg
  • 1/2 Teaspoon Salt
  • 1/4 Teaspoon Black Pepper
  • 1 Pound Mozzarella Cheese, shredded
  • 1 1/4 Cups Fresh Parmesan Cheese, grated

Directions:

In a large pot or dutch oven brown sausage and ground beef over medium heat. Add onions and garlic. Sauté until translucent, browning and fragrant (5 minutes). Add red wine to deglaze the pan. Stir in crushed tomatoes, tomato past and tomato sauce. Bring sauce to a simmer. Add sugar, basil, Italian seasoning, salt, pepper and parmesan rind to the pot. Cover and simmer on low heat for at least 1.5 hours. Remove parmesan rind before using.

In a medium sized bowl combine ricotta, egg, 1/2 teaspoon of salt, 1/4 teaspoon black pepper and 1/4 cup of parmesan cheese. Mix to combine and set aside. Place noodles in a large pan, pour boiling water over the noodles and soak for 2-3 minutes. Remove noodles from the pan, place in a colander and rinse with cold water. Place shredded mozzarella and remaining shredded parmesan together in a bowl, Mix to combine and set aside.

Preheat oven to 375 ° F.

Assemble your lasagna. Cover the bottom of the baking dish with 1 cup of meat sauce. Cover sauce with 6 lasagna noodles. Layer one half of the ricotta mixture, gently spread. Sprinkle with mozzarella and parmesan cheese mixture. Top with 1 1/2 cups of meat  sauce, and sprinkle another layer of cheese. Repeat layers. Top the final layer of noodles with remaining meat sauce and cheese.

Cover loosely with foil and bake for 25 minutes. Remove foil and bake for an additional 25 minutes. Allow to cool for at least 15 minutes before serving.

Adapted from All Recipes.

You may also like…

IMG_3573

Kale Caesar Salad

Warm Sweet & Salty Rosemary Cashews

November 8, 2018 by Danielle 2 Comments

IMG_20181026_114911

Ok guys the holidays are coming! As I write this we are less then 7 weeks away from Christmas! That’s so crazy! Coming over the next 7 weeks will be lots of Christmas and Thanksgiving recipes. Canadian Thanksgiving may be over, but I know American Thanksgiving is right around the corner and there is some great sides a desserts coming for all my American friends. I also have some bonus posts coming up and even a new series coming in December! The next 7 weeks are going to be jam packed with Holiday content!

Today I’m kicking off my holiday content with a perfect holiday appetizer. These Warm Sweet and Salty Rosemary Cashews are so simple, but make a big impact. I’m all about impressing guests with as little effort as possible. The Holidays are so busy we really don’t need any fussy appetizers. With all the food that gets served on Thanksgiving and Christmas I like to keep things pretty simple. I also love that these can be made in advance and just warmed for a few minutes in the oven on the day of your party!

IMG_20181026_115050

This recipe can be customized to your tastes. Don’t like cashews? Swap in some almonds. Hate the taste of rosemary? Throw a little chili powder in with the butter, sugar and honey mixture. You can really make it your own. I think I may even make a trio of nuts for my next party to go along with a super simple cheese board. How delicious would that be? The possibilities really are endless. Also the possibilities are really delicious and addicting… just saying!

I hope this helps jump start your holiday menu planning!

IMG_20181026_114751

Warm Sweet & Salty Rosemary Cashews

Yields: 8 Servings

  • 1 Pound Raw Unsalted Cashews
  • 2 Tablespoon Unsalted Butter
  • 1 Tablespoon Honey
  • 2 Tablespoon Brown Sugar
  • 2 Tablespoon Fresh Rosemary, finely minced
  • Flakey Sea Salt, to taste

Directions:

Preheat the over to 350°F. Line a rimmed baking sheet with parchment paper or a silicone baking mat.

In a saucepan melt butter, honey and brown sugar over medium-low heat. Once combined remove from heat. Add cashews and stir to coat.

Transfer cashews to the lined baking sheet and spread out into an even layer.Bake cashews for 10 minutes tossing the cashews half way through the cooking time.

Remove from the oven. Add chopped rosemary and sprinkle with sea salt. Toss to combine. Allow to cool for 5 minute before transferring to a serving dish.

Store in an airtight container for up to a week. To re warm the cashews bake in a 300°F oven for 5 minutes.

Adapted from Entertaining with Beth.

Sautéed Brussels Sprouts

November 1, 2018 by Danielle 2 Comments

IMG_20181026_115931

Happy November! Do you get excited for a new month? I don’t normally, but now that we are heading into the holiday season I was very excited for this new month.

Today I will be sharing a recipe for Sautéed Brussels Sprouts. This recipe is delicious on your Thanksgiving or Christmas table, but so simple you could throw it together on a typical weeknight (we do!). Now I know that brussels sprouts are a polarizing vegetable, but I think even a brussels sprout hated would enjoy this recipe.

IMG_20181026_120223

I like to sauté shaved brussel sprouts instead of cooking them whole. Not only do they cook fast but I have found that people who claim not to like brussels sprouts will like them way better if they are shaved like this. Also add bacon, garlic and cheese to anything and I’m totally sold.

IMG_20181026_120241

Sautéed Brussels Sprouts

Yields: 4-6 Servings

Ingredients:

  • 1 lbs Brussels Sprouts
  • 2 Sliced Bacon, diced
  • 1 Garlic Clove, minced
  • 2 Teaspoon Worcestershire Sauce (soy sauce can be substituted)
  • Fresh Parmesan Cheese
  • Salt and Pepper, to taste

Directions:

Trim the end off the brussels sprouts and remove outer leaves. Use a food processors grater attachment of a knife to shave brussels sprouts. Alternatively you can buy a bag of pre cut brussels sprouts. Set aside.

In a frying pan cook diced bacon over medium heat until starting to crisp, about 3-5 minutes. Drain off excess fat. I leave just enough bacon fat in the pan to coat and discard the rest. Add brussels sprouts to the pan. Sauté over medium heat for 2 minutes. Add minced garlic and sauté for 4 minutes. Add Worcestershire sauce and salt and pepper to the pan. Sauté for another minute.

Transfer to a serving dish and top with freshly grated or shaved parmesan. Serve immediately.


You may also like…

IMG_3124

Lemon Parmesan Green Beans


Homemade Caramel Corn

October 30, 2018 by Danielle 2 Comments

IMG_20181012_142119

BOO! I have one more Halloween post before the big day tomorrow! I hope you all enjoy the fun and spooky day, and if you have kids I hope they have the best time trick or treating! Like I said in this post, I wish I could go! Anyway I hope you are all doing something festive (I love festive!).

Today I thought I’d share one of my favourite fall recipes that I think is the perfect treat for Halloween night! I think this is a great recipe if you’re staying in watching a scary movie, or if you’re having people over for a Halloween party. I know I get sick of these mini chocolate bar and prefer to have festive fall treats at Halloween parties.

Tomorrow we will be snacking on Caramel Corn, drinking a beer and watching a scary movie. Oh and by scary movie I mean Hocus Pocus….it’s the scariest movie I can handle (Pathetic I know!).

IMG_20181012_142314_1

I always found caramel intimidating, so I never tried making my own caramel corn until recently. Once I did I felt really silly for waiting so long since it is incredibly easy! It’s perfect for halloween or really and day ending in Y! We’re addicted! So please give this a try it’s really easy and really delicious!

IMG_20181012_142115

Homemade Caramel Corn

Yields: 12 Cups

Ingredients:

  •  12 Cups Popped Popcorn (1 cup kernels, approx.)
  •  1 Cup Unsalted Butter
  •  1 1/2 Cup Brown Sugar, packed
  •  1/3 Cup Light Corn Syrup
  •  1/2 Teaspoon Vanilla Extract
  •  1 Teaspoon Salt
  •  1 Teaspoon Baking Soda

Directions:

Preheat oven to 225 degrees F. Line a large baking sheet (you may need two) with parchment paper. Spread popcorn evenly on baking sheet, and set aside.


In a medium saucepan on medium heat add butter, brown sugar and corn syrup. Whisk together until butter has melted and ingredient combine into a smooth sauce. This will take 3-5 minutes. Add vanilla, salt and baking soda to the sauce. Whisk constantly. Sauce will lighten in colour and increase in volume. Continue to cook for 2-4 minutes to thicken, whisking constantly. Remove from the heat.

Pour sauce over the trays of popcorn. Use a spatula (silicone is best) to toss popcorn and coat. This does not need to be perfect.

Bake popcorn for 30 minutes. Check on the popcorn every 10 minutes. Remove the baking sheet from the oven and toss the popcorn again to continue coating and breaking up chunks. Repeat this process 2-3 times over the 30 minute baking time.

Remove baking sheet from the oven set aside and allow to cool for at least an hour. Check on your popcorn after 30 minutes to break up any large clumps that are forming. Once fully cool serve immediately or store in an airtight contained for up to 5 days.


Adapted from Homemade Hooplah, Homemade Caramel Popcorn.

Poisoned Apple Cocktail

October 25, 2018 by Danielle Leave a Comment

IMG_20181012_124425-3

I feel like people either love or hate Halloween. My husband, Calvin falls into the later camp. Always has and always will (even as a kid!). There are some aspects of the holiday he does enjoy… carving pumpkins, watching scary movies and of course the candy.

I grew up loving Halloween. I loved dressing up and trick or treating with my friends. As an adult I am not as big of a fan. Maybe because I’m not into crazy parties? I am more into pumpkins, candy and corn mazes. Also is 25 too old to go trick or treating? Asking for a friend.

One thing we both love regardless of the holiday is a festive cocktail!

IMG_20181012_124827-2

So today I’m sharing the perfect cocktail for your Halloween celebrations. This cocktail is right up my ally because it sweet, but not too sweet and has a nice warming spice for fall. It is also a deep red colour which looks spooky for Halloween. If you really want to up the spook factor add a drop or two of black food colouring to really deepen the colour of your drink!

This recipe is really simple, but I like it because it’s not fussy like some cocktails. You can make a big pitcher in advance of your guests arrival. As always I have the measurements for one drink and a full pitcher listed below.

IMG_20181012_124416-2

Poison Apple Cocktail

Yields: 1 Serving or Pitcher

Ingredients:

Single Serving:

  • 2 Ounces Spiced Apple Cider
  • 1 Ounce Pomegranate Juice
  • 2 Ounces Vodka or Apple Vodka

Pitcher (12 Servings):

  • 3 Cups Spiced Apple Cider
  • 1 1/2 Cups Pomegranate Juice
  • 3 Cups Vodka or Apple Vodka

Directions:

For a single serving fill a cocktail shaker with ice. Pour apple cider, pomegranate juice and vodka into shaker. Shake cocktail until cold. Pour into stemware of choice.

For pitcher add apple cider, pomegranate juice and vodka into a large pitcher. Chill in your fridge until ready to serve. Pour into stemware of your choice.

Adapted from Julep.

You may also like…

IMG_3955

Hot Apple Cider


IMG_20181020_120841

Whole Wheat Banana Pancakes with Brûlée Bananas

« Previous Page
Next Page »

Primary Sidebar

Danielle at Home

Hi, I’m Danielle. I am a twenty something woman working her office job by day and blogging at night! I’m married, a new home owner and I love sharing all my favourite things on this blog. So grab a glass of wine and follow along. I’m so glad you’re here!

SUBSCRIBE & FOLLOW

Pinterest
Instagram
Facebook
Twitter

Footer

Copyright © 2026 Danielle at Home on the Foodie Pro Theme