• Skip to primary navigation
  • Skip to main content
  • Skip to primary sidebar
  • Skip to footer

DANIELLE AT HOME

  • HOME
    • About
    • Contact
  • LIFESTYLE
    • Favourites
    • Goals
    • Home
      • DIY Projects
      • Organization
    • Holidays
      • Christmas
      • Easter
      • Halloween
      • New Years
      • Thanksgiving
      • Valentine’s Day
      • Gift Guides
  • STYLE
  • WELLNESS
  • FOOD + DRINK
    • Appetizers
    • Breakfast
    • Dessert
    • Drinks
    • Side Dishes
    • Snacks
    • Holiday Recipes
      • Christmas
      • Cinco De Mayo
      • Easter
      • Father’s Day
      • Halloween
      • Mother’s Day
      • New Years
      • St. Patrick’s Day
      • Thanksgiving
      • Valentine’s Day

Fall

Blueberry Oat Muffins

January 26, 2019 by Danielle 7 Comments

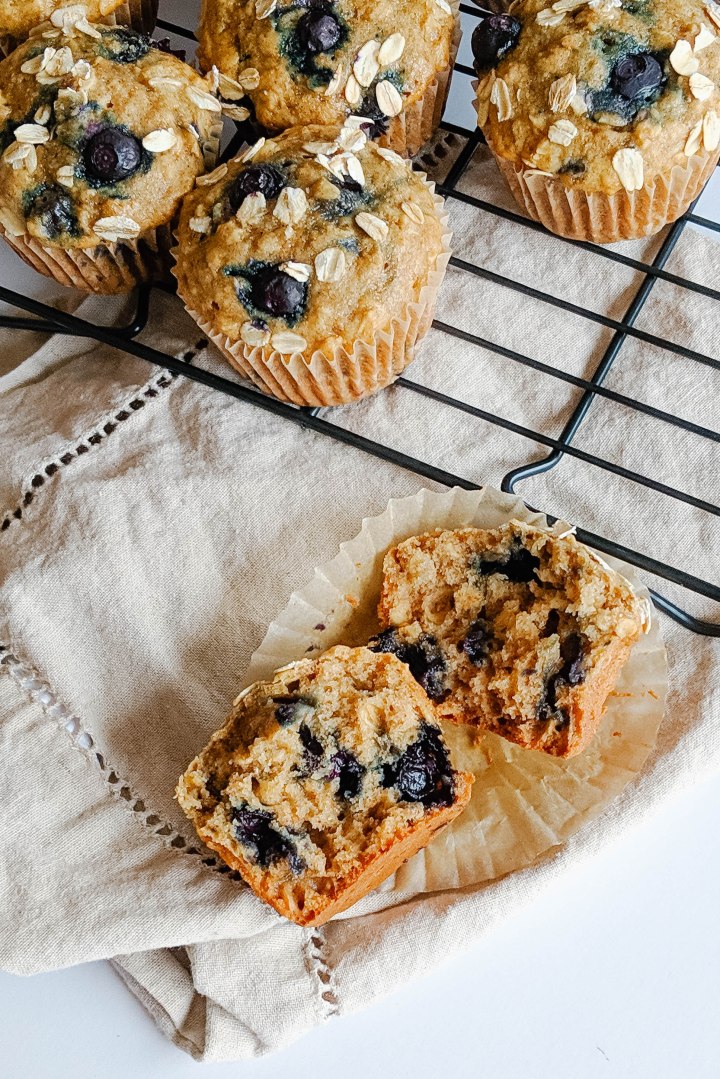
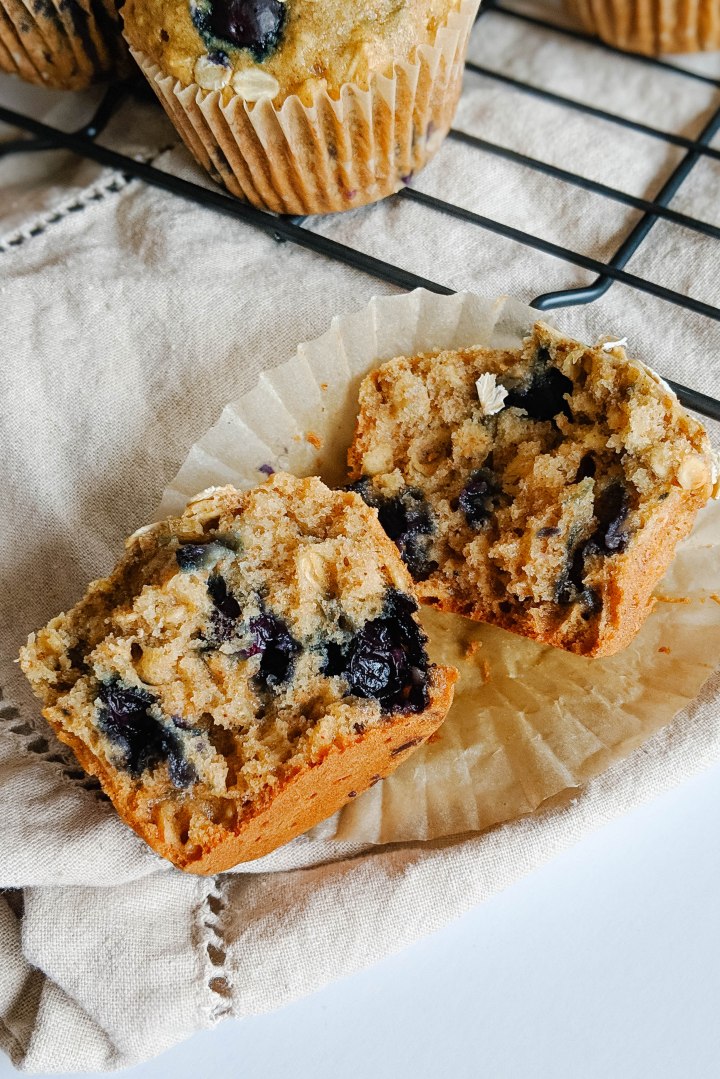
Whole wheats and oat muffins, bursting with juicy blueberries.

00000portrait_00000_burst20190118130024168

Every weekend I try to make muffins or banana bread. Some sort of baked good that can be grabbed on our way to work in the morning. Or thrown in my purse for a mid morning snack. Bonus points if it’s tasty enough to enjoy as dessert. Anything that keeps me away from a chocolate bar is key to keep my waist line from growing!

Blueberry muffins are one of my favourite kinds of muffins. I like that they are fresh and light while still providing the comfort of a baked good. I personally am not a fan of the baker style muffin. To me those are truly a dessert. They are more like cake than muffin and you will rarely find me baking them. If a baked good is going to be part of my regular diet as part of a meal pr snack I have a few requirements:

  • Mostly whole wheat or whole grain
  • Low in sugar
  • Healthy fat source
  • Delicious!
00100dportrait_00100_burst20190118125935794_cover
00000img_00000_burst20190118130230495_cover

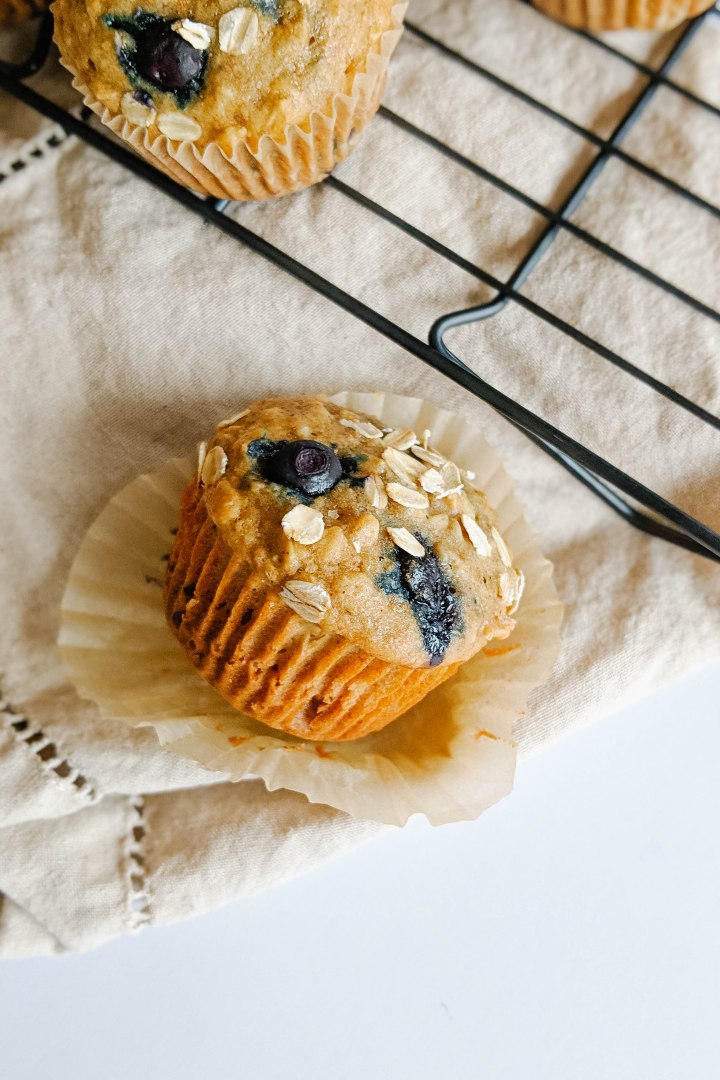
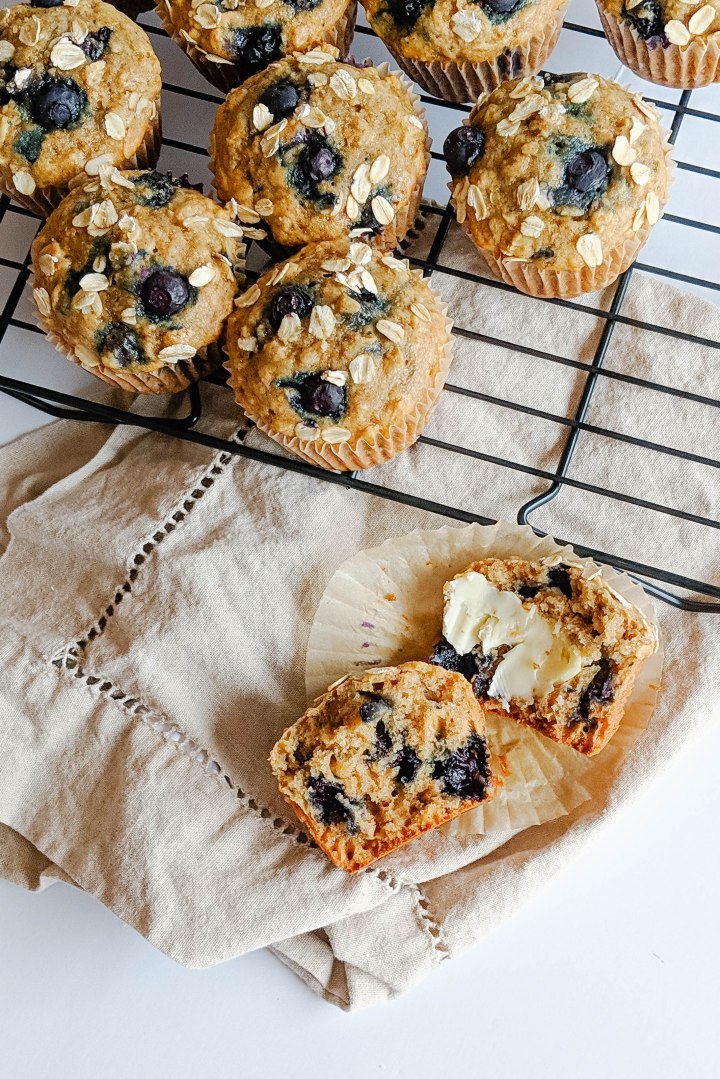
These muffins fit my rules. They contain whole wheat flour, rolled oats, honey, cinnamon, apple sauce, coconut oil and blueberries! Lots of filling healthy ingredients to fuel your day.

We’ve enjoyed these so much I’m going to me making another batch on Sunday!

00100dportrait_00100_burst20190118130018696_cover

Blueberry Oat Muffins

Yields: 14 Muffins

Ingredients:

  • 1 cup Whole Wheat Flour
  • 1/2 cup All Purpose Flour
  • 1 1/2 cup Rolled Oats
  • 1/2 tsp Salt
  • 1/2 tsp Cinnamon
  • 1 tsp Baking Powder
  • 1/2 tsp Baking Soda
  • 1/4 cup Brown Sugar, loosely packed
  • 1/3 cup Honey
  • 1/3 cup Unsweetened Apple Sauce
  • 1/3 cup Coconut Oil, melted
  • 1 cup Milk (Cows milk, nut milk, oat milk – your favourite!)
  • 1 tsp Vanilla
  • 1 Egg
  • 1 cup Blueberries (fresh or frozen, do not defrost frozen)
  • Optional: Rolled Oats and Turbinado Sugar, for topping

Directions:

Preheat the oven to 350°F. Prepare your muffin tins with cupcake liners or grease with oil or non stick spray. Set aside.

In a medium bowl whisk together whole wheat flour, all purpose flour, oats, salt, cinnamon, baking powder and baking soda. Once ingredients are evenly distributed, set aside.

In a large bowl whisk together brown sugar, honey, apple sauce, coconut oil, milk, vanilla and egg. Whisk until smooth. Pour dry ingredients into the wet. Fold in the dry ingredients until just combined. Add blueberries, fold into batter.

Pour batter into the prepared muffin tins. Fill each tin 3/4 of the way full. Do not over fill.  Sprinkle tops of muffins with rolled oats and turbinado sugar if desired. Bake muffins for 20-30 minutes. Muffins are done when a toothpick comes out clean.

Store in an airtight container in your refrigerator for about a week. These muffins also freeze and defrost well.

Winter Grain Salad with Glory Dressing

January 19, 2019 by Danielle 3 Comments

Simple delicious whole food ingredients smothered is the best dressing ever invented.

img_20190106_125638

Happy Saturday guys! I’m popping on here today to share a staple salad and a dressing that can be used to make just about anything taste delicious! This recipe is actually adapted from a recipe my husband got from an old roommate. Many years ago my husband, then boyfriend made us glory bowls for dinner. It was one of the first dinners he ever cooked for me. At this time I was still living at home and honestly hadn’t cooked much, he was the better cook back then. I watched him prep the ingredients, cook rice, grill chicken and make the most amazing dressing. I was so impressed! Since then his recipe for glory dressing has evolved and the scrape of paper the recipe was written on is scribbled with notes and splattered with soy sauce. Isn’t that a sign of a well loved recipe? I think so.

img_20190106_125753img_20190106_125729

The best thing about the recipe I’m sharing today is how customizable it is. Today I’m sharing a simple but hardy salad full of whole grains and delicious vegetables. I’ve added grilled chicken, crispy tofu, sliced steak and soft boiled eggs to this salad to round out the meal. You can also switch up the vegetables, add cucumber and pickled red onion, or ad roasted cauliflower and sweet potatoes. The world is your oyster. This is really just a jumping off point for your own creativity!

Now the dressing, it’s made up of olive oil, tahini, soy sauce, apple cider vinegar, garlic and sesame oil. I recommend making this dressing in a blender or a magic bullet. You can make it by hand, but I like the magic bullet because it emulsifies the oil and makes the dressing super creamy. Also you can skip the step of chopping garlic, because lets be honest chopping garlic is the worst!

Once the dressing is made pick your favourite grain and veggies toppings, assemble and smother with dressing. You won’t regret it!

img_20190106_125728

Winter Grain Salad with Glory Dressing

Yields: 2 cups dressing & 4 salad bowls

Salads:

  • 3 cups Brown Rice, cooked
  • 4 Cups Spring Mix
  • 2 Carrots, raw grated
  • 4 Beets, cooked sliced
  • Optional: chicken, steak, crispy tofu, soft boiled egg

Dressing:

  • 3 tablespoons Tahini
  • 1/2 cup Soy Sauce
  • 1/4 cup Apple Cider Vinegar
  • 1/4 cup Water
  • 2 Garlic Cloves
  • 1 cup Olive Oil
  • 1 teaspoon Sesame Oil

Directions:

Add dressing ingredients to a blender, blend until smooth and emulsified.

Place a bed or rice into bowls or on plates, top with spring mix, sliced beets, grated carrots and optional protein toppings. Drizzle dressing over the salad. Serve immediately.

Dressing keeps up to week in your refrigerator.

You may also like…

IMG_4085

Apple Cheddar Pecan Salad

Winter Grain Salad with Glory Dressing - YUM!

Brown Butter Shortbread with Maple Glaze

December 22, 2018 by Danielle Leave a Comment

Today’s post is the very last Christmas cookie recipe I will be sharing for 2018. How did this month go so fast? I cant believe Christmas is in just a few days. If you still haven’t checked out week one through three of this series click here, here and here.

Today’s recipe is a variation on shortbread cookies. I know people think they are dry and tasteless, so I’ve added brown butter and brown sugar for a deeper flavour. I also added a delicious maple glaze to make then ever more flavourful.

These cookies are great because you probably already have all the ingredients in your pantry. These are also a slice and bake cookie so there isn’t any rolling and cutting out shapes to do. Slice and bake cookies are so simple to make.

So if you’re up for some more Christmas baking give these or any of the other recipes in this series a try. This is my last recipe post before Christmas, so I hope you have enjoyed all the festive holiday content over the past few months as much as I’ve enjoyed sharing it. Merry Christmas!

Brown Butter Shortbread with Maple Glaze

Yields: 24 cookies

Ingredients:

  • 2 Cups All Purpose Flour
  • 1/4 Teaspoon Salt
  • 1 1/4 Cup Unsalted Butter
  • 2/3 Cup Brown Sugar
  • 2/3 Cup White Sugar
  • 1 Teaspoon Vanilla Extract
  • 1 Cup Confectioners sugar
  • 2 Tablespoons Real Maple Syrup
  • 1 Tablespoon Half and Half
  • Optional: Raw Turbinado Sugar

Directions:

Melt butter over medium heat in a light coloured skillet. Swirl the pan occasionally. Cook until butter browns and has a nutty aroma, 2-3 minutes. pour butter into a bowl and place in the fridge to solidify for about 30 minutes. The brown butter should have a similar texture to softened butter.

Whisk flour and salt together set aside.

In a stand mixer beat the cooled brown butter on high until creamy and smooth. Add white sugar, brown sugar and vanilla, cream until smooth. Add dry ingredients to the mixer and beat on low until just combined.

Form dough into two 8 inch logs. Wrap in plastic wrap and chill for 1-2 hours.

Preheat the oven to 350°F, line baking sheets with parchment and set aside.

Roll the logs of dough in turbinado sugar and slice each log into 12 equal sized pieces. Place cookies on lined baking sheet about 2 inches apart. Bake cookies for 12-14 minutes. Allow to cool on the baking sheet for 5 minutes before transferring to a cooling rack.

In a small bowl combine confectioner sugar, maple syrup and half and half. Drizzle glaze over cooled cookies. Place in the fridge to set.

Adapted from Sally’s Baking Addiction.

You may also like…

Sugar Cookie Snowflakes
Cranberry White Chocolate Oatmeal Cookies

Garlic and Thyme Roast Potatoes

December 4, 2018 by Danielle 1 Comment

IMG_20181123_183128

Ok so I know these aren’t the prettiest pictures, but this is an amazing recipe so I had to share it anyway. This recipe is for a classic English roast potato, kicked up a notch with garlic and thyme. They were so tasty!

This is a riff on my Mom’s roast potatoes. She always makes them with roast beef dinner and they are amazing! She even get chunks of beef fat from the butcher to roast her potatoes in… just like her mom did. Personally that’s a bit much or me. Plus I like to try to make as many side as I can vegetarian, so everyone can enjoy.

I like to use half butter and half olive oil to roast my potatoes. This way you get delicious flavour from the butter, but a slightly higher smoke point for the oil. This will help stop things from burning. And both make for a crispy potato! Yum!

IMG_20181123_183424_1.jpg

This recipe calls for russet potatoes.. I have not experimented with any other type of potato. This is what my mom and Grandma used, so why mess with a good thing?

The most important part about working with potatoes is to let them steam in the colander after cooking,  this is the only way you will get crispy potatoes.

The second rule of this recipe is patience. These potatoes roast for an hour and a half! Yes they do! It takes a long time to get the texture of a signature roast potato! Believe me when I say it is so worth the wait. Patience is a virtue right…. And believe me it will all be worth it!

IMG_20181123_183131

Garlic and Thyme Roast Potatoes

Serves: 6

Ingredients:

  • 5 Russet Potatoes
  • 2 Tablespoons Butter, melted
  • 3 Tablespoons Olive Oil
  • 1 Bunch Thyme
  • 6 Garlic Gloves
  • Salt and Pepper

Directions:

Preheat the oven to 375°F.

In a large pot of salted water, boil potatoes for 8 minutes. Strain potatoes and set aside to steam for 5 minutes.

In a large baking dish or roasting pan add butter and oil (2 tbsp each). Place in your preheated oven for a few minutes until butter is melted (2-5 mins). Remove pan from the oven and add potatoes. Season liberally with salt and pepper, and toss to coat in fat. Roast in the oven for 30 minutes.

In a small bowl place garlic cloves. Tear thyme bunch in half or thirds and add to bowl. Drizzle with oil (about a tbsp). Toss to coat. Remove potatoes from the oven and sprinkle garlic and thyme over the pan. Give the pan a good shake to evenly distribute and return to the oven. Bake for an additional hour.

Remove from the oven and serve immediately…. hopefully with lots of gravy!

Adapted from Jamie Oliver


Baked Brie Braid – 2 Ways!

November 27, 2018 by Danielle Leave a Comment

It’s officially the holiday season, so you know what that means. Lots of holiday entertaining! Today I’ll be sharing a super quick and easy appetizer idea for your next party.

Baked Brie Braids are the perfect way to impress your guests without a lot of effort. It looks fancier then your standard cheese wheel, but it really doesn’t take much effort. I’ll admit it’s barely a recipe.

The two flavours of Bakes Brie Braids I’m sharing today are a classic fig jam and a savoury sun-dried tomato pesto. This couldn’t be easier since all you have to do is assemble and bake… like I said barely a recipe.

Even though it’s crazy easy it’s also crazy delicious and is a really show stopper at any party! Put it alongside some roasted cashews and you’re ready for cocktails!

Baked Brie Braid – 2 Ways

Serves: 8-10

Ingredients:

  • 2 Sheets Puff Pastry
  • 6-8 Slices of Brie Cheese
  • 2 Tablespoons Fig Jam
  • 2 Tablespoons Sun-dried Tomato Pesto
  • 1 Egg, beaten
  • Optional: Pine Nuts or Walnuts for garnish 

Directions:

Preheat the oven to 400 °F. Line a baking sheet with parchment paper and set aside.

Gently mark your puff pasty with a knife to section off the pastry into thirds vertically. Do not cut through the pastry.

Spread fig jam down the center of the puff pastry. Top with 3-4 slices of brie. Using a small knife cut the outer sections of the puff pastry into 1 inch strips. Fold the strips into the centre to cover the cheese and jam, alternating sides to form a braid. Brush the braid with egg wash.

Repeat the steps with the sun-dried tomato pesto.

Place the two braids on the prepared baking sheet. Bake for 25 minutes or until the puff pastry is golden brown. Remove from the oven and top with nuts if desired. Allow to cool for 5 minutes before serving.

Adapted from Entertaining With Beth.

You may also like…

Warm Sweet & Salty Cashews

Baked Macaroni & Cheese

November 20, 2018 by Danielle Leave a Comment

I love all carbs, but noodles are my favourite! I always get cravings for Baked Macaroni and Cheese in the fall and winter. It’s just so comforting. I know the box stuff is convenient but it’s not the same. I have also tried all of those trick for making a single serving in the microwave and I’m sorry but that just wont cut it! Homemade with a roux and cream sauce os the only way!

I have been making homemade Baked Macaroni and Cheese since I was a teenager. In high school I used to make it every Monday night for my brother and I to have for dinner before heading off to dance and soccer. I used a recipe out of one of my mom’s well used cookbooks and would top the whole thing with ritz crackers instead of breadcrumbs. It was good, but even back then I knew it wasn’t perfect.

It was dry, there wasn’t enough cheesy flavour and the noodles were way too soft. For years I didn’t make Baked Macaroni Cheese. There is a store by my house that sells a decent Baked Macaroni and Cheese, so when I need my fix my husband runs out and grabs some (he knows to keep me well fed!). Since it’s just the two of us it seemed like over kill to make a whole pan. But one morning I was watching cooking videos on Youtube and got inspired to perfect my Baked Macaroni and Cheese recipe.

This recipe it perfect. It solved all the issues I had in the past and I really learned a lot about making Baked Macaroni and Cheese.

  1. Undercook your pasta. Always undercook your pasta when making a Baked Macaroni and Cheese. Then you won’t end up with bloated macaroni
  2. Use the strongest and highest quality cheese you can afford. You want to get the most flavour out of your cheese as possible. Find the best old cheddar cheeses you can find, you wont be disappointed.
  3. Make way more sauce then you think you need. The sauce to noodle ratio should alarm you, you should be terrified that your making soup instead of macaroni and cheese. All kidding aside you need a lot of sauce!

If you can remember those three things your Baked Macaroni and cheese will turn out perfect. I hope that this recipe makes it to your table this fall.

Baked Macaroni & Cheese

Yields: 6 servings

Ingredients:

8 Ounces Elbow Macaroni

  • 1/4 Cup Butter
  • 1/3 Cup All Purpose Flour
  • 3 Cups Whole Milk 
  • 8 Ounces Aged Old White Cheddar (crumbled or grated)
  • 4 Ounces Sharp Orange Cheddar Cheese (crumbled or grated)
  • 1/4 Teaspoon Salt 
  • 1/4 Teaspoon Chili Powder
  • 1/8 Teaspoon Garlic Powder

  • 1 Cup Plain Breadcrumbs
  • 2 Tablespoons Butter, melted

Directions:

Cook macaroni according to package directions, but reduce the cook time by 2 minutes. You need very al dente pasta for this recipe. Drain pasta and set aside.

Preheat the oven to 350 °F. Grease an 8 inch baking dish with butter or oil.

In a large sauce pan melt butter over medium heat. Whisk in flour and continue to cook for about 2 minutes. Slowly whisk milk into the roux. Whisk constantly to combine the mixture and prevent milk from burning. Continue to cook the mixture until it thickens, about 10 minutes. Whisk sauce occasionally.

Once the sauce has thickened reduce the heat to low. Add the cheese to the sauce, stir to combine. Season the sauce with salt, chili and garlic powder.

Fold cooked macaroni to the sauce to coat. Transfer the mixture to your prepared baking dish. Set aside.

In a small bowl mix together breadcrumbs and melted butter. Sprinkle the mixture over the macaroni and cheese. Bake for 25 minutes until the top is golden and the macaroni and cheese is bubbling.

Adapted from Seasons and Suppers

You may also like…

Homemade Lasagna
Chicken Pot Pie
« Previous Page
Next Page »

Primary Sidebar

Danielle at Home

Hi, I’m Danielle. I am a twenty something woman working her office job by day and blogging at night! I’m married, a new home owner and I love sharing all my favourite things on this blog. So grab a glass of wine and follow along. I’m so glad you’re here!

SUBSCRIBE & FOLLOW

Pinterest
Instagram
Facebook
Twitter

Footer

Copyright © 2025 Danielle at Home on the Foodie Pro Theme