• Skip to primary navigation
  • Skip to main content
  • Skip to primary sidebar
  • Skip to footer

DANIELLE AT HOME

  • HOME
    • About
    • Contact
  • LIFESTYLE
    • Favourites
    • Goals
    • Home
      • DIY Projects
      • Organization
    • Holidays
      • Christmas
      • Easter
      • Halloween
      • New Years
      • Thanksgiving
      • Valentine’s Day
      • Gift Guides
  • STYLE
  • WELLNESS
  • FOOD + DRINK
    • Appetizers
    • Breakfast
    • Dessert
    • Drinks
    • Side Dishes
    • Snacks
    • Holiday Recipes
      • Christmas
      • Cinco De Mayo
      • Easter
      • Father’s Day
      • Halloween
      • Mother’s Day
      • New Years
      • St. Patrick’s Day
      • Thanksgiving
      • Valentine’s Day

Main Dish

Easy Chicken Soup

October 11, 2018 by Danielle 2 Comments

IMG_20180929_142036

For the last two weeks my husband has been nursing a horrible cold. Like most men he really struggles when he gets sick. I’ve been pumping him full of fluids, and comforting nutritious foods. Including chicken soup.

For a long time he hated soup, honestly he still kind of does. I of course love soup and could eat it all fall and winter long. Especially when I get sick. So naturally when I found out he was a soup hater I questioned our entire relationship (kidding!). Actually I was determined to find soup that he would actually enjoy. I now have a few soup recipes in my arsenal that he enjoys. Luckily my Chicken Soup is one of the recipes he enjoys and it’s perfect for a bad cold!

IMG_20180929_142053

This recipe is super easy and you probably have all the ingredients in your fridge right now. It’s actually easy enough that you could make it while you’re sick.

I roasted the chicken for this soup, but you could use leftover cooked chicken instead. I also recommend cooking your noodles first instead of cooking them in the soup. Cooking them in the broth makes them soggy and they soak up too much of the broth. You can also switch up the vegetables based on what you have on hand.

Give this recipe a try next time you get sick.
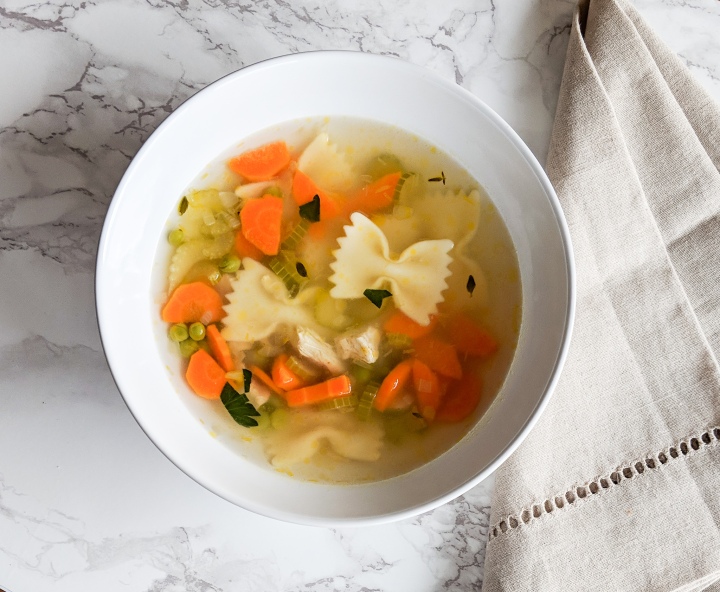
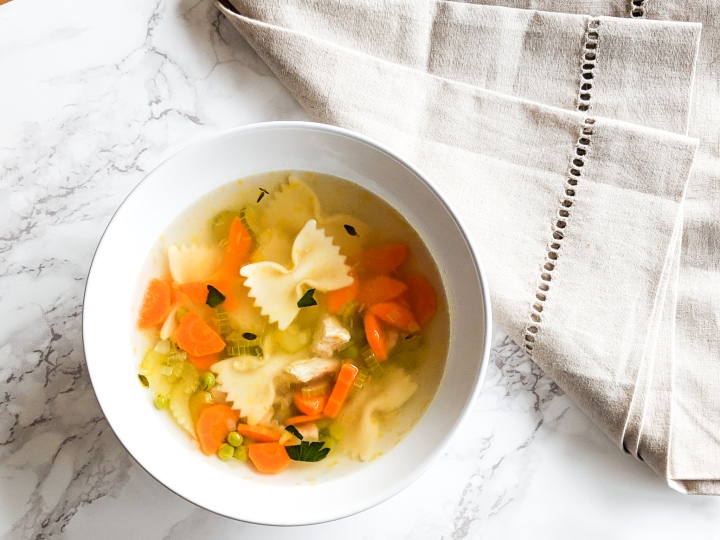
IMG_20180929_142032

Easy Chicken Soup

Yields: 10 Servings

Ingredients:

  • 2 Cups Uncooked Short Cut Pasta (Shells, macaroni, bow-tie etc)
  • 2 Tbsp Olive Oil
  • 1 Garlic Clove
  • 1/2 Medium Yellow Onion, diced
  • 2 Stalks of Celery, diced
  • 3 Carrots, diced
  • 2 Chicken Breasts
  • 10 Cups Low Sodium Chicken Broth
  • 1 Tsp Thyme, fresh
  • Salt and Pepper to taste
  • Optional: 2/3 Cup Frozen Peas

Directions:

Preheat the over to 400°F. Place chicken on a sheet pan lined with parchment paper. Season the chicken with salt and pepper, bake for 30 minutes or until the internal temperature reached 165°F. Dice chicken and set aside.

While the chicken cooks bring a large pot of water to a boil and cook the pasta according to package directions. Drain and set aside.

In the same large pot heat olive oil over medium-low heat. Add onions and cook for 2-3 minutes. Season with salt and pepper to taste. Add garlic, carrots and celery, cook for 4 minutes. Add broth to the pot and bring to a simmer.

Stir in chicken, frozen peas and thyme. Continue to simmer the soup for 5 minutes. Stir pasta into the soup just before serving.

This soup will keep in the fridge for 3-4 days, or it can be stored in the freezer for up to 3 months.

Adapted from, Fraiche Nutrition.

You may also enjoy…

IMG_20180930_182444

Chicken Pot Pie

IMG_20180914_142616

Slow Coker Vegetarian Chili

Chicken Pot Pie

October 4, 2018 by Danielle 1 Comment

IMG_20180930_182444

My husband has been begging to make Chicken Pot Pie for months now, but I just couldn’t bring myself to make it during the hot summer months. This past Sunday the skies were grey and the air was cold. It seemed like the perfect day to finally make this delicious comfort food. And believe me it did not disappoint, he hasn’t stopped talking about how delicious it was!

Now I know Chicken Pot Pie can be a big intimidating since you have to make the crust, but really just remember to keep your dough cold and I promise you will be fine. Check out my tips for pie in this post.

IMG_20180930_181126

This recipe would also be perfect to make use of Thanksgiving leftovers. Canadian Thanksgiving is coming up this weekend and using all your leftover turkey in the pot pie would be delicious! It actually might be better then your turkey dinner.

This dish is also perfect when you need to bring someone a homemade meal. It’s perfect to bring a new mom ore someone who needs a little extra love. It’s warm and comforting and bring everyone a bit of joy. I hope you and your family enjoy it too.

IMG_20180930_182448

Chicken Pot Pie

Yields: 1 9 inch Pie

Ingredients:

Crust:

Crust:

  • 2 2/3 cups All Purpose Flour
  • 1 teaspoon salt
  • 1/2 cup Vegetable Shortening, cold
  • 1/2 cup Unsalted Butter, cold
  • 8 to 12 tablespoons ice water
  • Egg, beaten

Filling:

  • 3 Chicken Breasts
  • 1 Cup Carrots, sliced (2 large carrots)
  • 1/2 Cup Celery, sliced (2 stalks)
  • 1/3 Cup Butter
  • 1/2 Large Onion, chopped
  • 1 Large Garlic Clove, minced
  • 1/4 Cup All Purpose Flour
  • 1 3/4 Cup Chicken Broth
  • 2/3 Cup Milk (I used 2%, but any kind will work)
  • 1 Cup Frozen Peas
  • 1 Tsp Salt
  • 1/2 Tsp Black Pepper
  • 1 Tsp Fresh Thyme, chopped

Directions:

In a large bowl mix the flour and salt. Add the cold butter and shortening. Cut the butter and shortening into the flour mixture using a pastry cutter or two forks until the chunks of butter and shortening are the size of small peas.

Drizzle in the ice water and stir the mixture to bring the dough together. Continue to add water until the dough starts to clump and form a ball. Form the dough into a ball. Cut dough in half and form each half into discs. Wrap each disc tightly in plastic wrap, and chill in the fridge for at least 1 hour.

Preheat your oven to 450°F. Place the chicken breasts on a baking sheet and bake in the oven for 20 minutes or until the internal temperature of the chicken reaches 165°F. Set aside to cool.

In a large sauté pan melt the butter over medium low heat. Add the onions and garlic to the butter and cook for 2-3 minutes. Season onions and garlic with salt and pepper. Add carrots and celery, cook for 4-5 minutes.

Add flour to the pan to create a roux. Cook the flour for 2-3 minutes to prevent the filling from having a floury taste. Slowly add chicken broth to the roux, stirring constantly to prevent lumps. Once fully combined add the milk to the pan. Simmer the sauce until it become thick and coats the back of the spoon, about 5 minutes.

Chop the cooled chicken breasts. Add the chicken, frozen peas and thyme to the sauce and stir to combine. Set mixture aside.

Preheat the oven to 425°F. Remove your dough from the fridge. Roll out the pie dough into two discs. Carefully line your pie plate with one of the rolled out halves of dough. Pour the filling into the pie plate. Carefully place the top layer of dough on the filling. Using a fork or your fingers seal the edges of the pie dough. Cut a few slits in the top crust to allow steam to escape. Brush the top of the pie with the beaten egg.

Bake the pie for 30-40 minutes until the crust is golden brown. Set the pie aside to cool for 15 minutes before serving.

Adapted from Grandma’s Berry Pie and Sally’s Baking Addiction.


You may also like…


IMG_20180914_142616

Slow Cooker Vegetarian Chili

Slow Cooker Vegetarian Chili

September 25, 2018 by Danielle Leave a Comment

IMG_20180914_142616

I’ve been trying to cook less during the week. Life is just so busy and there aren’t enough hours in the day to get everything accomplished. So I’ve been cooking big batches of food and reheating leftovers. Making up pans of lasagna and enchiladas to get us though busy weeknights. Of course another great time saver is the slow cooker. I will admit I don’t utilize mine as much as I should. I mostly use mine to batch cook soups, stews and sauces. It really is satisfying to come home from work and smell dinner cooking away.

One of my favourite recipes for the slow cooker is vegetarian chili. I love this recipe because it’s cheap, it’s easy and it’s flavourful. This recipe doesn’t require browning or sautéing. You can literally just dump everything in the slow cooker and let it do it’s thing.

IMG_20180914_142559

For this chili recipe all you have to do is chop your vegetables, blend one can of tomatoes and add everything to the slow cooker. It really is crazy how simple that is.

Once your chili is ready it’s time to add toppings! I like sour cream, cheddar cheese and green onion. Tortilla chips or Fritos (YUM!) are also great on top. I also like to serve my chili with a bun or some cornbread to round out the meal.

It’s seriously so delicious and couldn’t be easier! It also screams fall and football Sundays. I love throwing all the ingredients in the slow cooker running my Sunday errands, going on our weekly walk and coming home to a perfect Sunday dinner. A perfect Sunday dinner that makes enough leftovers for Monday and even more for your freezer! I mean isn’t that what we all need?

IMG_20180914_142557.jpg

Slow Cooker Vegetarian Chili

Yields: 8 servings

Ingredients:

  • 1 White Onion, diced
  • 2 Carrots, diced
  • 2 Stalks of Celery, diced
  • 1 Red Pepper, chopped
  • 4 Cloves of Garlic, minced
  • 1 Chipotle in Adobo Sauce, chopped
  • 2 Tsp Adobo Sauce
  • 2 15 oz Cans Fire Roasted Tomatoes
  • 1 15 oz Can Red Kidney Beans, rinsed
  • 1 15 oz Can Black Beans, rinsed
  • 1 15 oz Can Pinto Beans, rinsed
  • 1 Cup Frozen Corn
  • 1 Cup Low Sodium Vegetable Broth
  • 3 Tbsp Chili Powder
  • 2 Tbsp Ground Cumin
  • Salt & Pepper to taste

Directions:

Chop onion, carrots, celery, red pepper, garlic and chipotle pepper. Add to the slow cooker. Pulse one can of the tomatoes in a food processor or blender until tomatoes break down and the mixture is thick. Add the pulsed tomatoes and the can of un pulsed tomatoes to slow cooker. Drain and rinse kidney beans, black beans and pinto beans. Add beans and corn to the slow cooker. Add vegetable broth, adobe sauce, chili powder and cumin to the slow cooker. Cook on low for 8 hours, or high for 4 hours. Before serving add salt and pepper if needed.


You may also like…

IMG_3554

Cheddar Drop Biscuits

IMG_20180916_094102

Skillet Cornbread


Korean BBQ Beef

September 13, 2018 by Danielle Leave a Comment

IMG_4152

My favourite thing to order at our local Korean restaurant is BBQ beef. I love to make it at home because ground beef is cheap, it’s delicious and only takes 20 minutes to make. This recipe has become a weeknight staple in my house.

IMG_4149.jpg

The sauce for the beef is made of just a few simple staples. Soy sauce, sugar, sesame oil, garlic and ginger. It seriously could not be simpler. I like to serve this over rice with a side of steamed snap peas.

IMG_4151

Korean Beef

Yields: 4 Servings

Ingredients:

  • 3 Tbsp White Sugar
  • 1/4 Cup Reduced Sodium Soy Sauce
  • 2 Tsp Sesame Oil
  • 1/2 Tsp Red Pepper Flakes
  • 1/4 Tsp Grated Ginger
  • 2 Cloves Garlic, minced
  • 1 Pound Extra Lean Ground Beef
  • 2 Green Onions, thinly sliced

Directions:

In a small bowl mix together sugar, soy sauce, sesame oil, red pepper flakes, ginger and garlic. Heat a nonstick fry pan over medium high heat. Brown beef in until cooked through, drain excess fat. Add sauce and green onions to the pan and allow to simmer for 2 minutes. Serve immediately.

Adapted from, Damn Delicious

You may also like…


IMG_3482

Greek Turkey Burger


IMG_3592

BBQ-less BBQ Chicken

BBQ-less BBQ Chicken

August 21, 2018 by Danielle 2 Comments

IMG_3581

This is the best BBQ chicken I have ever had. They are tender and flavourful and you don’t even need a barbecue.

I use chicken thighs in this recipe since I’m convinced they are impossible to overcook. I also use a sheet pan with a baking sheet on it to crisp the outside of the thighs. This also renders off the excess fat in the thighs.

IMG_3592

You could also of course use your barbecue for this recipe, but I like the convenience of using the oven. Plus you can enjoy it year round!

So are you team barbecue or oven?

Servings: 4

Ingredients:

  • 1 Pound Boneless Skinless Chicken Thighs
  • 2 Teaspoons Garlic Powder
  • 2 Teaspoons Onion Powder
  • 1 Teaspoon Chilli Powder
  • 1/2 Teaspoon Salt
  • 1/4 Teaspoon Fresh Ground Black Pepper
  • 1 Cup BBQ Sauce (my favourite)

Directions:

Preheat the oven to 400°F. Place a cooling rack on a sheet pan and grease the cooling rack with non stick spray.

Mix together garlic powder, onion powder, chilli powder, salt and pepper. Season the chicken thighs on both sides. Place chicken thighs on the cooling rack. Bake the the chicken thighs for 2o minutes, flipping half way through.

Remove chicken from the oven and baste the chicken thighs on one side with BBQ sauce. Bake for 5 minutes. Flip the chicken and baste the other side of the chicken with BBQ sauce. Repeat the process two more times.

Allow chicken to rest for 10 minutes before serving.


You might also like…

IMG_3578

Kale Caesar Salad

IMG_3130

The BEST Chicken Marinade

IMG_3126

Lemon Parmesan Green Beans


Greek Turkey Burgers

August 7, 2018 by Danielle Leave a Comment

These burgers are amazing! They are based on a burger served at a local gourmet burger restaurant. These have feta cheese, red onion and oregano. They are flavourful and juicy.

IMG_3482

I serve these burgers on a wheat bun with arugula, cucumbers and tzatziki. I love the mix of a warm juicy burgers with the fresh crunch of the cucumber and the cool creamy tzatziki.

These are delicious on there own or served with lemony greek potatoes and greek salad.

IMG_3497

So do you like a traditional burger or a twist on a classic?

Servings: 4

Ingredients:

  • 1 Pound Lean Ground Turkey
  • 1/4 cup Breadcrumbs
  • 1 Egg, beaten
  • 1/4 cup Feta Cheese, crumbled
  • 2 Tablespoons Olive Oil
  • 1/2 Teaspoon Oregano
  • 1/2 Teaspoon Salt
  • 1/4 Teaspoon Pepper
  • 4 Whole Wheat Hamburger Buns
  • Sliced Cucumber
  • Arugula
  • Tzatziki

Directions:

Mix together turkey, breadcrumbs, egg, feta cheese, oil, oregano, salt and pepper. Form mixture into 4 patties. Heat a fry pan or grill over medium heat. Cook the burgers 7 minutes per side until the centre of the patty reaches 165°

Place the burgers on the buns and top as desired.

« Previous Page
Next Page »

Primary Sidebar

Danielle at Home

Hi, I’m Danielle. I am a twenty something woman working her office job by day and blogging at night! I’m married, a new home owner and I love sharing all my favourite things on this blog. So grab a glass of wine and follow along. I’m so glad you’re here!

SUBSCRIBE & FOLLOW

Pinterest
Instagram
Facebook
Twitter

Footer

Copyright © 2025 Danielle at Home on the Foodie Pro Theme