• Skip to primary navigation
  • Skip to main content
  • Skip to primary sidebar
  • Skip to footer

DANIELLE AT HOME

  • HOME
    • About
    • Contact
  • LIFESTYLE
    • Favourites
    • Goals
    • Home
      • DIY Projects
      • Organization
    • Holidays
      • Christmas
      • Easter
      • Halloween
      • New Years
      • Thanksgiving
      • Valentine’s Day
      • Gift Guides
  • STYLE
  • WELLNESS
  • FOOD + DRINK
    • Appetizers
    • Breakfast
    • Dessert
    • Drinks
    • Side Dishes
    • Snacks
    • Holiday Recipes
      • Christmas
      • Cinco De Mayo
      • Easter
      • Father’s Day
      • Halloween
      • Mother’s Day
      • New Years
      • St. Patrick’s Day
      • Thanksgiving
      • Valentine’s Day

Easter

Sun-dried Tomato Spinach and Goat Cheese Quiche

April 12, 2019 by Danielle Leave a Comment

Flavourful springtime quiche

IMG_20190315_162001-2.jpg

Is your family more of an Easter brunch or Easter dinner family? We’re both lol! I love quiche for brunch. I’m a fan of a savoury brunch over sweet. I picture servings this quiche with a simple salad, or my lemon parmesan green beans. Add some homemade cinnamon buns, fresh fruit and yogurt with granola to really round out the buffet.

And if you need a dessert for Easter how about carrot cake cupcakes?

Now lets get into this delicious quiche recipe!

IMG_20190315_162001IMG_20190315_162731

This quiche starts with my grandma’s classic pie dough recipe. You’ve seen it before for my chicken pot pie and my grandma’s famous berry pie! Today we’re using half of her recipe as the base of our crust.

The base of this quiche is so simple; just eggs and milk!

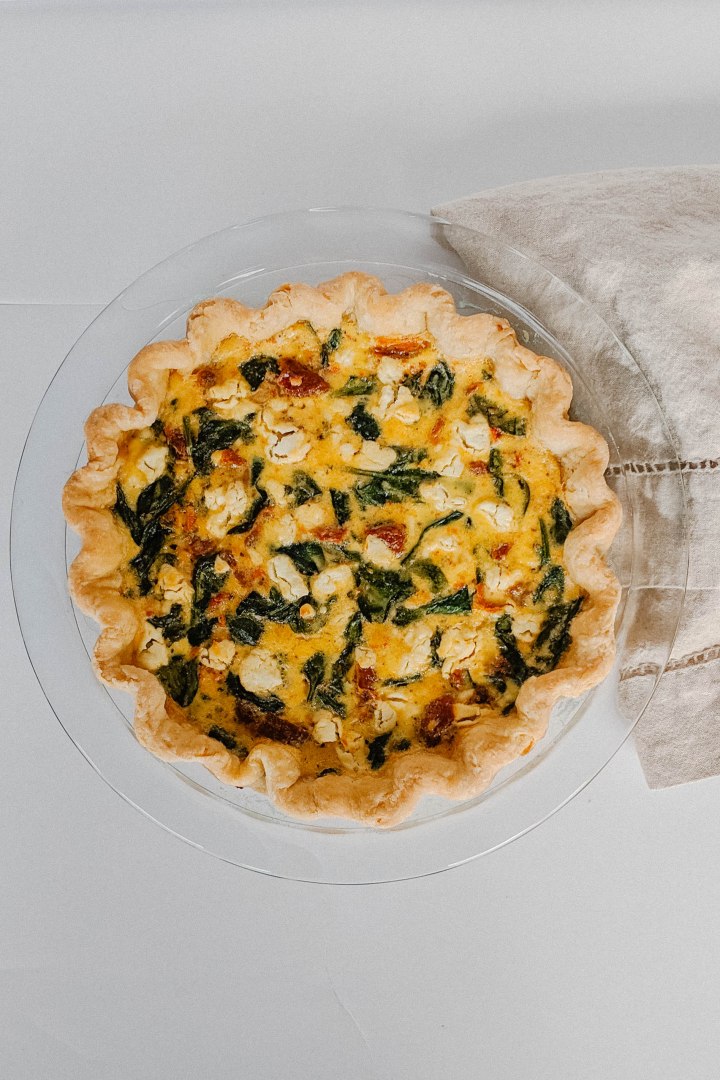
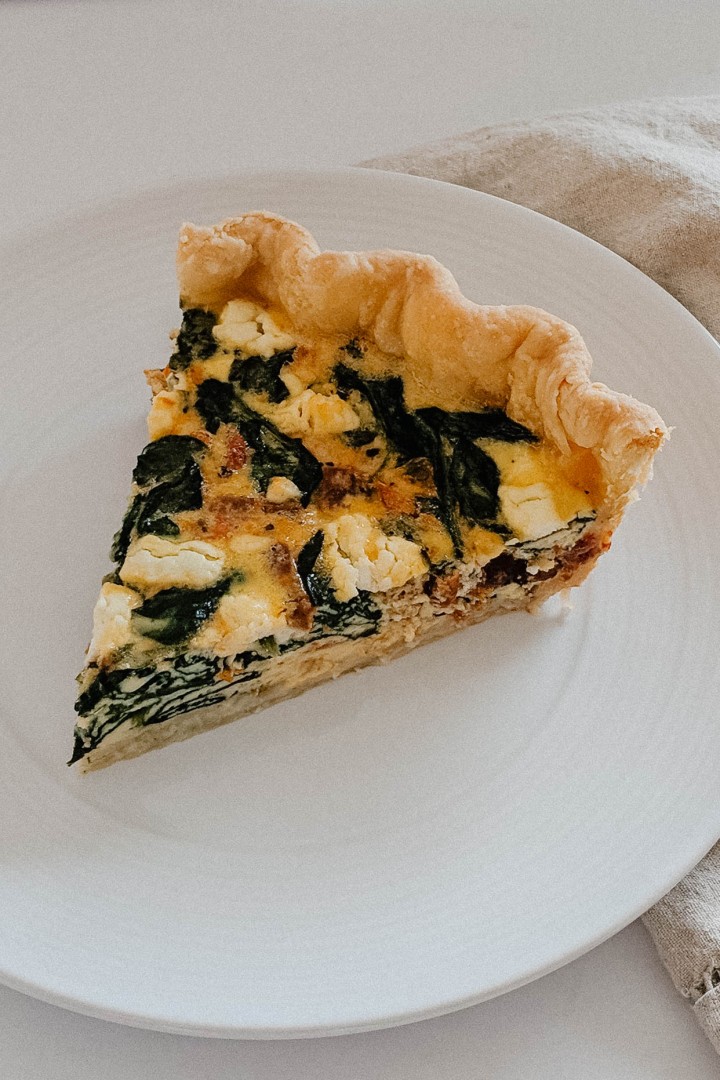
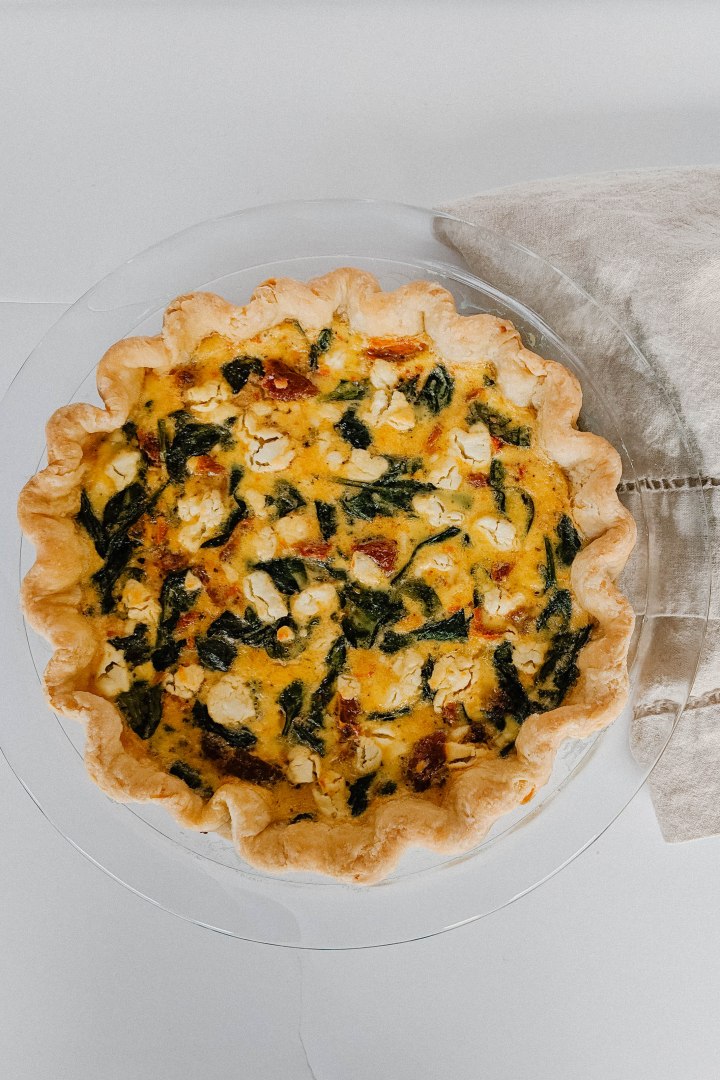
To flavour the quiche we are adding garlic, sun-dried tomatoes, spinach and crumbled goat cheese. Such a yummy combination.

After blind baking the pie shell pour the filling into the shell and bake,

Once baked this quiche is great cold or warm. Super delicious! And entertaining worthy!

IMG_20190315_161951.jpg

Sun-dried Tomato Spinach and Goat Cheese Quiche

Yields: 6 servings

Ingredients:

Pie Dough:

  • 1 1/3 cups All Purpose Flour
  • 1 tsp Salt
  • 1/4 cup Vegetable Shortening, cold
  • 1/4 cup Unsalted Butter, cold
  • 4 to 8 tbsp Ice Water

Filling:

  • 1 tsp Butter
  • 2 Garlic Cloves, minced
  • 2 cups Spinach
  • 4 Eggs
  • 1 cup Whole Milk
  • 1/3 cup Sun-dried Tomatoes, drained and chopped
  • 4 ounces Goat Cheese, crumbled
  • Salt & Pepper, to taste

In a medium bowl whisk together flour and salt. Using a pastry cutter cut butter and shortening into flour until combined and mixture resembles peas and sand. Slowly add ice water one tablespoon at a time until a ball forms. Form into a disk, wrap in plastic wrap and store in the fridge for at least an hour.

Preheat oven to 350°F.

Roll pastry into a 9 inch disk. Line your pie dish. Crimp the edges of the crust. Prick the crust with a fork. Place a piece of parchment paper over the crust. Fill with dry beans or pie weights. Bake for 10 minutes. Remove from the oven and allow to cool.

In a fry pan over low heat add butter, spinach and garlic. Sauté until it spinach begins to wilt. Place in a small bowl to cool.

In a large bowl whisk together eggs and milk. Add sun-dried tomatoes, spinach, goat cheese, salt and pepper to the egg mixture. Fold together. Pour filling into pie shell.

Bake for 45-60 minutes until the crust starts to brown and the centre of the quiche is set. Allow to cool slightly before serving, 5-10 minutes.

Adapted from Sally’s Baking Addiction and Danielle at Home.

Carrot Cake Cupcakes with Cream Cheese Frosting

April 10, 2019 by Danielle 6 Comments

The BEST carrot cake cupcakes with tangy cream cheese frosting!

IMG_20190330_161913

Ok everyone today were taking carrot cake! Any carrot cake fans out there? I’m such a big fan. One of my wedding cake flavours was ever carrot cake. It was insanely delicious!

I make carrot cake every year for Easter which means my Uncle gets a chance to make the same joke every year. “Danielle did you grate the carrots?” Yep the joke is getting old but the cake is not.

I’ve experimented extensively with carrot cake over the years, nuts, no nuts, pineapple, yogurt, coconut etc etc etc. But the recipe I’m sharing today is a classic carrot cake. I like serving it as cupcakes because we tend to do dessert buffets at Easter and I think cupcakes are better for that. Also layered cakes are a ton of work so I tend to save them for birthdays.

IMG_20190330_161959IMG_20190330_161909IMG_20190330_162419

For my carrot cake I got nut free in the base. The cupcakes pictured are topped with nuts but you could skip that if you want. There are nut allergies in my husbands family and mine so we tend to keep our gatherings nut free. Hence why you wont find a tone of desserts containing nuts on my site.

All carrot cake recipes require some sort of moistening ingredient. I’ve used greek yogurt, apple sauce and crushed pineapple. My favourite is sour cream. For a super moist classic carrot cake this is a must.

As for the frosting I always make cream cheese frosting. I follow a 2:1 ratio of cream cheese to butter ratio. From there I add confectioner sugar and vanilla until the flavour and consistency is just right.

Now no more stalling lets get to this recipe! I know you’ll want it on your table at Easter!

IMG_20190330_162201.jpg

Carrot Cake Cupcakes and Cream Cheese Frosting

Yields: 12 cupcakes

Ingredients:

Carrot Cake:

  • 1 1/4 cups All Purpose Flour
  • 1 tsp Baking Powder
  • 1/2 tsp Baking Soda
  • 1/2 tsp Salt
  • 1 tsp Cinnamon
  • 1/2 tsp Ground Ginger
  • 1/4 tsp Nutmeg
  • 1/4 tsp Cloves
  • 1/2 cup Vegetable Oil
  • 1 cup Brown Sugar, lightly packed
  • 2 Eggs
  • 1/3 cup Sour Cream
  • 1 tsp Vanilla Extract
  • 2 Medium Carrots, grated

Cream Cheese Frosting:

  • 8 ounces Cream Cheese, softened
  • 1/2 cup Butter, softened
  • 3 cups Confectioner Sugar (more if needed for texture)
  • 1 tsp Vanilla Extract

Directions:

Preheat oven to 350°F. Line 12 count muffin tin with liners.

In a medium bowl whisk together flour, baking powder, baking soda, salt and spices. Set aside. In the bowl of your stand mixer beat vegetable oil and brown sugar until combined. Add eggs and mix on high until combined. Add sour cream and vanilla, continue to mix until combined.

Add dry ingredients to wet and mix on low until just combined. Add grated carrots and fold into batter. Fill muffin tins 3/4 of the way full.

Bake for 20-25 minutes until a toothpick comes out clean. Allow to cool completely before frosting.

Beat cream cheese and butter on high until fluffy. Add confectioners sugar and vanilla, beat on low until combined and fluffy. Once cupcakes are cool, frost and enjoy!

Adapted from Sally’s Baking Addiction.

Scalloped Potatoes

April 5, 2019 by Danielle Leave a Comment

The perfect Easter side dish.

IMG_20190317_172403

Ok this recipe is a real winner. Scalloped potatoes are so yummy. I didn’t grown up eating scalloped potatoes with Easter dinner. My Grandma hates cheese (crazy right?!) so a potato dish covered in cheese just wasn’t on our table. But in my house we love cheese and potatoes and my hubby loves anything smothered in a creamy sauce. That means this recipe is a serious winner!

Layers of potatoes smothered in a creamy sauce , sautéed onions and more cheese than your diet would ever allow. This is comfort food people. It’s for special occasions not everyday.

IMG_20190317_172243IMG_20190317_172536

I’ve got a few tips for making this recipe and then we can get into making (and eating) this deliciousness!

Ok first things first cut those potatoes thin! As thin as you can. Personally I use a mandolin. They are really great at this job. This is the one I have. I love it because its small but effective. I use setting number two!

Secondly the type of potato. You can use russets but I like using a yellow potato. They hold their shape better after a long cook time and overall I prefer their flavour.

Slow cook your onions. This is a must! I’m super impatient but for this dish you can rush cooking your onions. You want them soft, translucent and not even a little brown. If they brown they will discolour your cream sauce.

Layering. Add sauce and cheese in between each layer of potatoes. Now depending how thin you cut your potatoes you will have approximately 4-6 layers of potatoes. Spoon a small about of sauce over each layer and sprinkle a small amount of cheese over each layer.

Now lets get into this delicious recipe!

IMG_20190317_172358.jpg

Scalloped Potatoes

Yields: 12 servings

Ingredients:

  • 3 tbsp Butter
  • Yellow Onion, thinly sliced into half moons
  • 4 Garlic Cloves, minced
  • 1/4 cup All Purpose Flour
  • 1 cup Vegetable Broth (you can use chicken)
  • 2 cups Milk (I use 2%)
  • 1 1/2 tsp Salt
  • 1/2 tsp Pepper
  • 1 tsp Fresh Thyme, chopped
  • 4 pounds Yellow Potatoes, peeled and sliced 1/8 inch thick
  • 2 cups Old Cheddar Cheese, grated
  • 1/2 cup Fresh Parmesan Cheese, grated

Directions:

Preheat oven to 400°F.

In a large sauté pan melt butter over medium low heat. Add onions sauté until soft and translucent, about 6-7 minutes. Add garlic and cook until fragrant. Add flour to the pan. Cook flour and onions for about a minute. Slowly add vegetable stock, stir constantly until a thick but smooth sauce forms. Slowly add milk to sauce, stir until smooth. Add salt, pepper and thyme. Cook over low heat for 5 minutes to thicken slightly. Set aside.

Line a 13×9 inch baking dish with a layer of potatoes. Top with 1/3 cup sauce (approx.) and onions. Sprinkle 1/4 cup cheese over sauce. Continue to layer potatoes until complete. Pour the remaining sauce over the top layer of potatoes. Sprinkle with remaining cheese.

Cover pan with foil and bake for 30 minute. Remove foil and bake for an additional 30-40 minutes until the top is brown and the potatoes are cooked though.

Remove from the oven and let cool for 5 minutes before serving. Top with additional thyme and cheese if desired.

Recipe adapted from Gimme Some Oven.

Scalloped Potatoes copy

Garlic and Thyme Roast Potatoes

December 4, 2018 by Danielle 1 Comment

IMG_20181123_183128

Ok so I know these aren’t the prettiest pictures, but this is an amazing recipe so I had to share it anyway. This recipe is for a classic English roast potato, kicked up a notch with garlic and thyme. They were so tasty!

This is a riff on my Mom’s roast potatoes. She always makes them with roast beef dinner and they are amazing! She even get chunks of beef fat from the butcher to roast her potatoes in… just like her mom did. Personally that’s a bit much or me. Plus I like to try to make as many side as I can vegetarian, so everyone can enjoy.

I like to use half butter and half olive oil to roast my potatoes. This way you get delicious flavour from the butter, but a slightly higher smoke point for the oil. This will help stop things from burning. And both make for a crispy potato! Yum!

IMG_20181123_183424_1.jpg

This recipe calls for russet potatoes.. I have not experimented with any other type of potato. This is what my mom and Grandma used, so why mess with a good thing?

The most important part about working with potatoes is to let them steam in the colander after cooking,  this is the only way you will get crispy potatoes.

The second rule of this recipe is patience. These potatoes roast for an hour and a half! Yes they do! It takes a long time to get the texture of a signature roast potato! Believe me when I say it is so worth the wait. Patience is a virtue right…. And believe me it will all be worth it!

IMG_20181123_183131

Garlic and Thyme Roast Potatoes

Serves: 6

Ingredients:

  • 5 Russet Potatoes
  • 2 Tablespoons Butter, melted
  • 3 Tablespoons Olive Oil
  • 1 Bunch Thyme
  • 6 Garlic Gloves
  • Salt and Pepper

Directions:

Preheat the oven to 375°F.

In a large pot of salted water, boil potatoes for 8 minutes. Strain potatoes and set aside to steam for 5 minutes.

In a large baking dish or roasting pan add butter and oil (2 tbsp each). Place in your preheated oven for a few minutes until butter is melted (2-5 mins). Remove pan from the oven and add potatoes. Season liberally with salt and pepper, and toss to coat in fat. Roast in the oven for 30 minutes.

In a small bowl place garlic cloves. Tear thyme bunch in half or thirds and add to bowl. Drizzle with oil (about a tbsp). Toss to coat. Remove potatoes from the oven and sprinkle garlic and thyme over the pan. Give the pan a good shake to evenly distribute and return to the oven. Bake for an additional hour.

Remove from the oven and serve immediately…. hopefully with lots of gravy!

Adapted from Jamie Oliver


Baked Macaroni & Cheese

November 20, 2018 by Danielle Leave a Comment

I love all carbs, but noodles are my favourite! I always get cravings for Baked Macaroni and Cheese in the fall and winter. It’s just so comforting. I know the box stuff is convenient but it’s not the same. I have also tried all of those trick for making a single serving in the microwave and I’m sorry but that just wont cut it! Homemade with a roux and cream sauce os the only way!

I have been making homemade Baked Macaroni and Cheese since I was a teenager. In high school I used to make it every Monday night for my brother and I to have for dinner before heading off to dance and soccer. I used a recipe out of one of my mom’s well used cookbooks and would top the whole thing with ritz crackers instead of breadcrumbs. It was good, but even back then I knew it wasn’t perfect.

It was dry, there wasn’t enough cheesy flavour and the noodles were way too soft. For years I didn’t make Baked Macaroni Cheese. There is a store by my house that sells a decent Baked Macaroni and Cheese, so when I need my fix my husband runs out and grabs some (he knows to keep me well fed!). Since it’s just the two of us it seemed like over kill to make a whole pan. But one morning I was watching cooking videos on Youtube and got inspired to perfect my Baked Macaroni and Cheese recipe.

This recipe it perfect. It solved all the issues I had in the past and I really learned a lot about making Baked Macaroni and Cheese.

  1. Undercook your pasta. Always undercook your pasta when making a Baked Macaroni and Cheese. Then you won’t end up with bloated macaroni
  2. Use the strongest and highest quality cheese you can afford. You want to get the most flavour out of your cheese as possible. Find the best old cheddar cheeses you can find, you wont be disappointed.
  3. Make way more sauce then you think you need. The sauce to noodle ratio should alarm you, you should be terrified that your making soup instead of macaroni and cheese. All kidding aside you need a lot of sauce!

If you can remember those three things your Baked Macaroni and cheese will turn out perfect. I hope that this recipe makes it to your table this fall.

Baked Macaroni & Cheese

Yields: 6 servings

Ingredients:

8 Ounces Elbow Macaroni

  • 1/4 Cup Butter
  • 1/3 Cup All Purpose Flour
  • 3 Cups Whole Milk 
  • 8 Ounces Aged Old White Cheddar (crumbled or grated)
  • 4 Ounces Sharp Orange Cheddar Cheese (crumbled or grated)
  • 1/4 Teaspoon Salt 
  • 1/4 Teaspoon Chili Powder
  • 1/8 Teaspoon Garlic Powder

  • 1 Cup Plain Breadcrumbs
  • 2 Tablespoons Butter, melted

Directions:

Cook macaroni according to package directions, but reduce the cook time by 2 minutes. You need very al dente pasta for this recipe. Drain pasta and set aside.

Preheat the oven to 350 °F. Grease an 8 inch baking dish with butter or oil.

In a large sauce pan melt butter over medium heat. Whisk in flour and continue to cook for about 2 minutes. Slowly whisk milk into the roux. Whisk constantly to combine the mixture and prevent milk from burning. Continue to cook the mixture until it thickens, about 10 minutes. Whisk sauce occasionally.

Once the sauce has thickened reduce the heat to low. Add the cheese to the sauce, stir to combine. Season the sauce with salt, chili and garlic powder.

Fold cooked macaroni to the sauce to coat. Transfer the mixture to your prepared baking dish. Set aside.

In a small bowl mix together breadcrumbs and melted butter. Sprinkle the mixture over the macaroni and cheese. Bake for 25 minutes until the top is golden and the macaroni and cheese is bubbling.

Adapted from Seasons and Suppers

You may also like…

Homemade Lasagna
Chicken Pot Pie

Warm Sweet & Salty Rosemary Cashews

November 8, 2018 by Danielle 2 Comments

IMG_20181026_114911

Ok guys the holidays are coming! As I write this we are less then 7 weeks away from Christmas! That’s so crazy! Coming over the next 7 weeks will be lots of Christmas and Thanksgiving recipes. Canadian Thanksgiving may be over, but I know American Thanksgiving is right around the corner and there is some great sides a desserts coming for all my American friends. I also have some bonus posts coming up and even a new series coming in December! The next 7 weeks are going to be jam packed with Holiday content!

Today I’m kicking off my holiday content with a perfect holiday appetizer. These Warm Sweet and Salty Rosemary Cashews are so simple, but make a big impact. I’m all about impressing guests with as little effort as possible. The Holidays are so busy we really don’t need any fussy appetizers. With all the food that gets served on Thanksgiving and Christmas I like to keep things pretty simple. I also love that these can be made in advance and just warmed for a few minutes in the oven on the day of your party!

IMG_20181026_115050

This recipe can be customized to your tastes. Don’t like cashews? Swap in some almonds. Hate the taste of rosemary? Throw a little chili powder in with the butter, sugar and honey mixture. You can really make it your own. I think I may even make a trio of nuts for my next party to go along with a super simple cheese board. How delicious would that be? The possibilities really are endless. Also the possibilities are really delicious and addicting… just saying!

I hope this helps jump start your holiday menu planning!

IMG_20181026_114751

Warm Sweet & Salty Rosemary Cashews

Yields: 8 Servings

  • 1 Pound Raw Unsalted Cashews
  • 2 Tablespoon Unsalted Butter
  • 1 Tablespoon Honey
  • 2 Tablespoon Brown Sugar
  • 2 Tablespoon Fresh Rosemary, finely minced
  • Flakey Sea Salt, to taste

Directions:

Preheat the over to 350°F. Line a rimmed baking sheet with parchment paper or a silicone baking mat.

In a saucepan melt butter, honey and brown sugar over medium-low heat. Once combined remove from heat. Add cashews and stir to coat.

Transfer cashews to the lined baking sheet and spread out into an even layer.Bake cashews for 10 minutes tossing the cashews half way through the cooking time.

Remove from the oven. Add chopped rosemary and sprinkle with sea salt. Toss to combine. Allow to cool for 5 minute before transferring to a serving dish.

Store in an airtight container for up to a week. To re warm the cashews bake in a 300°F oven for 5 minutes.

Adapted from Entertaining with Beth.

« Previous Page
Next Page »

Primary Sidebar

Danielle at Home

Hi, I’m Danielle. I am a twenty something woman working her office job by day and blogging at night! I’m married, a new home owner and I love sharing all my favourite things on this blog. So grab a glass of wine and follow along. I’m so glad you’re here!

SUBSCRIBE & FOLLOW

Pinterest
Instagram
Facebook
Twitter

Footer

Copyright © 2025 Danielle at Home on the Foodie Pro Theme