• Skip to primary navigation
  • Skip to main content
  • Skip to primary sidebar
  • Skip to footer

DANIELLE AT HOME

  • HOME
    • About
    • Contact
  • LIFESTYLE
    • Favourites
    • Goals
    • Home
      • DIY Projects
      • Organization
    • Holidays
      • Christmas
      • Easter
      • Halloween
      • New Years
      • Thanksgiving
      • Valentine’s Day
      • Gift Guides
  • STYLE
  • WELLNESS
  • FOOD + DRINK
    • Appetizers
    • Breakfast
    • Dessert
    • Drinks
    • Side Dishes
    • Snacks
    • Holiday Recipes
      • Christmas
      • Cinco De Mayo
      • Easter
      • Father’s Day
      • Halloween
      • Mother’s Day
      • New Years
      • St. Patrick’s Day
      • Thanksgiving
      • Valentine’s Day

Dessert

Strawberries and Cream Naked Cake

May 8, 2019 by Danielle Leave a Comment

Packed full of berry flavour and perfect for spring.

IMG_0394

Today I am sharing my new favourite cake recipe. It’s pretty fitting to share a cake on your birthday right! Yep it’s my 26th birthday today! This year has gone so fast and I can’t believe I’m turing another year older. Twenty five was a huge year for me, I got married, was in a wedding, attended weddings, saw friends and family become Mamas for the first time, lost my Grandma, changed jobs twice, got asked to be a bridesmaid (again!), made the biggest purchase of my life (more to come on that!) and started this BLOG! This year was big! I’m heading into 26 more confident, wiser, more patient and ready to tackle anything life throws my way. I though it would be hard to say goodbye to this age since 25 was so great, but I’m actually ok with turning another year older. I’m grateful for my life and ready to see what the second half of my twenties has in store.

Now enough about me let’s talk cake! I made this cake with Mother’s day in mind, fun fact we always celebrate my birthday, my grandmas birthday (we’re birthday twins!) and mother’s day all at once. So cake is always the dessert of choice. My grandma was what inspired this pink cake! She loves pink and since mother’s day and her birthday get rolled into one I think she deserves a pink cake. She’s also turning 90 this year, so believe me when I say we are celebrating hard this weekend.

IMG_0370IMG_0422IMG_0373

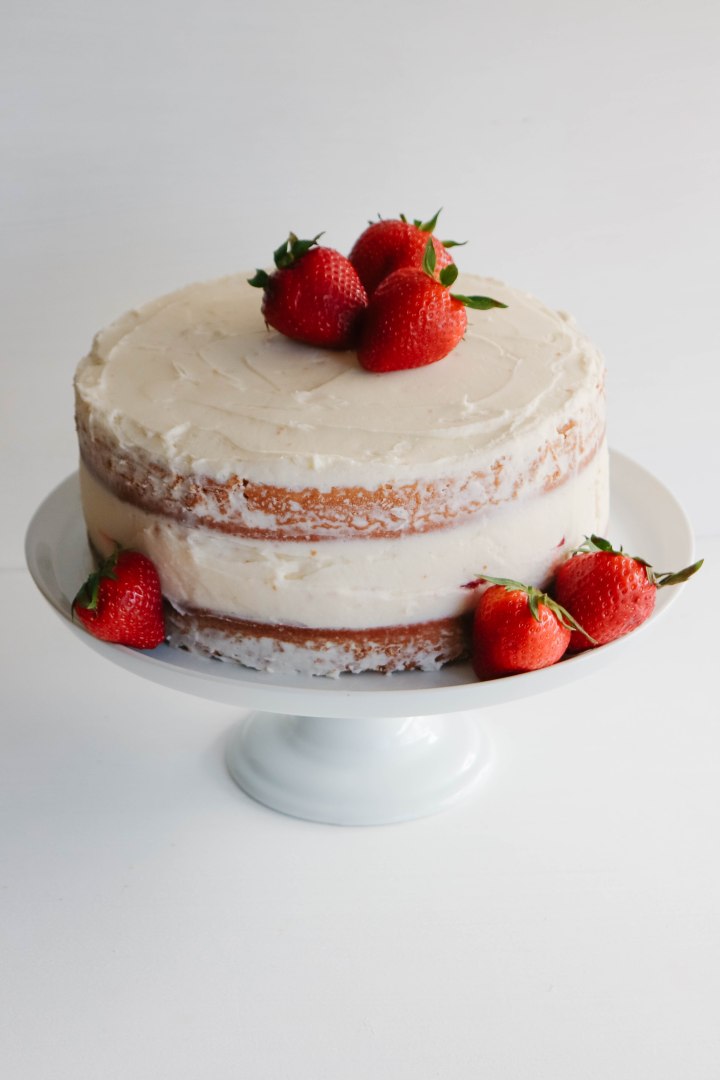
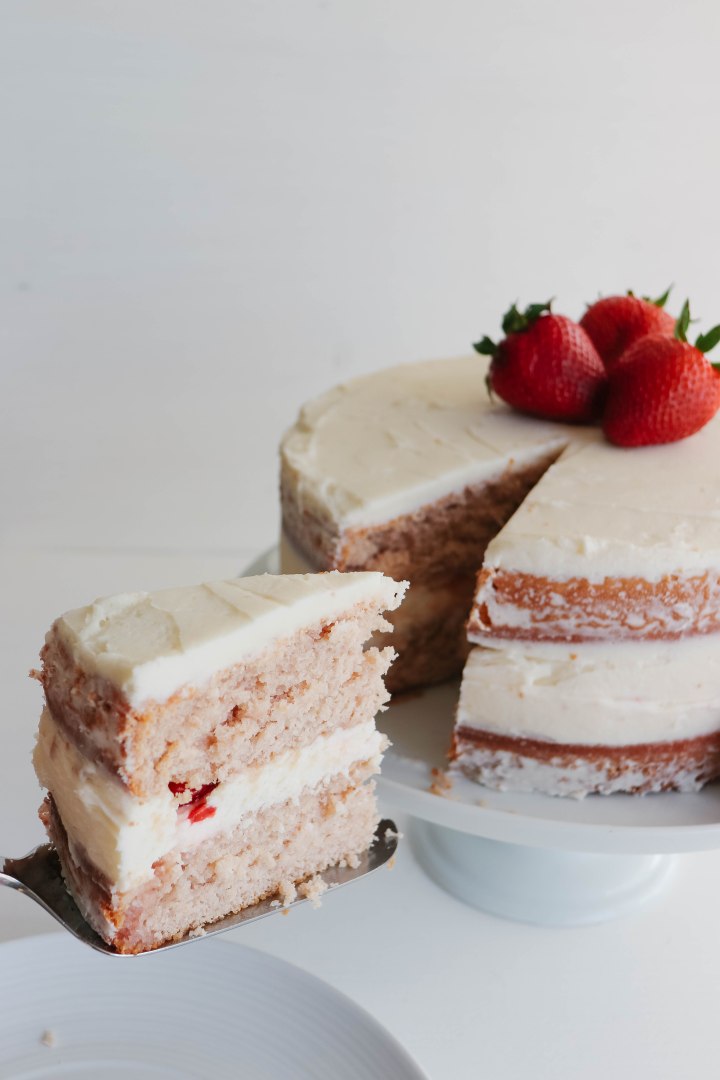
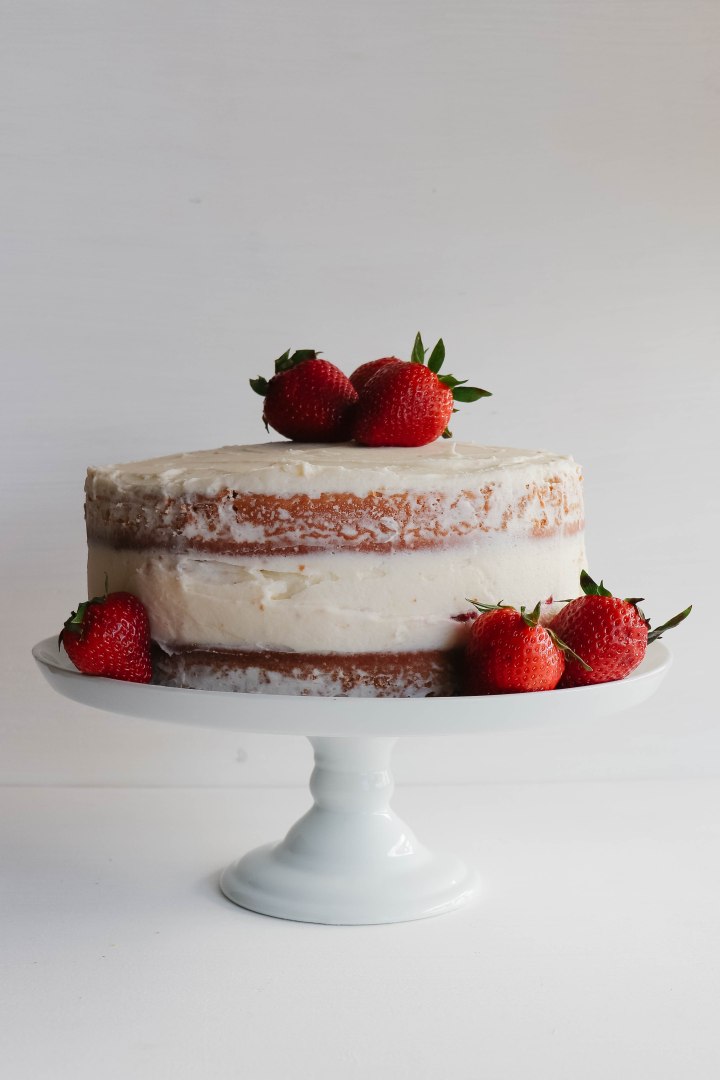
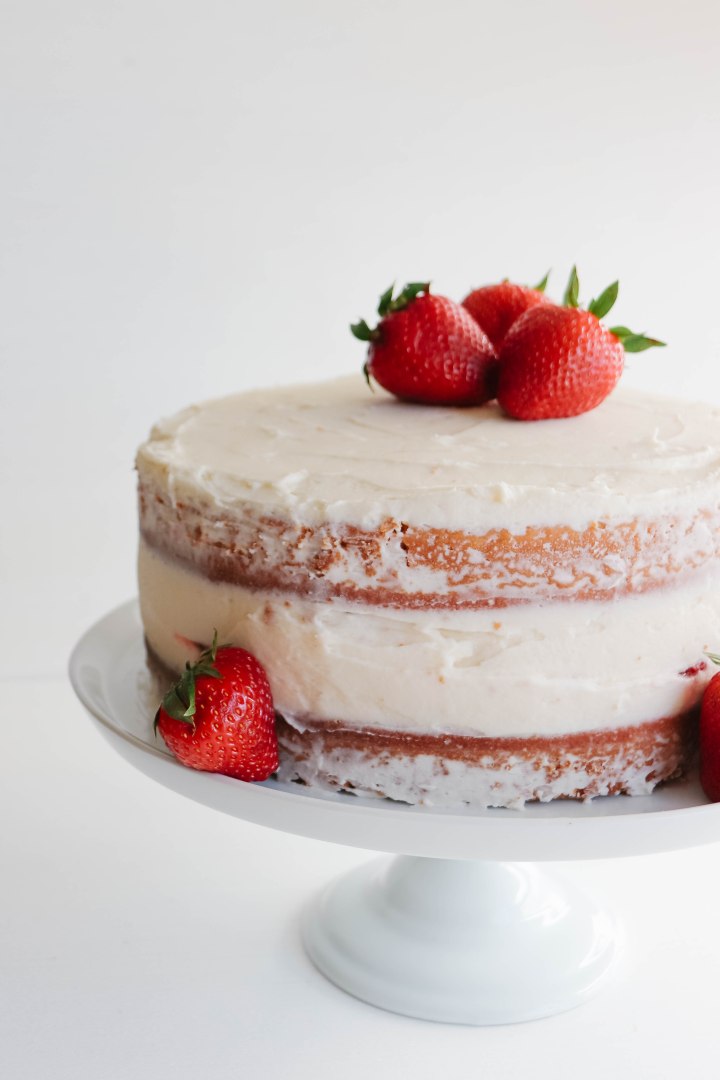
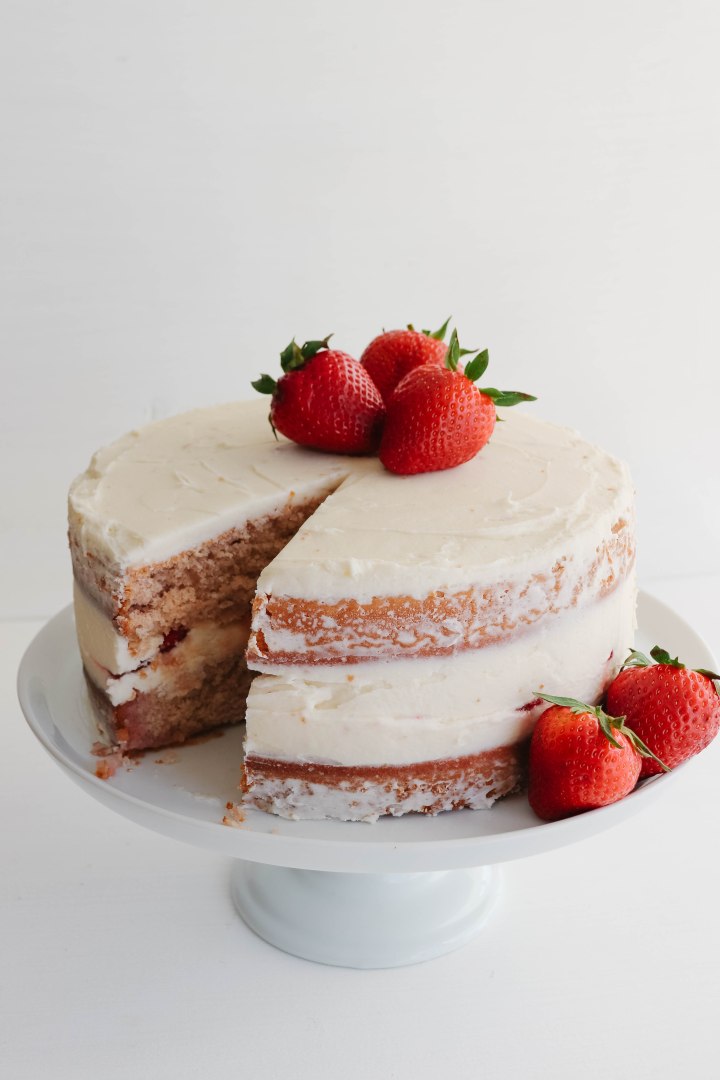
I made this cake a naked cake because I don’t like too much frosting. Plus the actual cake is quite sweet. Between the cake layers and strawberries you really dont need too much buttercream. So let’s break this thing down!

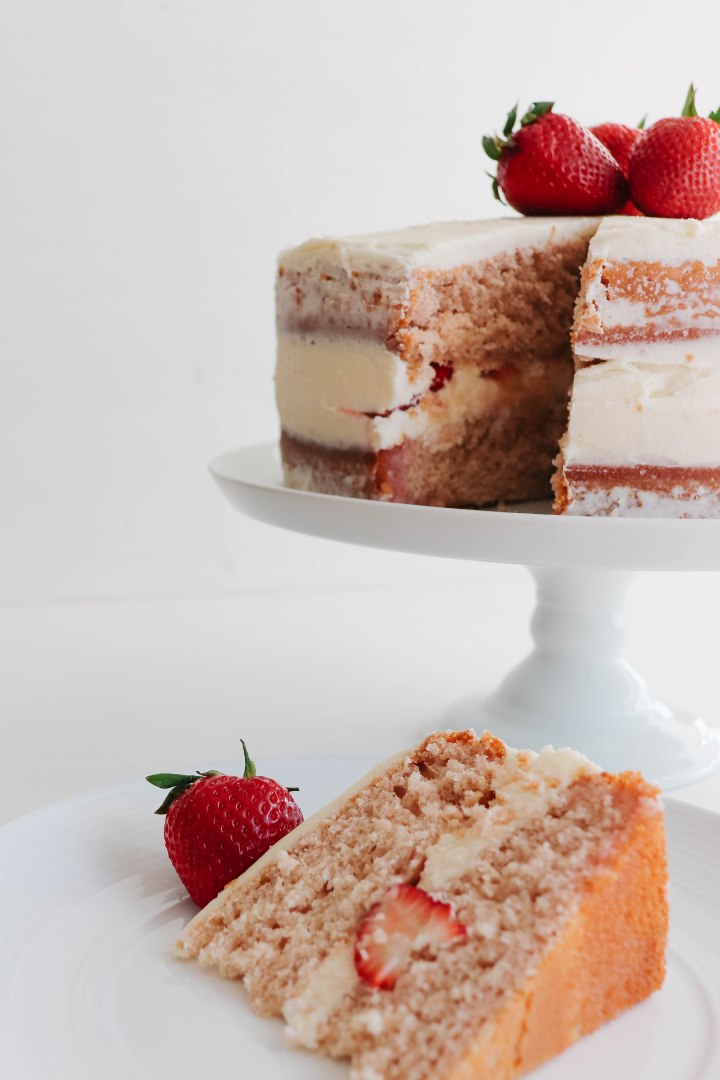
Cake Layers: The cake layers are strawberry flavoured. I use a strawberry purée to flavour the classic vanilla cake layer. This also tints the cake a slight pink colour which is a perfect compliment to the bright white frosting!

Filling: Fresh strawberries! Pretty self explanatory, but you can’t have a strawberry cake without it if you ask me!

Frosting: A classic vanilla frosting! This is always my go to frosting, it’s highly requested in my house! It goes well on just about everything including this cake.

IMG_0431

Ok guys no excuses, this cake is almost as easy as a boxed one, but so much better! Make it for your Momma this Sunday or heck make it in honour of my birthday!! xo

IMG_0437

Strawberry and Cream Naked Cake

Yields: 2 layer cake

Ingredients:

Cake Layers:

  • 2 1/2 cups All Purpose Flour
  • 2 tsp Baking Powder
  • 1/2 tsp Baking Soda
  • 1 tsp Salt
  • 3/4 cup Unsalted Butter, softened
  • 1 3/4 cups White Sugar
  • 5 Egg Whites
  • 1/3 cup Sour Cream
  • 2 tsp Vanilla Extract
  • 1/2 cup Whole Milk
  • 1 pound Strawberries

Filling:

  • 10-12 Strawberries, sliced

Frosting:

  • 1 cup Salted Butter
  • 4 – 5 cups Confectioner’s Sugar
  • 1/4 cup Half & Half (or whole milk)
  • 2 tsp Vanilla Extract

Directions:

Cake Layers:

In a blender or food processor blend 1 pound of strawberries until smooth. Add blended strawberries to a small sauce pan over medium heat. Cook until the mixture reduces and starts to thicken slightly about 10-15 minutes. Allow to cool fully in the fridge for at least an hour, or overnight.

Pre heat the oven to 350°F. Grease and flour two 9 inch cake pans, set aside.

In a bowl whisk together flour, baking powder, baking soda and salt. Set aside. Add butter to the bowl of a stand mixer. Beat on high for 2-5 minutes until the butter is pale yellow or white in colour. Add sugar to the whipped butter. Mix on medium until fully combined. Add egg whites and whip on high until combined and fluffy. Add sour cream and vanilla mix on medium low until well combined.

Add half of the dry ingredients on low until just combined. Keeping the mixer on low slowly drizzle in half of the milk until combined. Repeat with the remaining flour and milk mixtures. Add strawberry purée to batter and mix on low until combined.

Pour batter into cake pans. Bake for 20-25 minutes or until a toothpick comes out clean. Allow to cool in pans for 5 minutes before transferring to a cooling rack. Cool completely before assembling and icing.

Buttercream Frosting:

Add butter to the bowl of stand mixer. Whip on high for at least 5 minutes until pale in colour and light and fluffy. Add confectioners sugar on low until well mixed. Add vanilla and half and half to the bowl. Continue to whip on high until frosting is fluffy and is you desired consistency.

Filling & Assembly:

Trim tops of cake layers to level if necessary. Place cake layer on your cake plate or cake stand. Place about a cup of frosting on first cake layer. Spread slightly to cover. Cover frosting with layers of sliced strawberries. Place second cake layer on top. Cover the cake with the remaining frosting. Keeping most of the frosting on the top of the cake. Decorate with whole strawberries. Place in the fridge for an hour to set before serving.

Adapted from Sally’s Baking Addiction strawberry cake and buttercream frosting.


Carrot Cake Cupcakes with Cream Cheese Frosting

April 10, 2019 by Danielle 6 Comments

The BEST carrot cake cupcakes with tangy cream cheese frosting!

IMG_20190330_161913

Ok everyone today were taking carrot cake! Any carrot cake fans out there? I’m such a big fan. One of my wedding cake flavours was ever carrot cake. It was insanely delicious!

I make carrot cake every year for Easter which means my Uncle gets a chance to make the same joke every year. “Danielle did you grate the carrots?” Yep the joke is getting old but the cake is not.

I’ve experimented extensively with carrot cake over the years, nuts, no nuts, pineapple, yogurt, coconut etc etc etc. But the recipe I’m sharing today is a classic carrot cake. I like serving it as cupcakes because we tend to do dessert buffets at Easter and I think cupcakes are better for that. Also layered cakes are a ton of work so I tend to save them for birthdays.

IMG_20190330_161959IMG_20190330_161909IMG_20190330_162419

For my carrot cake I got nut free in the base. The cupcakes pictured are topped with nuts but you could skip that if you want. There are nut allergies in my husbands family and mine so we tend to keep our gatherings nut free. Hence why you wont find a tone of desserts containing nuts on my site.

All carrot cake recipes require some sort of moistening ingredient. I’ve used greek yogurt, apple sauce and crushed pineapple. My favourite is sour cream. For a super moist classic carrot cake this is a must.

As for the frosting I always make cream cheese frosting. I follow a 2:1 ratio of cream cheese to butter ratio. From there I add confectioner sugar and vanilla until the flavour and consistency is just right.

Now no more stalling lets get to this recipe! I know you’ll want it on your table at Easter!

IMG_20190330_162201.jpg

Carrot Cake Cupcakes and Cream Cheese Frosting

Yields: 12 cupcakes

Ingredients:

Carrot Cake:

  • 1 1/4 cups All Purpose Flour
  • 1 tsp Baking Powder
  • 1/2 tsp Baking Soda
  • 1/2 tsp Salt
  • 1 tsp Cinnamon
  • 1/2 tsp Ground Ginger
  • 1/4 tsp Nutmeg
  • 1/4 tsp Cloves
  • 1/2 cup Vegetable Oil
  • 1 cup Brown Sugar, lightly packed
  • 2 Eggs
  • 1/3 cup Sour Cream
  • 1 tsp Vanilla Extract
  • 2 Medium Carrots, grated

Cream Cheese Frosting:

  • 8 ounces Cream Cheese, softened
  • 1/2 cup Butter, softened
  • 3 cups Confectioner Sugar (more if needed for texture)
  • 1 tsp Vanilla Extract

Directions:

Preheat oven to 350°F. Line 12 count muffin tin with liners.

In a medium bowl whisk together flour, baking powder, baking soda, salt and spices. Set aside. In the bowl of your stand mixer beat vegetable oil and brown sugar until combined. Add eggs and mix on high until combined. Add sour cream and vanilla, continue to mix until combined.

Add dry ingredients to wet and mix on low until just combined. Add grated carrots and fold into batter. Fill muffin tins 3/4 of the way full.

Bake for 20-25 minutes until a toothpick comes out clean. Allow to cool completely before frosting.

Beat cream cheese and butter on high until fluffy. Add confectioners sugar and vanilla, beat on low until combined and fluffy. Once cupcakes are cool, frost and enjoy!

Adapted from Sally’s Baking Addiction.

Salted Caramel Brownies

March 22, 2019 by Danielle 1 Comment

Super fudgy brownies with pockets of delicious salted caramel!

IMG_20190224_145434_1-2x3

Brownies are probably one of my favourite desserts, and you already know about my love of salted caramel (here, here and here!). I love brownies because I can whip them up in one bowl. Fast easy and impressive… totally my jam! Now of course salted caramel is a wee bit more involved than a one bowl brownie, but I promise it is worth it! For this recipe we will be using my favourite Homemade Salted Caramel Sauce! It’s straightforward, delicious and there might be leftovers for your ice cream.

IMG_20190224_145727-2x3IMG_20190224_145808-2x3

Before we get into this mouth watering recipe I have a few tips.

  1. Freeze your caramel, this helps prevent over spreading when the brownies bake
  2. Don’t over bake, I life a gooey brownie so stick to the cook time below
  3. If cutting them is a challenge pot them in the fridge
  4. Sprinkle with sea salt at the end

These are seriously delicious and I defiantly need to make another batch very soon!

IMG_20190224_145734_1-2x3

Salted Caramel Brownies

Yields: 9-12 brownies (I recommend cutting these small since they are super rich!)

Ingredients:

  • Homemade Salted Caramel Sauce (we will use 2/3 of the recipe in the brownies the rest can be saved for another use – ps. it freezes great!)
  • 4 oz Unsweetened Chocolate
  • 1/2 cup Butter, melted
  • 1 1/4 cup Sugar
  • 2 Eggs
  • 1 Tsp Vanilla
  • 1 cup All Purpose Flour
  • Pinch of Salt
  • 1/2 cup Chocolate Chips
  • Optional: Flaked Seas Salt for finishing

Directions:

Make my Homemade Salted Caramel Sauce recipe. Pour 2/3 of the recipe into a square baking dish lined with parchment paper. Place in your freezer. Store the rest in an air tight container in your fridge or freezer.

Preheat the over to 350°F. Line an 8×8 inch baking dish with parchment paper, spray with baking spray. Set aside.

In a large microwave safe bowl place butter and chocolate. Microwave in 30 second intervals, stir in between until the chocolate and butter have just melted. Add sugar, eggs, vanilla and salt. Stir well until smooth and combined. Add flour, fold into batter until combined. Once combined stir in chocolate chips.

Pour brownie batter into prepared baking sheet. Remove caramel from the freezer. Break or cut into small squares. Place the caramels on to the brownie batter. Space evenly and press slightly into batter.

Bake the brownies for 20-30 minutes until set. Sprinkle with flakey sea salt if desired. Cool before serving. Enjoy!

Adapted from Pinch of Yum.

Salted Caramel Brownies - Yum!

Raspberry Lemon Linzer Cookies

February 9, 2019 by Danielle 4 Comments

Lemon and raspberry cookies cut in heart shapes, perfect for Valentine’s Day!

00000IMG_00000_BURST20190201155312845_COVER-2x3.jpg

Valentine’s Day is now less then a week away! Have you bought your sweetie a gift? If you haven’t check out my Valentine’s Day gift guides. Have you made your reservations? Planned a special date? Or are you a last minute planner? We booked our dinner reservation and I got my husband a gift a few weeks ago. This year we are going to our favourite restaurant. It’s walking distance from our house so we can enjoy a long dinner, share a few too many drinks before safely walking home.

For our first Valentine’s Day we dressed up and went out to a fine dining restaurant, ate a very expensive preset menu and ordered oysters. We thought it would be the perfect dinner. But of course Calvin hated his duck and we discovered that neither of us like oysters. The dinner was so expensive my husband still won’t tell me how much the dinner costs. We were collage kids with no money so this dinner was a really big deal. Although it wasn’t perfect we still look back at it as a great memory of our early days.

The year after that we got teen burgers from A&W, I made some treats and we had a picnic in the living room. Over the last six years we’ve done everything from fancy dinners to fast food. Last year we made homemade heart shaped pizza (my pizza dough recipe) and chocolate lava cakes (YUM!). Regardless of how we’ve celebrated we’ve spent quality time together showing our love for the other and reminding ourselves how important our relationship is.

00100dPORTRAIT_00100_BURST20190201155529317_COVER-2x3.jpg00000IMG_00000_BURST20190201155304888_COVER-2x300000IMG_00000_BURST20190201155157724_COVER-Edited 2x3

I love to celebrate everything, big and small. I like to show people that I care about them. I love to give gifts, but giving people something you made is so special. These cookies are perfect to give to family and friends or serve to your sweetheart. They are also just really cute and festive!

Linzer cookies are super simple to make kind of like a sugar cookie but way better! But they have almond flour and are made without leavener. They are delicate, flavourful and rich. The addition on lemon zest adds a fresh light citrus flavour to the cookie. Raspberry jam is sandwiched between two cookies to add a delicious berry flavour.

These cookies are so so so good. They are also really fun to make. They look really impressive too so they are perfect to giveaway. I love when a simple baked good makes someones day! These are totally worth it!

00100dPORTRAIT_00100_BURST20190201155513446_COVER-2x3

Lemon Raspberry Linzer Cookies

Yields: 12 cookies

Ingredients:

  • 3/4 cup Unsalted Butter
  • 1/2 cup White Sugar
  • Zest of One Lemon
  • 1 Egg Yolk
  • 1 teaspoon Vanilla Extract
  • 1 cup All Purpose Flour
  • 3/4 cup Almond Flour
  • 1/8 teaspoon Salt
  • Seedless Raspberry Jam
  • Confectioner’s Sugar

Directions:

In a medium bowl whisk together all purpose flour, almond flour and salt together. Set aside.

Using a stand mixer beat butter, sugar until pale until fluffy. About 2 minutes. Add lemon zest, egg yolk and vanilla extract, beat until smooth. Add dry ingredients to the bowl and mix on low until just combined. Divide dough into two disks, wrap in plastic wrap and chill in the fridge for 30 minutes.

Line two baking sheets with parchment paper and set aside. Roll dough a quarter inch thick. Using a medium sized heart shaped cookie cutter cut out 24 hearts. Using a smaller heart shaped cookie cutter cut the centre out of 12 of the cookies. Place the cookies on the baking sheets. Place the cookie sheets in the fridge for an hour to chill.

Preheat the oven to 350°F.

Bake cookies for 8-10 minutes until the edges are just beginning to turn brown. Allow the cookies to cool on the baking sheet for 5 minutes before transferring to a cooling rack.

Once completely cool dust cookie tops with confectioner sugar. Spread 1/2 teaspoon of jam on each of the cookie bottoms. Leave a boarder around the jam to ensure the jam doesn’t spill out the sides of the cookies. Place the tops pf the cookies on the bottom.

Chill the cookies in the fridge or 30 minutes before serving to set the jam. Store in the fridge for up to one week.

Recipe adapted from King Arthur Flour.

Lemon Raspberry Linzer Cookies - Valentine's Day Treats, yummy!

Brown Butter Shortbread with Maple Glaze

December 22, 2018 by Danielle Leave a Comment

Today’s post is the very last Christmas cookie recipe I will be sharing for 2018. How did this month go so fast? I cant believe Christmas is in just a few days. If you still haven’t checked out week one through three of this series click here, here and here.

Today’s recipe is a variation on shortbread cookies. I know people think they are dry and tasteless, so I’ve added brown butter and brown sugar for a deeper flavour. I also added a delicious maple glaze to make then ever more flavourful.

These cookies are great because you probably already have all the ingredients in your pantry. These are also a slice and bake cookie so there isn’t any rolling and cutting out shapes to do. Slice and bake cookies are so simple to make.

So if you’re up for some more Christmas baking give these or any of the other recipes in this series a try. This is my last recipe post before Christmas, so I hope you have enjoyed all the festive holiday content over the past few months as much as I’ve enjoyed sharing it. Merry Christmas!

Brown Butter Shortbread with Maple Glaze

Yields: 24 cookies

Ingredients:

  • 2 Cups All Purpose Flour
  • 1/4 Teaspoon Salt
  • 1 1/4 Cup Unsalted Butter
  • 2/3 Cup Brown Sugar
  • 2/3 Cup White Sugar
  • 1 Teaspoon Vanilla Extract
  • 1 Cup Confectioners sugar
  • 2 Tablespoons Real Maple Syrup
  • 1 Tablespoon Half and Half
  • Optional: Raw Turbinado Sugar

Directions:

Melt butter over medium heat in a light coloured skillet. Swirl the pan occasionally. Cook until butter browns and has a nutty aroma, 2-3 minutes. pour butter into a bowl and place in the fridge to solidify for about 30 minutes. The brown butter should have a similar texture to softened butter.

Whisk flour and salt together set aside.

In a stand mixer beat the cooled brown butter on high until creamy and smooth. Add white sugar, brown sugar and vanilla, cream until smooth. Add dry ingredients to the mixer and beat on low until just combined.

Form dough into two 8 inch logs. Wrap in plastic wrap and chill for 1-2 hours.

Preheat the oven to 350°F, line baking sheets with parchment and set aside.

Roll the logs of dough in turbinado sugar and slice each log into 12 equal sized pieces. Place cookies on lined baking sheet about 2 inches apart. Bake cookies for 12-14 minutes. Allow to cool on the baking sheet for 5 minutes before transferring to a cooling rack.

In a small bowl combine confectioner sugar, maple syrup and half and half. Drizzle glaze over cooled cookies. Place in the fridge to set.

Adapted from Sally’s Baking Addiction.

You may also like…

Sugar Cookie Snowflakes
Cranberry White Chocolate Oatmeal Cookies

Peppermint Bark

December 18, 2018 by Danielle Leave a Comment

Today marks one week until Christmas….. let that sink in a moment.

Ok how are we all doing? Stressed, excited, organized, overwhelmed? Personally I’m feeling pretty good. I think I have things pretty under control. Since we travel at Christmas I’ve always had to be organized well in advance. And I think this year will be the smoothest… knock on wood. 

Today I am sharing a recipe I have made since I was a kid. I would make this with my mom and brother every Christmas as a kid and it’s still one of my favourites today. Peppermint Bark is seriously simple to make and so delicious. It looks great on a cookie tray, and it’s also a great hostess gift.

It’s so easy you can even make it in the microwave. Don’t we all need easy at the holidays? So give it a try and let me know what you think.

Peppermint Bark

Yields: 1 sheet pan

Ingredients:

  • 16 ounces White Chocolate
  • 8 ounces Milk or Dark Chocolate
  • 1 1/2 teaspoons Coconut Oil, divided
  • 1/4 teaspoon Peppermint Extract
  • 5 Candy Canes, crushed

Directions:

Line a large baking sheet with parchment paper. Set aside.

In a microwave safe bowl melt 6 ounces of the milk chocolate in 30 second intervals (1-2 mins), string in between. Stir in remaining chocolate and 1/2 teaspoon of coconut oil. Spread the chocolate thinly on the prepared baking sheet. Allow to set in the refrigerator for 20 minutes.

Repeat the same melting process with 12 ounces of the white chocolate. Stir remaining chocolate, remaining coconut oil and peppermint extract into the chocolate. Pour chocolate over the set milk chocolate and spread out to cover. Sprinkle crushed candy canes all over the white chocolate. Return bark to the fridge to set for at least 2 hours or overnight.

Once set break bark into sizes of your choosing. Store in an air tight container in your refrigerator for up to 2 weeks. You can also store in your freezer for a few months.

You may also like…

Sugar Cookie Snowflakes
« Previous Page
Next Page »

Primary Sidebar

Danielle at Home

Hi, I’m Danielle. I am a twenty something woman working her office job by day and blogging at night! I’m married, a new home owner and I love sharing all my favourite things on this blog. So grab a glass of wine and follow along. I’m so glad you’re here!

SUBSCRIBE & FOLLOW

Pinterest
Instagram
Facebook
Twitter

Footer

Copyright © 2025 Danielle at Home on the Foodie Pro Theme