• Skip to primary navigation
  • Skip to main content
  • Skip to primary sidebar
  • Skip to footer

DANIELLE AT HOME

  • HOME
    • About
    • Contact
  • LIFESTYLE
    • Favourites
    • Goals
    • Home
      • DIY Projects
      • Organization
    • Holidays
      • Christmas
      • Easter
      • Halloween
      • New Years
      • Thanksgiving
      • Valentine’s Day
      • Gift Guides
  • STYLE
  • WELLNESS
  • FOOD + DRINK
    • Appetizers
    • Breakfast
    • Dessert
    • Drinks
    • Side Dishes
    • Snacks
    • Holiday Recipes
      • Christmas
      • Cinco De Mayo
      • Easter
      • Father’s Day
      • Halloween
      • Mother’s Day
      • New Years
      • St. Patrick’s Day
      • Thanksgiving
      • Valentine’s Day

Blog Posts

December 4, 2018 by Danielle 1 Comment

IMG_20181123_183128

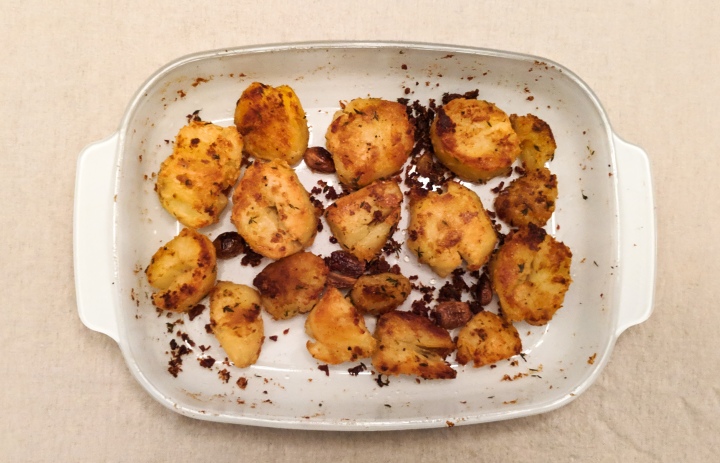
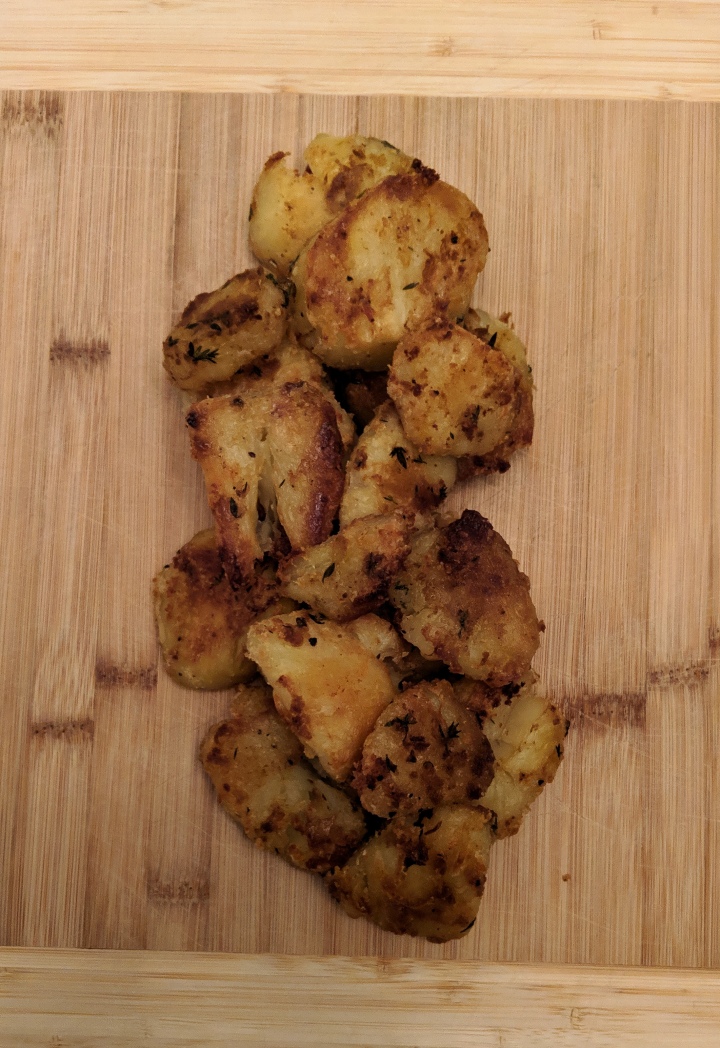
Ok so I know these aren’t the prettiest pictures, but this is an amazing recipe so I had to share it anyway. This recipe is for a classic English roast potato, kicked up a notch with garlic and thyme. They were so tasty!

This is a riff on my Mom’s roast potatoes. She always makes them with roast beef dinner and they are amazing! She even get chunks of beef fat from the butcher to roast her potatoes in… just like her mom did. Personally that’s a bit much or me. Plus I like to try to make as many side as I can vegetarian, so everyone can enjoy.

I like to use half butter and half olive oil to roast my potatoes. This way you get delicious flavour from the butter, but a slightly higher smoke point for the oil. This will help stop things from burning. And both make for a crispy potato! Yum!

IMG_20181123_183424_1.jpg

This recipe calls for russet potatoes.. I have not experimented with any other type of potato. This is what my mom and Grandma used, so why mess with a good thing?

The most important part about working with potatoes is to let them steam in the colander after cooking,  this is the only way you will get crispy potatoes.

The second rule of this recipe is patience. These potatoes roast for an hour and a half! Yes they do! It takes a long time to get the texture of a signature roast potato! Believe me when I say it is so worth the wait. Patience is a virtue right…. And believe me it will all be worth it!

IMG_20181123_183131

Garlic and Thyme Roast Potatoes

Serves: 6

Ingredients:

  • 5 Russet Potatoes
  • 2 Tablespoons Butter, melted
  • 3 Tablespoons Olive Oil
  • 1 Bunch Thyme
  • 6 Garlic Gloves
  • Salt and Pepper

Directions:

Preheat the oven to 375°F.

In a large pot of salted water, boil potatoes for 8 minutes. Strain potatoes and set aside to steam for 5 minutes.

In a large baking dish or roasting pan add butter and oil (2 tbsp each). Place in your preheated oven for a few minutes until butter is melted (2-5 mins). Remove pan from the oven and add potatoes. Season liberally with salt and pepper, and toss to coat in fat. Roast in the oven for 30 minutes.

In a small bowl place garlic cloves. Tear thyme bunch in half or thirds and add to bowl. Drizzle with oil (about a tbsp). Toss to coat. Remove potatoes from the oven and sprinkle garlic and thyme over the pan. Give the pan a good shake to evenly distribute and return to the oven. Bake for an additional hour.

Remove from the oven and serve immediately…. hopefully with lots of gravy!

Adapted from Jamie Oliver


December 1, 2018 by Danielle Leave a Comment

IMG_20181118_142912

Happy December 1st! It is officially the Christmas season and that means this blog is going to be full of lots of holiday content and bonus posts from now until Christmas. Technically I kicked off the schedule a little early by coming out with 4 posts this week, and that will be continuing until Christmas. So in addition to my regularly schedules 2 recipes per week you will also see gift guides and edible gift posts on Wednesdays and a brand new Christmas cookie series on Saturdays. Yes that’s right weekend posts!

So every Saturday until Christmas you will see a new Christmas cookie recipe hit the blog! I am so excited about this cookie series as you have already been told I love cookies they are my favourite dessert, so this post is near and dear to my heart. Also Christmas cookies and Christmas baking in general brings me so much nostalgia and happiness. My mom has never been a big Christmas baker, but both my Grandma’s were. So baking at Christmas makes me think of making minced meat tarts with my mom’s mom and sitting at the kitchen table scarfing down cherry shortbread with my Dad’s mom.

IMG_20181118_142343

Today’s recipe is one I have made many variations of over the years. These are a thick and chewy oatmeal cookie jammed packed with dried cranberries and white chocolate chips. I would love to say that this batch of cookies is still in my freezer waiting to be pulled out for Christmas, but these are long gone and are probably the most beloved Christmas cookie that I make. This weekend I’ll be making a double batch and immediately putting them into the freezer…. hopefully this batch makes it until Christmas (finger crossed!).

I love this recipe because it’s so easy… I love a drop cookie. They are my preferred type of cookie because I simple am busy (and LAZY!). I’d much rather scoop and bake then roll out dough and cut out shapes. So many Christmas cookies are cut outs and it’s nice to have a few Christmas cookies that are quick and easy! Also the flavours of cranberry and white chocolate scream Christmas to me. I think these are a great cookie to include on your cookie tray!

IMG_20181118_142755


Cranberry White Chocolate Oatmeal Cookies

Yields: 36 cookies

Ingredients:

  • 1 1/2 cups All Purpose Flour
  • 1 teaspoon Baking Soda
  • 1/2 teaspoon Salt
  • 3 cups Rolled Oats
  • 1 cup Unsalted Butter, softened
  • 1 cup Brown Sugar
  • 1/4 cup White Sugar
  • 2 Eggs
  • 2 teaspoons Vanilla Extract
  • 1/2 cup Dried Cranberries
  • 1/2 cup White Chocolate Chips

Directions:

Whisk flour, baking soda and salt together, set aside.

In the bowl of a stand mixer cream butter on high until pale yellow and fluffy. Add sugars and cream on medium speed to combine. Add vanilla and mix until combined. Add the flour mixture and the oats to the bowl mix on low until just combined.

Add cranberries and white chocolate mixing on low speed. Cover the bowl with plastic wrap and chip in the fridge for  3 hours or overnight.

Preheat oven to 350°F. Roll out dough into balls and place 2 inches apart on a parchment lined baking sheet. Bake for 10-12 minutes or until the edges are lightly browned. The centres will look slightly under baked (that’s what makes then chewy!). Allow to cool on the baking sheet for at least 5 minutes before transferring to a wire rack.

Adapted from Sally’s Baking Addiction.


You may also like…

IMG_20181026_160151

Salted Caramel Cookies

November 29, 2018 by Danielle 2 Comments

IMG_20181125_093407

Today we are talking all things Christmas morning breakfast. Growing up my Christmas mornings were very different then most kids. We would travel to visit my Dad’s family for Christmas Eve. And then on Christmas morning we would wake up in my Grandma’s house and would drive home to our house. We wouldn’t get home to open our presents until 2pm! That’s right my Christmas morning was more like a Christmas afternoon. I still have yet to wake up in my own bed on Christmas Day. Yes we still travel on Christmas Day. When my husband and I started dating he claimed he would never travel on Christmas, but here he is with 4 travelling Christmas’ under his belt (he skipped the first year).

Christmas morning is a big deal for my husband’s family. His whole family goes to his parents house to open presents and eat brunch. Now when I say whole family I mean aunts, uncles, grandparents… the works. There is no Christmas dinner on the 25th, his family saves that for boxing day. So Christmas morning is the big event. Finding a way for me to still visit my family while make it home in time for his families brunch has been tricky we have managed to make it work. It means a very early morning for us and a long drive after a late night with my family. But this year is the last year we will be going away at Christmas… I’m sad about it, but I know it’s time for us to make new traditions now that we are our own little family of two.

IMG_20181125_101005

Since I’ve done my fair share of travelling at Christmas I know a thing or two about making things in advance and travelling with food. So today I am sharing the perfect treat for Christmas morning that can be made well in advance. It would also be a great hostess gift. Cranberry orange Coffee Cake. I’m actually planing to make this for my in-laws Christmas brunch this year. My plan is to bake the cake far in advance and give it to my mother-in-law a few days before Christmas. It can defrost while were out of town for Christmas Eve.

I think that this cake would be perfect to put out with some coffee and hot chocolate on Christmas morning. Every one can nibble at it while they open presents. I know it’s how I’d like to start my morning.

IMG_20181125_093137.jpg

Cranberry Orange Coffee Cake

Serves: 16

Ingredients:

For the Cake:

  • 4 Eggs
  • 1 Cup Vegetable oil
  • 1/2 Cup Sugar
  • 1/2 Cup Brown Sugar
  • Zest and Juice of 1 Orange
  • 1/2 Cup Water
  • 1 Teaspoon Vanilla Extract
  • 1 2/3 Cups All Purpose Flour
  • 2 Teaspoons Baking Powder
  • 1 Teaspoon Salt
  • 1 Teaspoon Cinnamon
  • 1 1/2 Cups Fresh or Frozen Cranberries

For the Crumb Topping:

  • 1/2 Cup Flour
  • 1/4 Teaspoon Baking Powder
  • Pinch of Salt
  • 2 Tablespoons Sugar
  • 2 Tablespoons Brown Sugar
  • 1/4 Teaspoon Cinnamon
  • 1/4 Cup Butter, melted
  • 1/3 Cup Pecans, chopped

For the Glaze:

  • 1 Cup Confectioners Sugar
  • 4 Tablespoons Milk (adjust for consistency)
  • 1/4 Teaspoon Cinnamon
  • 1 Teaspoon Vanilla

Directions:

Cake:

Preheat oven to 350° F. Grease a springform pan (or a high sided cake pan), set aside.

In a large bowl whisk to combine eggs, oil, sugar, orange zest and juice, water and vanilla. Set aside. In a small bowl whisk together flour, baking powder, salt and cinnamon. Stir dry ingredients into wet until just combined. Fold in cranberries. Pour batter into prepared cake pan.

Topping:

In a small bowl whisk flour, baking soda, salt, sugar and cinnamon. Add melted butter and whisk with a fork until a crumb forms. Add chopped pecans. Sprinkle crumb topping into cake, gently pressing the topping into the batter.

Bake the cake for 50-75 minutes or until a skewer comes out clean. Allow to cool for 20-30 minutes.

Glaze:

In a small bowl whisk together confectioner sugar, cinnamon, vanilla and milk. Glaze should be thick but pourable. Drizzle glaze over the cake. Allow to set for a few minutes before serving.

Adapted from Entertaining with Beth.

November 28, 2018 by Danielle 1 Comment

Disclosure: This post contains affiliate links. As an Amazon Associate I earn from qualifying purchases. I only share products that I love! Thank you for your support.

I can’t believe it’s time to talk Christmas shopping already! I feel like Christmas has really snuck up on me this year. Normally I am done all my Christmas shopping by December 1st so that I can enjoy the lead up to Christmas without the stress of actually shopping. Unfortunately this year I have barely scratched the surface.  That’s where Amazon comes in right? So I thought I would help you out with gift guides every Wednesday until Christmas! So to start things off the gift guide for the chef in your life!

Cook's Gift Guide 2018

one / two / three / four / five / six

Everything in this gift guide I either own and love or are currently on my wish list…. Santa if you’re listening I’d like to see dutch oven under the tree! 

  1. I love wooden cutting boards not only are they fantastic investment pieces for your kitchen, but they double as serving pieces! I love my wooden cutting boards and John Boos makes the best. I also love this deep walnut colour! Walnut John Boos Cutting Board
  2. I’ve been watching a lot of Jamie Oliver lately and man does he even love his mortar and pestle. I bought my day a dark granite version of the one on this gift guide for Christmas a few years ago and I think it’s time to add one to my kitchen too! White Mortar and Pestle
  3. I love my olive oil dispenser. They look great on your counter and allow you to buy olive oil in bulk… wait am I the only one who buys mass quantities of olive oil at a time? Regardless I think this would be an unexpected but great stocking stuffer! Olive Oil Dispenser
  4. This Staub dutch oven has been on my wish list for a few years now… it was even on my wedding registry. I think I will have to break down and buy it myself during all the after Christmas sales! No one in my life understands my need for a heavy bottomed enamel pot that can go in the oven! You guys do though right? Staub 5.5 Quart Cocotte
  5. The holly grail of blenders, a Vitamix! Not only a Vitamix, but a white one (that makes me way too happy!). This is another permanent fixture on my wish list. My basic blender just isn’t making the cut anymore… huge chunks of kale in my daily smoothie make me want to cry! Vitamix A2300 Ascent Series Smart Blender
  6. This USA sheet pan with cooling rack is probably one of my most used kitchen items. I use it for many recipes from making bacon in the oven to crisping up leftover pizza and it’s a must in my BBQ-less BBQ Chicken! I am slowly but surely getting all my friends and family to buy this awesome sheet pan combo! It’s easily my most used wedding gift! USA Sheet Pan and Rack

Ok! There you have it my 2018 Gift Guide for the Chef in your life! I had so much fun putting this together for you, so I hope you enjoy it! Come back next Wednesday for the Bakers Gift Guide!

//z-na.amazon-adsystem.com/widgets/onejs?MarketPlace=US&adInstanceId=83a51c7f-43f3-46b0-b596-788d140f8357

Disclosure: This post contains affiliate links. As an Amazon Associate I earn from qualifying purchases. I only share products that I love. Thank you for your support!

November 27, 2018 by Danielle Leave a Comment

It’s officially the holiday season, so you know what that means. Lots of holiday entertaining! Today I’ll be sharing a super quick and easy appetizer idea for your next party.

Baked Brie Braids are the perfect way to impress your guests without a lot of effort. It looks fancier then your standard cheese wheel, but it really doesn’t take much effort. I’ll admit it’s barely a recipe.

The two flavours of Bakes Brie Braids I’m sharing today are a classic fig jam and a savoury sun-dried tomato pesto. This couldn’t be easier since all you have to do is assemble and bake… like I said barely a recipe.

Even though it’s crazy easy it’s also crazy delicious and is a really show stopper at any party! Put it alongside some roasted cashews and you’re ready for cocktails!

Baked Brie Braid – 2 Ways

Serves: 8-10

Ingredients:

  • 2 Sheets Puff Pastry
  • 6-8 Slices of Brie Cheese
  • 2 Tablespoons Fig Jam
  • 2 Tablespoons Sun-dried Tomato Pesto
  • 1 Egg, beaten
  • Optional: Pine Nuts or Walnuts for garnish 

Directions:

Preheat the oven to 400 °F. Line a baking sheet with parchment paper and set aside.

Gently mark your puff pasty with a knife to section off the pastry into thirds vertically. Do not cut through the pastry.

Spread fig jam down the center of the puff pastry. Top with 3-4 slices of brie. Using a small knife cut the outer sections of the puff pastry into 1 inch strips. Fold the strips into the centre to cover the cheese and jam, alternating sides to form a braid. Brush the braid with egg wash.

Repeat the steps with the sun-dried tomato pesto.

Place the two braids on the prepared baking sheet. Bake for 25 minutes or until the puff pastry is golden brown. Remove from the oven and top with nuts if desired. Allow to cool for 5 minutes before serving.

Adapted from Entertaining With Beth.

You may also like…

Warm Sweet & Salty Cashews

November 22, 2018 by Danielle Leave a Comment

The first time I ever cooked a steak was for my now husbands 24th birthday. I was 20 years old and we had only been dating about 8 months. I wanted to make his birthday really special. I took on a pretty ambitious menu; steak, mashed potatoes, green beans, homemade bread and peach cobbler for dessert. I had literally never cooked any of these items before. I’ve always had confidence in the kitchen and after reading many recipes I thought I could do it.

I decided I would make the steak by searing in a fry pan, finishing in the oven and I would top it all off with compound butter. Pretty ambitious. So armed with my list of ingredients I went to the store. Since I was a broke college kid you can imagine that this dinner was costing me quite a bit of money. So when i got to the meat section to pick out my steaks my heart sank. All I could afford was the fast fry steaks… no sirloin or rib eye here. I was disappointed, but figured steak was steak and bought them anyway. It would still be the best steak of his life right?

I hate to spoil the ending, but the steak was not the best he had ever had. It was dry and overcooked. Not my best, but we both had budget pallets so it wasn’t so bad. Ever since then I have been on a mission to cook the perfect steak. 


For me the perfect steak is:

  • Top Sirloin, Rib Eye or Fillet
  • Seared in cast iron
  • Medium Rare
  • Seasoned with salt, pepper, butter and garlic

I am obsessed with cooking my steak this way… maybe its all the butter and garlic. Whatever it is I really enjoy it. And my husband defiantly doesn’t miss the days of over cooked, tough fast fry steaks.

The Perfect Steak

Servings: 2

Ingredients:

  • 2 Thick Cut Steaks (Top Sirloin is my fav!)
  • 2 Teaspoons Canola Oil
  • 2 Tablespoons Butter
  • 3 Garlic Cloves, smashed
  • Salt and Pepper

Season the steaks liberally with salt and pepper on both sides. Rub canola oil on both sides of the steak. Set aside to come to room temperature.

Preheat the oven to 400 °F. Place your cast iron pan in the oven to preheat. Once your oven has preheated remove the pan from the oven. Place the pan on your stove over high heat.

Once your skillet is smoking add your steaks. Sear the steaks on he first side (30 seconds – 1 minute). Flip the steak and repeat. Add smashed garlic and butter to the cast iron pan. Place the pan in the oven cook for 2 minutes. Remove the pan from the oven, flip the steak and baste with melted butter. Repeat this process until the steak is cooked to your preference. Personally I cook mine for 4-6 minutes depending on thickness. For accurate cooking I highly recommend an instant read meat thermometer.

Allow steak to rest uncovered for 5-10 minutes before serving. I place garlic cloves and pour basting juices over the steaks while they rest for extra flavour.

You may also like….

Baked Macaroni and Cheese

November 20, 2018 by Danielle Leave a Comment

I love all carbs, but noodles are my favourite! I always get cravings for Baked Macaroni and Cheese in the fall and winter. It’s just so comforting. I know the box stuff is convenient but it’s not the same. I have also tried all of those trick for making a single serving in the microwave and I’m sorry but that just wont cut it! Homemade with a roux and cream sauce os the only way!

I have been making homemade Baked Macaroni and Cheese since I was a teenager. In high school I used to make it every Monday night for my brother and I to have for dinner before heading off to dance and soccer. I used a recipe out of one of my mom’s well used cookbooks and would top the whole thing with ritz crackers instead of breadcrumbs. It was good, but even back then I knew it wasn’t perfect.

It was dry, there wasn’t enough cheesy flavour and the noodles were way too soft. For years I didn’t make Baked Macaroni Cheese. There is a store by my house that sells a decent Baked Macaroni and Cheese, so when I need my fix my husband runs out and grabs some (he knows to keep me well fed!). Since it’s just the two of us it seemed like over kill to make a whole pan. But one morning I was watching cooking videos on Youtube and got inspired to perfect my Baked Macaroni and Cheese recipe.

This recipe it perfect. It solved all the issues I had in the past and I really learned a lot about making Baked Macaroni and Cheese.

  1. Undercook your pasta. Always undercook your pasta when making a Baked Macaroni and Cheese. Then you won’t end up with bloated macaroni
  2. Use the strongest and highest quality cheese you can afford. You want to get the most flavour out of your cheese as possible. Find the best old cheddar cheeses you can find, you wont be disappointed.
  3. Make way more sauce then you think you need. The sauce to noodle ratio should alarm you, you should be terrified that your making soup instead of macaroni and cheese. All kidding aside you need a lot of sauce!

If you can remember those three things your Baked Macaroni and cheese will turn out perfect. I hope that this recipe makes it to your table this fall.

Baked Macaroni & Cheese

Yields: 6 servings

Ingredients:

8 Ounces Elbow Macaroni

  • 1/4 Cup Butter
  • 1/3 Cup All Purpose Flour
  • 3 Cups Whole Milk 
  • 8 Ounces Aged Old White Cheddar (crumbled or grated)
  • 4 Ounces Sharp Orange Cheddar Cheese (crumbled or grated)
  • 1/4 Teaspoon Salt 
  • 1/4 Teaspoon Chili Powder
  • 1/8 Teaspoon Garlic Powder

  • 1 Cup Plain Breadcrumbs
  • 2 Tablespoons Butter, melted

Directions:

Cook macaroni according to package directions, but reduce the cook time by 2 minutes. You need very al dente pasta for this recipe. Drain pasta and set aside.

Preheat the oven to 350 °F. Grease an 8 inch baking dish with butter or oil.

In a large sauce pan melt butter over medium heat. Whisk in flour and continue to cook for about 2 minutes. Slowly whisk milk into the roux. Whisk constantly to combine the mixture and prevent milk from burning. Continue to cook the mixture until it thickens, about 10 minutes. Whisk sauce occasionally.

Once the sauce has thickened reduce the heat to low. Add the cheese to the sauce, stir to combine. Season the sauce with salt, chili and garlic powder.

Fold cooked macaroni to the sauce to coat. Transfer the mixture to your prepared baking dish. Set aside.

In a small bowl mix together breadcrumbs and melted butter. Sprinkle the mixture over the macaroni and cheese. Bake for 25 minutes until the top is golden and the macaroni and cheese is bubbling.

Adapted from Seasons and Suppers

You may also like…

Homemade Lasagna
Chicken Pot Pie

November 15, 2018 by Danielle Leave a Comment

Every year I make butternut squash soup and every year I’m underwhelmed. It never turns out very flavourful. Over the past year I’ve been cooking with all kinds of squashes a lot more then I used to. We love eating acorn, butternut and delicata squash. I’ve been roasting, mashing, topping salads and making sauces out of squash constantly. So when I made soup this year I was ready to get it right. And I did just that! This recipe is rich is flavour, easy to make and great for work day lunches.

In this recipe I roast butternut squash, onions and garlic in the oven until caramelized and browning. I also add fresh sage and delicious brown butter which takes the soup to the next level!

I like serving this soup with so super fast homemade croutons or to make it a really filling me some cooked apple sausage. Both are great options.

Roasted Butternut Squash Soup with Sage

Yields: 8 servings

Ingredients:

  • 1 Medium Butternut Squash, peeled and chopped
  • 1 Medium Onion, chopped
  • 2 Cloves of Garlic
  • 1/2 Teaspoon of Salt
  • 1/4 Teaspoon of Pepper
  • 1 Tablespoon Olive Oil
  • 2 Tablespoons of Butter
  • 2 Teaspoons Fresh Sage, chopped
  • 6 Cups Low Sodium Vegetable Stock
  • Optional: Salt and Pepper, to taste

Directions:

Preheat oven to 400 °F. Spread out chopped butternut squash, onions and whole garlic cloves on a large baking sheet. Toss with olive oil, salt and pepper. Roast in the oven for 30-40 minutes until soft and squash begins to caramelize.

In a large soup pot melt the butter on medium heat. Continue to cook the butter in medium heat until it becomes golden and brown buts form on the bottom of the pot (3-5 mins). Reduce heat to low and add chopped sage. Sauté sage until fragrant and starting to crisp, about a minute. 

Add onions, butternut squash and garlic to the pot. Stir mixture to combine. Add the vegetable stock. Bring soup to a simmer for at least 30 minutes.

Using an immersion blender blend soup until completely smooth (If using a traditional blender allow soup to cool before blending). Return soup to pot. Taste the soup, add salt and pepper to taste if needed.

Serve with your favourite soup toppings and sides.

You may also like…..

Chicken Noodle Soup

November 13, 2018 by Danielle Leave a Comment

IMG_20181109_121152

If I could eat Italian food for every meal I would. Pasta for breakfast sounds way better then oatmeal or eggs to me. I have always loved Lasagna. My mom would always make it when my grandparents came to visit. It’s such a great crowd pleasing meal that can be made in advance.

Now this recipe is not my mom’s. Her recipe came from the back of the pasta box. Although delicious you wont see me make a lasagna recipe that contains cottage cheese in place of ricotta…. sorry mom! This recipe has, ground beef, Italian sausage, ricotta, fresh basil and lots of cheese!! I’ll also share a trick for avoiding soggy noodles. Believe me this recipe is worth the effort.

IMG_20181109_120547

So my tips for this recipe are….

  1. Find the biggest pan you can! If you can get a pan thats actually called a lasagna pan that’s the best this to use since this makes a large quantity. I use the deepest 13×9 baking dish I own and always have a little bit left over. SO the bigger the better!
  2. Double or even triple the recipe. Make up a few lasagnas in foil baking dishes and stock your freezer. I wouldn’t call this recipe hard, but it is time consuming so you might as well batch cook.
  3. Throw a parmesan rind into your meet sauce. Now this is totally optional, so if you don’t have one no worries. If you do have a parmesan rind (I freeze my leftover rinds) throw it in to simmer with your sauce it will add incredible flavour.
  4. Either use fresh lasagna noodles or quick soak your dried pasta. Ok so I hate cooking lasagna sheets, they always tear and my largest pot is already being used to simmer the meat sauce. So I have two options for you, the first is using fresh pasta. This stuff cooks so fast you don’t need to boil it! It can be pretty pricy though so I normally opt for option two, quick soaking regular lasagna noodles. I put the noodles in a large pan, cover the noodles with boiling hot water for 2-3 minutes. This will soften the noodles but they will still have a nice structure, and they don’t soak up too much sauce as the lasagna bakes.
  5. My fifth and final tip is that fresh is best! Fresh cheese and fresh basil! Get your self a basil plant, they are the best! Basil is one of the only herbs I refuse to use dried. In my opinion if you only have dried basil you might as well not use any at all. Secondly your cheese should be either deli sliced, or freshly grated by you! Pre grated cheese has a weird powder on it and it impacts the flavour of the cheese so buying a block is best (and cheaper!)

So now you have a fews tip on how I make this lasagna, its really so good!

IMG_20181109_121217-2

Homemade Lasagna

Yields: 12 Servings

Ingredients:

  • 1 Pound Italian Sausage (I use spicy, but sweet is also delicious!)
  • 2 Pounds Lean Ground Beef
  • 1 White Onion, finely diced
  • 6 Cloves of Garlic, crushed
  • 2 (28 oz) Cans Crushed Tomatoes
  • 2 (6 oz) Cans Tomato Paste
  • 1 (15 oz) Can Tomato Sauce
  • 1/2 Cup Red Wine (Chianti and Pino Noir are my favourites)
  • 1 Tablespoon White Sugar
  • 1/2 Cup Fresh Basil, chopped
  • 1 Tablespoon Italian Seasoning
  • 1/2 Teaspoon Salt
  • 1/4 Teaspoon Black Pepper
  • Parmesan Cheese Rind (optional)
  • 1 Pound Lasagna Noodles
  • 16 Ounces Ricotta Cheese
  • 1 Egg
  • 1/2 Teaspoon Salt
  • 1/4 Teaspoon Black Pepper
  • 1 Pound Mozzarella Cheese, shredded
  • 1 1/4 Cups Fresh Parmesan Cheese, grated

Directions:

In a large pot or dutch oven brown sausage and ground beef over medium heat. Add onions and garlic. Sauté until translucent, browning and fragrant (5 minutes). Add red wine to deglaze the pan. Stir in crushed tomatoes, tomato past and tomato sauce. Bring sauce to a simmer. Add sugar, basil, Italian seasoning, salt, pepper and parmesan rind to the pot. Cover and simmer on low heat for at least 1.5 hours. Remove parmesan rind before using.

In a medium sized bowl combine ricotta, egg, 1/2 teaspoon of salt, 1/4 teaspoon black pepper and 1/4 cup of parmesan cheese. Mix to combine and set aside. Place noodles in a large pan, pour boiling water over the noodles and soak for 2-3 minutes. Remove noodles from the pan, place in a colander and rinse with cold water. Place shredded mozzarella and remaining shredded parmesan together in a bowl, Mix to combine and set aside.

Preheat oven to 375 ° F.

Assemble your lasagna. Cover the bottom of the baking dish with 1 cup of meat sauce. Cover sauce with 6 lasagna noodles. Layer one half of the ricotta mixture, gently spread. Sprinkle with mozzarella and parmesan cheese mixture. Top with 1 1/2 cups of meat  sauce, and sprinkle another layer of cheese. Repeat layers. Top the final layer of noodles with remaining meat sauce and cheese.

Cover loosely with foil and bake for 25 minutes. Remove foil and bake for an additional 25 minutes. Allow to cool for at least 15 minutes before serving.

Adapted from All Recipes.

You may also like…

IMG_3573

Kale Caesar Salad

November 8, 2018 by Danielle 2 Comments

IMG_20181026_114911

Ok guys the holidays are coming! As I write this we are less then 7 weeks away from Christmas! That’s so crazy! Coming over the next 7 weeks will be lots of Christmas and Thanksgiving recipes. Canadian Thanksgiving may be over, but I know American Thanksgiving is right around the corner and there is some great sides a desserts coming for all my American friends. I also have some bonus posts coming up and even a new series coming in December! The next 7 weeks are going to be jam packed with Holiday content!

Today I’m kicking off my holiday content with a perfect holiday appetizer. These Warm Sweet and Salty Rosemary Cashews are so simple, but make a big impact. I’m all about impressing guests with as little effort as possible. The Holidays are so busy we really don’t need any fussy appetizers. With all the food that gets served on Thanksgiving and Christmas I like to keep things pretty simple. I also love that these can be made in advance and just warmed for a few minutes in the oven on the day of your party!

IMG_20181026_115050

This recipe can be customized to your tastes. Don’t like cashews? Swap in some almonds. Hate the taste of rosemary? Throw a little chili powder in with the butter, sugar and honey mixture. You can really make it your own. I think I may even make a trio of nuts for my next party to go along with a super simple cheese board. How delicious would that be? The possibilities really are endless. Also the possibilities are really delicious and addicting… just saying!

I hope this helps jump start your holiday menu planning!

IMG_20181026_114751

Warm Sweet & Salty Rosemary Cashews

Yields: 8 Servings

  • 1 Pound Raw Unsalted Cashews
  • 2 Tablespoon Unsalted Butter
  • 1 Tablespoon Honey
  • 2 Tablespoon Brown Sugar
  • 2 Tablespoon Fresh Rosemary, finely minced
  • Flakey Sea Salt, to taste

Directions:

Preheat the over to 350°F. Line a rimmed baking sheet with parchment paper or a silicone baking mat.

In a saucepan melt butter, honey and brown sugar over medium-low heat. Once combined remove from heat. Add cashews and stir to coat.

Transfer cashews to the lined baking sheet and spread out into an even layer.Bake cashews for 10 minutes tossing the cashews half way through the cooking time.

Remove from the oven. Add chopped rosemary and sprinkle with sea salt. Toss to combine. Allow to cool for 5 minute before transferring to a serving dish.

Store in an airtight container for up to a week. To re warm the cashews bake in a 300°F oven for 5 minutes.

Adapted from Entertaining with Beth.

« Previous Page
Next Page »

Primary Sidebar

Danielle at Home

Hi, I’m Danielle. I am a twenty something woman working her office job by day and blogging at night! I’m married, a new home owner and I love sharing all my favourite things on this blog. So grab a glass of wine and follow along. I’m so glad you’re here!

SUBSCRIBE & FOLLOW

Pinterest
Instagram
Facebook
Twitter

Footer

Copyright © 2025 Danielle at Home on the Foodie Pro Theme