• Skip to primary navigation
  • Skip to main content
  • Skip to primary sidebar
  • Skip to footer

DANIELLE AT HOME

  • HOME
    • About
    • Contact
  • LIFESTYLE
    • Favourites
    • Goals
    • Home
      • DIY Projects
      • Organization
    • Holidays
      • Christmas
      • Easter
      • Halloween
      • New Years
      • Thanksgiving
      • Valentine’s Day
      • Gift Guides
  • STYLE
  • WELLNESS
  • FOOD + DRINK
    • Appetizers
    • Breakfast
    • Dessert
    • Drinks
    • Side Dishes
    • Snacks
    • Holiday Recipes
      • Christmas
      • Cinco De Mayo
      • Easter
      • Father’s Day
      • Halloween
      • Mother’s Day
      • New Years
      • St. Patrick’s Day
      • Thanksgiving
      • Valentine’s Day

Blog Posts

October 2, 2018 by Danielle Leave a Comment

IMG_20180929_140830.jpg

Now that it is officially October I feel it is acceptable to post all things pumpkin. As much as I love pumpkin I just think September is too early. But with Canadian Thanksgiving coming up on Sunday I have pumpkin on the brain.

This recipe is perfect because it has whole wheat flour, coconut oil and maple syrup making it much better for you and more nutritious then a lot of the more indulgent recipes out there. Since this bread is healthier then some of the other pumpkin treats out there you’re free to enjoy all season long.

IMG_20180929_140752.jpg

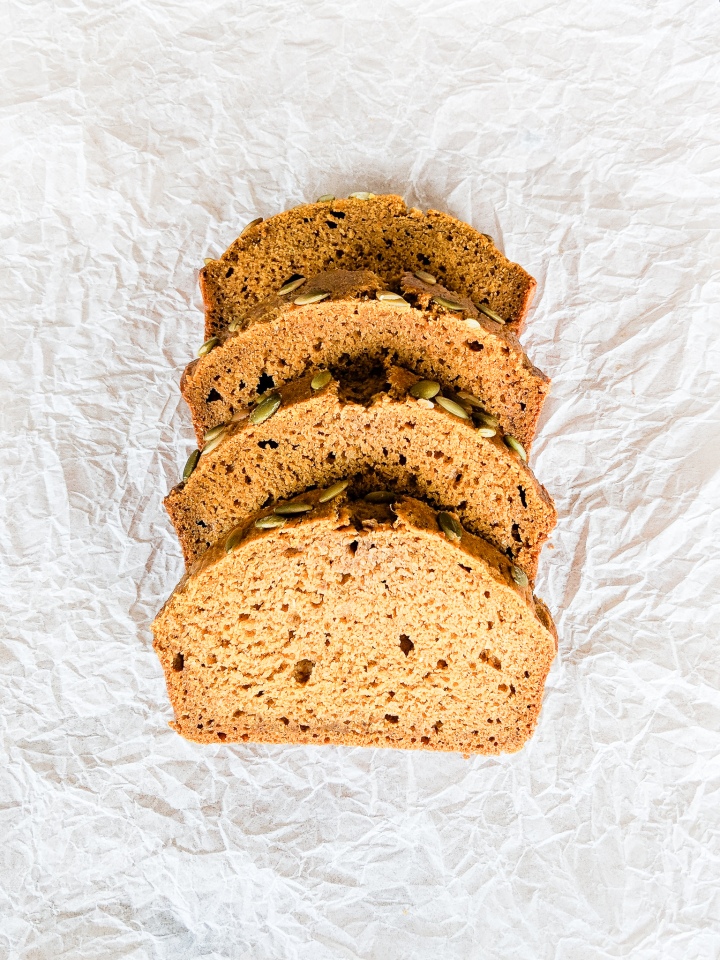
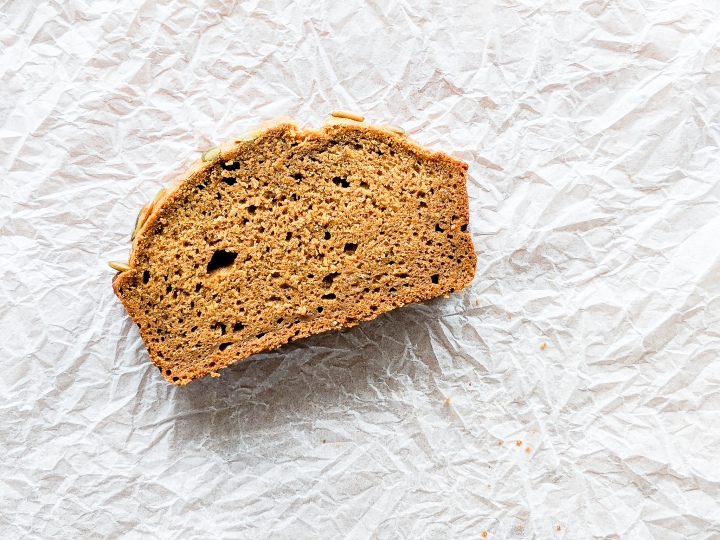
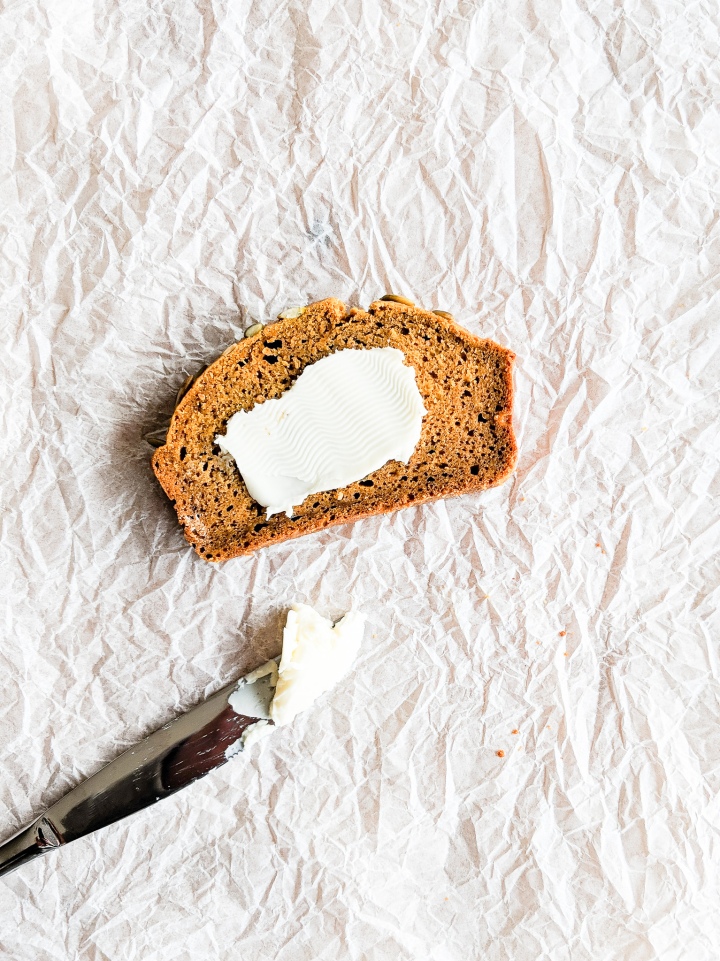
The texture of this bread is AMAZING! I actually can’t believe how well it turned out, its soft and dense while still being light and airy. The best way to achieve this texture is to hand mix the batter. Gently fold the dry ingredients into the wet until just combined.

This bread would also be great with some mix ins or other toppings. I topped mine with a few handfuls of pumpkin seeds, but you could just leave it plain. You could also mix in nuts or chocolate chips. you could even ice the top with cream cheese frosting and serve it as a dessert.. not so healthy but defiantly delicious. however you make it you won’t be disappointed.

IMG_20180929_141112.jpg

Healthier Pumpkin Bread

Yields: 1 Loaf

Ingredients:

  • 1/3 Cup Coconut Oil, melted
  • 1/2 Cup Maple Syrup
  • 2 Eggs
  • 1 Cup Pumpkin Purée (NOT pumpkin pie filling)
  • 1/4 Cup Milk (I used 2%, but any milk even non dairy will work)
  • 1 Tsp Vanilla Extract
  • 1 1/2 Tsp Pumpkin Pie Spice
  • 1 Tsp Baking Soda
  • 1/2 Tsp Salt
  • 1 Cup All Purpose Flour
  • 3/4 Cup Whole Wheat Flour
  • Optional: 1/4-1/2 Cup mix-ins or toppings, pumpkin seeds, nuts, chocolate chips etc.

Directions:

Preheat oven to 325°F and grease a 9×5-inch loaf pan.

In a large bowl whisk flour, baking soda, salt and pumpkin pie spice. Set aside.

In a medium sized bowl whisk together coconut oil, maple syrup until completely combined.  Add eggs, pumpkin purée, milk and vanilla extract to the wet ingredients and whisk together to combine.

Pour the wet ingredients into the dry and fold the mixture together with a spatula or wooden spoon. Continue to fold until the flour is just combined. Gently fold in any mix-in’s if using.

Pour the batter into the greased loaf pan. Sprinkle the loaf with toppings if desired.

Bake the loaf for 50-60 minutes, or until a tooth pick comes out clean. Allow the bread to cool in the loaf pan for 10 minutes before transferring to a cooling rack.

Adapted from, Cookie and Kate

September 25, 2018 by Danielle Leave a Comment

IMG_20180914_142616

I’ve been trying to cook less during the week. Life is just so busy and there aren’t enough hours in the day to get everything accomplished. So I’ve been cooking big batches of food and reheating leftovers. Making up pans of lasagna and enchiladas to get us though busy weeknights. Of course another great time saver is the slow cooker. I will admit I don’t utilize mine as much as I should. I mostly use mine to batch cook soups, stews and sauces. It really is satisfying to come home from work and smell dinner cooking away.

One of my favourite recipes for the slow cooker is vegetarian chili. I love this recipe because it’s cheap, it’s easy and it’s flavourful. This recipe doesn’t require browning or sautéing. You can literally just dump everything in the slow cooker and let it do it’s thing.

IMG_20180914_142559

For this chili recipe all you have to do is chop your vegetables, blend one can of tomatoes and add everything to the slow cooker. It really is crazy how simple that is.

Once your chili is ready it’s time to add toppings! I like sour cream, cheddar cheese and green onion. Tortilla chips or Fritos (YUM!) are also great on top. I also like to serve my chili with a bun or some cornbread to round out the meal.

It’s seriously so delicious and couldn’t be easier! It also screams fall and football Sundays. I love throwing all the ingredients in the slow cooker running my Sunday errands, going on our weekly walk and coming home to a perfect Sunday dinner. A perfect Sunday dinner that makes enough leftovers for Monday and even more for your freezer! I mean isn’t that what we all need?

IMG_20180914_142557.jpg

Slow Cooker Vegetarian Chili

Yields: 8 servings

Ingredients:

  • 1 White Onion, diced
  • 2 Carrots, diced
  • 2 Stalks of Celery, diced
  • 1 Red Pepper, chopped
  • 4 Cloves of Garlic, minced
  • 1 Chipotle in Adobo Sauce, chopped
  • 2 Tsp Adobo Sauce
  • 2 15 oz Cans Fire Roasted Tomatoes
  • 1 15 oz Can Red Kidney Beans, rinsed
  • 1 15 oz Can Black Beans, rinsed
  • 1 15 oz Can Pinto Beans, rinsed
  • 1 Cup Frozen Corn
  • 1 Cup Low Sodium Vegetable Broth
  • 3 Tbsp Chili Powder
  • 2 Tbsp Ground Cumin
  • Salt & Pepper to taste

Directions:

Chop onion, carrots, celery, red pepper, garlic and chipotle pepper. Add to the slow cooker. Pulse one can of the tomatoes in a food processor or blender until tomatoes break down and the mixture is thick. Add the pulsed tomatoes and the can of un pulsed tomatoes to slow cooker. Drain and rinse kidney beans, black beans and pinto beans. Add beans and corn to the slow cooker. Add vegetable broth, adobe sauce, chili powder and cumin to the slow cooker. Cook on low for 8 hours, or high for 4 hours. Before serving add salt and pepper if needed.


You may also like…

IMG_3554

Cheddar Drop Biscuits

IMG_20180916_094102

Skillet Cornbread


September 20, 2018 by Danielle 1 Comment

IMG_20180916_100150

I remember the first time I ever had a piece of cornbread. I was at a random BBQ restaurant by SeaTac airport. Although I’m sure it was one of the wort places to try cornbread I still loved it. It’s my favourite side to soup and chili. It would also be great alongside some BBQ Chicken. I also can’t wait to try using this cornbread as a base for stuffing. I bet it would be amazing!

I like making cornbread in a cast iron skillet because the hot skillet creates a really nice crust. If you don’t have a cast iron skillet any oven safe skillet or baking pan will work for this recipe.

IMG_20180916_094102

This recipe is great plain but it is also great with mix ins. For savoury mix in’s I like fresh corn, cheddar cheese, jalapeños and chives. If you like a sweet cornbread try some dried cranberries, blueberries, or even swirl in raspberry jam. My favourites are Jalapeno and cheddar, or raspberry jam. I recommend adding 1 cup of which ever mix in’s you choose.

IMG_20180916_100225.jpg


Skillet Cornbread

Yields: 8 Servings

Ingredients:

  • 1/2 Cup Unsalted Butter
  • 1/4 Cup Honey
  • 1 Egg
  • 1 Cup Buttermilk
  • 1 Cup Cornmeal1
  • 1 Cup All Purpose Flour
  • 1 Tsp Baking Powder
  • 1/2 Tsp Baking Soda
  • 1/8 Tsp Salt

Directions:

Preheat oven to 400°F. Melt butter in a 12 inch cast iron skillet over low heat stirring occasionally.  Pour melted butter into a medium-sized bowl and allow to cool for 5-10 minutes. In a large bowl whisk together cornmeal, flour, baking powder, baking soda and salt. Set aside. Add honey, egg and butter milk to the melted butter. Whisk to combine. Pour when ingredients into the dry, and whisk until combined.

If adding mix in’s fold them into the batter careful not to over mix.

If your skillet is no longer warm heat it on low for a few minutes to warm up. Once skillet is heated pour in the batter. Bake for 15-20 minutes until the edges are golden brown and a tooth pick comes out clean. Allow to cool before slicing.

Adapted from, Sally’s Baking Addiction


You might also like…

IMG_3554

Ceddar Drop Biscuits

IMG_3592

BBQ-less BBQ Chicken

September 18, 2018 by Danielle Leave a Comment

IMG_3955.jpg

Fall has a arrived early here on the coast of BC. Normally September is just as warm as August, and October is crisp with a few rainy days. The constant grey rain clouds don’t normally set in until November. So far September is full of rain and misty days, with a bit of sunshine in between. Normally I wouldn’t give into fall flavours quite this soon, but with this weather I just can’t get enough.

There’s just something about venturing out in the crisp fall air that brings me such joy. On Sunday’s rain or shine we go out for a long trail walk. When we get home we bundle up and make ourselves a hot drink to warm us up. Hot apple cider is my fall go to. I love it because it’s warm and spicy, but not too sweet.  It really has all the flavours of fall in one glass (well except pumpkin).

IMG_3953.jpg

I like to make apple cider on the stove, but if I was having a party I would make this recipe in a slow cooker. You will find both methods below. This recipe is made with unfiltered apple juice instead of actual apples. I just don’t feel that the extra work to make it from apples is really worth it. There are some great unfiltered apple juices on the market, so I’d rather save myself the trouble. You will notice that this recipe has brown sugar as an optional ingredient. Some people like a sweeter cider and some prefer a spicy cider. I don’t like sweet beverages, so I like to leave it out. My husband prefers it a little more sweet. It’s really up to you and your preferences.

This recipe is non-alcoholic, so if I’m serving this at a party I would create a spike-it-yourself station. The best alcohol for adding to cider is bourbon, brandy, or dark rum. This would be perfect for thanksgiving, or a halloween party.

IMG_3964.jpg

Hot Apple Cider

Yields: 16 8oz servings

Ingredients:

  • 4 Litres (gallon) Unfiltered Apple Juice (not apple cider)
  • 1 Orange, sliced
  • 1 Apple, quartered
  • 5 Cinnamon Sticks
  • 1 Whole Nutmeg
  • 1 Tbsp Whole Cloves
  • 2 Tbsp Brown Sugar (optional)

Stove Method:

Add all ingredients to a large pot over medium heat and bring liquid to a simmer. Turn the heat down to low and cook for 20-30 minutes. Keep warm on the stove until ready to serve.

Slow Cooker Method:

Add all ingredients to your slow cooker. Heat on low for 4 hours. Place cider on the keep warm setting until ready to serve.


You might also like….

IMG_3729

Dutch Apple Pie Bars

September 13, 2018 by Danielle Leave a Comment

IMG_4152

My favourite thing to order at our local Korean restaurant is BBQ beef. I love to make it at home because ground beef is cheap, it’s delicious and only takes 20 minutes to make. This recipe has become a weeknight staple in my house.

IMG_4149.jpg

The sauce for the beef is made of just a few simple staples. Soy sauce, sugar, sesame oil, garlic and ginger. It seriously could not be simpler. I like to serve this over rice with a side of steamed snap peas.

IMG_4151

Korean Beef

Yields: 4 Servings

Ingredients:

  • 3 Tbsp White Sugar
  • 1/4 Cup Reduced Sodium Soy Sauce
  • 2 Tsp Sesame Oil
  • 1/2 Tsp Red Pepper Flakes
  • 1/4 Tsp Grated Ginger
  • 2 Cloves Garlic, minced
  • 1 Pound Extra Lean Ground Beef
  • 2 Green Onions, thinly sliced

Directions:

In a small bowl mix together sugar, soy sauce, sesame oil, red pepper flakes, ginger and garlic. Heat a nonstick fry pan over medium high heat. Brown beef in until cooked through, drain excess fat. Add sauce and green onions to the pan and allow to simmer for 2 minutes. Serve immediately.

Adapted from, Damn Delicious

You may also like…


IMG_3482

Greek Turkey Burger


IMG_3592

BBQ-less BBQ Chicken

September 11, 2018 by Danielle Leave a Comment

IMG_4081

I’m not a huge salad fan. I like restaurant salads, but homemade salads aren’t really my thing. They often taste too earthy and they never seem to have the correct amount of dressing. There are a few exceptions… anything with arugula, Kale Caesar Salad and this Apple Cheddar Pecan Salad. This salad is my go to for the fall, I love the refreshing fresh crunch the apples give. I’ve been making this salad for years and everyone who has tried it loves it.

IMG_4120

The homemade dressing on this salad really ties together the salad and really boosts the fall flavour. It has apple cider and pure maple syrup as two of the ingredients. I love to blend my dressings up in my magic bullet to emulsify the olive oil, but you can of course just use a whisk.

I like to serve this salad on the side of marinated chicken, or add a grilled chicken breast on top and take it to work for lunch. If you give it a try it will soon become your favourite fall salad.

IMG_4085.jpg

Cheddar Apple Pecan Salad

Yields: 6-8 Servings

Ingredients:

Salad:

  • 8 Cups Baby Greens
  • 1 Apple, thinly sliced
  • 1/4 Cup of Pecans
  • 1/4 Cup of Cheddar Cheese, shredded

Dressing:

  • 1/4 Cup Olive Oil
  • 2 Tbsp Apple Cider Vinegar
  • 1 Tbsp Dijon Mustard
  • 2 Tsp Pure Maple Syrup
  • Pinch of Salt & Pepper

Directions:

In a blender, or small dish add olive oil, apple cider vinegar, dijon mustard, maple syrup, salt and pepper. Blend or whisk until the dressing comes together and emulsifies.

Add baby greens, apples, pecans and cheese to a large bowl. Drizzle dressing over salad and toss to coat. Serve immediately.


You might also like…

IMG_3573

Kale Caesar Salad

IMG_3546

Cheddar Drop Biscuits

September 4, 2018 by Danielle Leave a Comment

IMG_3694

Even though I have been out of school for quite a while now there is something about September that always feels like a new beginning. When August ends and September begins it’s like a new year. And with every new year comes changes and bettering yourself. Bad habits are kicked, we try to spend less, workout more and of course eat better. Also with fall comes a busier schedule, goodbye lazy summer days.

With busier days comes a need to stay organized and find fast healthy meals. Breakfast is always the hardest meal of the day. It’s such a rush to get out of the house to work on time, so I love having fast easy to throw together breakfasts on hand.

IMG_3689

Granola is such a great breakfast option since you can throw it on top off yogurt, or even just add milk. It’s filling and delicious.

I prefer to make my own granola since the prepackaged stuff is full of sugar and unhealthy fats. It’s really easy to whip up and tastes delicious.

This particular granola has pecans, coconut flakes and dried blueberries, but you can use any combination of nuts, seeds and fruit you like. As the weather gets cooler I add pumpkin pie spice, maple syrup, pecans and pumpkin seeds. Pistachio and dried cranberries are also a great combo. You really can do whatever your heart desires with this recipe.

IMG_3691

Healthy Homemade Granola

Yields: 3 cups

Ingredients:

  • 2 Cups Rolled Oats
  • 1/2 Cup Raw Pecans, chopped
  • 1/2 Cup Dried Blueberries
  • 1/4 Cup Unsweetened Coconut Flakes
  • 3 Tablespoons Honey
  • 2 Tablespoons Coconut Oil, melted
  • 1 Egg White, whisked until frothy
  • 1/2 Teaspoon Vanilla Extract
  • Pinch of Salt

Directions:

Pre heat the oven to 300°F. In a medium-sized bowl mix together the oats, pecans and coconut flakes. In a small bowl whisk together honey, coconut oil, frothed egg white, vanilla extract and salt. Pour the wet ingredients over the dry and mix until evenly combined. Spread the mixture evenly on a baking sheet and bake for 15 minutes stirring half way in between. Remove from the oven and stir in dried blueberries. Allow to cool completely on the tray. Store in an airtight container for up to 2 weeks.

August 30, 2018 by Danielle 1 Comment

IMG_3729

We all know I love pie, and dutch apple pie is one of my favourites. What makes apple pie different from dutch apple pie it that instead of a top crust their is a crumble topping. It’s the best of both worlds. Now these bars a essentially a portable dutch apple pie. They are also drizzled with salted caramel, so you know they are good.

IMG_3731

These bars have four layers, shortbread crust, apple filling, crumble topping and caramel drizzle. I know that seems like a lot of work, but the ingredients and simple and so is the method. The tricky part is the caramel sauce. Now I like to make homemade salted caramel, it simple is the best. If you have the time please do yourself a favour and make the sauce from scratch. You wont be disappointed.

If you’re short on time, or just aren’t ready to try your hand at homemade caramel sauce you can use store bought. Buy the best quality caramel sauce you can find. Drizzle that on top of your bars and sprinkle some flaky sea salt on top. They will be almost as good.

IMG_3733

These are perfect to serve at an end of summer barbecue or on a fall dessert buffet. These bars with a cup of tea after your thanksgiving dinner… with a side of pumpkin pie of course.

Yields: 9-16 Bars

Ingredients:

Shortbread Crust:

  • 1/2 Cup Unsalted Butter, melted
  • 1/4 Cup White Sugar
  • 1 Teaspoon Vanilla Extract
  • 1/4 Teaspoon Salt
  • 1 Cup All Purpose Flour

Apple Filling:

  • 2 Apples, peeled and thinly sliced
  • 2 Tablespoons All Purpose Flour
  • 2 Tablespoons White Sugar
  • 1 Teaspoon Cinnamon

Streusel:

  • 1/2 Cup Rolled Oats
  • 1/3 Cup packed Brown Sugar
  • 1/4 Teaspoon Cinnamon
  • 1/4 Cup All Purpose Flour
  • 1/4 Cup Unsalted Butter, cold and cubed

Homemade Salted Caramel Sauce

Directions:

Preheat the oven to 300°F. Line the bottom and sides of an 8-inch square baking pan with parchment paper, leaving enough overhang on all sides. Set aside.

Make the crust: In a small bowl stir together the melted butter, granulated sugar, vanilla, and salt. Add the flour and stir until everything is combined. Press the mixture into the prepared baking pan. Bake for 15 minutes.

Make the apple filling:Combine the sliced apples, flour, granulated sugar and cinnamon together in a large bowl until all of the apples are evenly coated. Set aside.

Make the streusel: Whisk the oats, brown sugar, cinnamon, and flour together in a medium bowl. Cut in the chilled butter with your hands until the mixture resembles coarse crumbs. Set aside.

Remove the crust from the oven, and turn the oven up to 350°F (177°C). Layer the apples on top of the warm crust. Sprinkle the apple layer with streusel and bake for 30–35 minutes or until the streusel is golden brown.

Remove from the oven and allow to cool for at least 20 minutes at room temperature. Lift the bars out of the pan using the tabs of the parchment. Cut the bars into your desired serving size. I normally cut them into 12 squares, but 9 or 16 will also work. Once cut, drizzle the bars with the salted caramel sauce. The bars can be served warm, room temperature or cold.

Adapted from Sally’s Baking Addiction

August 28, 2018 by Danielle Leave a Comment

IMG_3573

We eat a lot of kale in my house. We sauté it, we put it in smoothies, and it into soups and casseroles. And of course we make salads out of it. When it comes to kale salads I am partial to a creamy dressing since kale can be such a tough green.

For a while I was buying a creamy parmesan dressing from the store for my kale salads. Making a creamy dressing at home seamed fussy and intimidating, but now that I’ve made this recipe I can’t go back to the bottled stuff again.

Now this salad is not a week night salad for me. I can handle making the dressing, but on a weeknight I skip the bacon and use store-bought croutons. It’s still delicious, but if you have the time to make your own it will be so much fresher and tastier!

IMG_3578

I love to serve this salad in the summer with grilled chicken, steak, or my BBQ-less Barbecue Chicken. In the winter I love to serve this along side lasagna, spaghetti or any roasted meat.

I also love kale because it’s the only salad you can toss in advance. I like to wash and prep my kale, and then toss it in dressing a few hours before serving. Then just before serving I’ll toss in the croutons and bacon. This helps the kale soften and not be as tough.

In addition to dressing the salad in advance I like to massage my kale. I know it sounds funny, but it makes your kale more tender. Once you kale has been washed, dried and chopped. Massage the leaves with your hands until they become a bright green colour. Then coat the leaves with dressing, this will make your kale more tender.

IMG_3569

Even if you are not a kale salad lover, you’re going to love this salad!

What’s your favourite salad?

Yields: 6-8 Servings

Ingredients:

For the Salad:

  • 1 Bunch Kale
  • 1/4 Cup Olive Oil
  • 1 Tablespoon White Vinegar
  • 2 Teaspoons Dijon Mustard
  • 1/2 Teaspoon Worcestershire Sauce
  • 2 Gloves of Garlic
  • 1 Teaspoons Capers
  • 4 Tablespoons Mayonnaise
  • 4 Tablespoons Parmesan Cheese, freshly grated
  • 2 Lemons, juiced
  • Salt & pepper, to taste
  • 4 Strips of Bacon
  • Optional: Additional parmesan cheese for topping

For the Croutons:

  • 4 Slices of Seeded Multi Grain Bread
  • 4 Tablespoons Olive Oil
  • 1/2 Teaspoon Garlic Powder
  • 1/4 Teaspoon Salt
  • 1/4 Teaspoon Pepper

Method:

In a blender combine, olive oil, vinegar, dijon mustard, worcestershire sauce, garlic, capers, mayonnaise, parmesan cheese, lemon juice, salt and pepper. Blend until smooth.

Wash, dry and chop the kale. Place in a large salad bowl. Massage the leaves until they are bright green. Toss the kale in the dressing and set aside. If prepping the salad in advance, cover the tossed salad with plastic wrap and store in the fridge.

Cook the bacon using your preferred method until crisp. Blot off excess grease and allow to cool completely. Once cool crumble the bacon, set aside.

Preheat the oven to 375°F. Cut the bread into 1 inch cubes, place the bread on a sheet tray. Drizzle olive oil over the bread and toss to coat. Sprinkle garlic powder, salt and pepper over bread and toss to coat evenly.

Bake the croutons for 15-20 minutes, flipping halfway through. Be careful to brown the croutons and not burn. Allow the croutons to cool fully as they will continue to harden and crisp as they cool.

When ready to serve, add bacon, croutons and parmesan cheese (if using) to the dressed kale. Toss the salad together. Serve immediately.

Adapted from Jillian Harris


You might also like…


IMG_3130

The BEST Chicken Marinade

IMG_3126

Lemon Parmesan Green Beans

IMG_3592

BBQ-less BBQ Chicken

August 23, 2018 by Danielle 1 Comment

For caramel lovers this recipe is heaven on earth. This recipe has a deep caramel flavour, it’s sweet but balanced and has a finish of salt that rounds out the flavour.

IMG_3757

Now I know making caramel can be intimidating, but with a few tips you can conquer the caramel. Fist things first choose your pot. You want to use a medium or large-sized pot with high sides. This will ensure that your caramel wont boil over. Secondly choose your utensils. I like to use a silicone spatula for melting the sugar and a whisk for mixing in the butter and cream.

IMG_3770

Now the ingredients. Pre measure everything out before starting to cook. With caramel you have to work fast and you will burn your sugar if your other ingredients aren’t ready. I also like to leave my butter and heavy cream out on the counter for an hour or more before I start cooking. This helps bring the ingredients up to room temperature and will make mixing them into the caramel easier.

IMG_3769

This sauce is great on ice cream, brownies, pies, bars, a spoon… seriously addicting.

Have you ever made caramel before?

Yields: 1 cup

Ingredients:

  • 1 Cup White Sugar
  • 6 Tablespoons Salted Butter, room temperature cut into small pieces
  • 1/2 Cup Heavy Cream (30-40% milk fat, sometimes called whipping cream, double cream can also be substituted)
  • 1 Teaspoon Salt

Directions:

In a medium or large sauce pan melt sugar over medium heat, stirring constantly with a silicone spatula or a wooden spoon.

The sugar will start to clump, but will eventually melt and thicken slightly. Once the sugar fully melts and becomes amber in colour you can add the other ingredients.

Add the butter to the pan, the caramel will bubble rapidly, so be very careful. Using a whisk mix the butter into the caramel completely, this can take 2-3 minutes.

Very slowly drizzly in the heavy cream while whisking. Again be extremely careful as the mixture will bubble up again.

Allow to boil for 1 minute, the mixture will bubble up the pan slightly.

Remove the mixture from the heat and whisk in the salt. Pour caramel into a storage container and allow to cool before using.

The salted caramel sauce can be stored in the fridge for up to 2 weeks.

Adapted from Sally’s Baking Addiction

You might also like…

IMG_3193

Chocolate Chunk Cookies


« Previous Page
Next Page »

Primary Sidebar

Danielle at Home

Hi, I’m Danielle. I am a twenty something woman working her office job by day and blogging at night! I’m married, a new home owner and I love sharing all my favourite things on this blog. So grab a glass of wine and follow along. I’m so glad you’re here!

SUBSCRIBE & FOLLOW

Pinterest
Instagram
Facebook
Twitter

Footer

Copyright © 2025 Danielle at Home on the Foodie Pro Theme